Soaring SITL with X-Plane
As of March 2017, ArduPlane has a soaring capability that allows many fixed-wing aircraft to stay in the air without motor power by exploiting rising air currents called thermals. These instructions are intended for people who would like to try out ArduPlane’s soaring controller in a software-in-the-loop (SITL) simulation with X-Plane, a popular commercial flight simulator.
Overview
This manual is fairly self-contained and covers all instructions necessary for setting up X-Plane and ArduPilot’s SITL, getting them to talk to each other, and having ArduPlane fly an RC sailplane through X-Plane’s soaring missions. Links to all requisite extras such as RC sailplane models for X-Plane, parameters files, and other potentially useful material are included in the document.
The instructions have been tested on Windows 8.1 and 10.
Setting up X-Plane
Download the X-Plane 10 demo or buy the full version.
X-Plane 11 also works, but the instructions below assume X-Plane 10’s UI.
Warning
The demo version will prevent you from controlling the plane manually after 15 minutes of flying or so, but flying in ArduPlane modes that don’t require manual input, e.g., Auto, and switching modes from a ground control station such as Mission Planner will work even after that.
Configure a joystick/transmitter for use with X-Plane.
X-Plane requires a joystick for manually controlling yaw, pitch, and roll. However, several transmitters for RC aircraft, e.g., FrSky Taranis, can also be used as joysticks for X-Plane.
To use an FrSky Taranis as an X-Plane joystick:
Switch on the Taranis, connect it to your PC with a mini USB cable, and move its On-Off switch to Off. The Taranis will stay on without using its battery – it is now getting power from the PC.
Calibrate it (this needs to be done only the first time you use it as your joystick). You can do so in Windows (on Windows 10: Start menu -> Settings -> Devices -> Printers and Scanners -> Devices and Printers) or in X-Plane (start X-Plane, hover near the top of the X-Plane window, and in the toolbar at that appears at the top of the window go to Settings -> Joystick & Equipment). For more info on joystick calibration in X-Plane, please refer to the Setup of X-Plane 10.
Note
This setup allows you to control throttle, yaw, pitch, and roll. Other commands, such as switching modes, will have to be issued via Mission Planner or some other means.
Install RC sailplane models and airfoils for them into X-Plane.
By default, X-Plane has no models of RC sailplanes’ size (~5-meter wingspan), weight (a few kilos), or flying characteristics. However, generous folks have created and published some:
To install them, create a folder RC Sailplanes under %XPlane-install-dir%\Aircraft and extract the .acf files from these archives there. Extra info on sailplane model installation is here.
Unfortunately, the X-Plane 10 demo doesn’t provide airfoils for most of the above models, and refuses to load these models without them. Fortunately, someone has created and published the airfoils too!
The airfoils are in NACA_64_xxx_Airfoils_from_TR824.zip in the ArduPilot repo. Originally, this archive comes from a post on X-Plane forum, and this X-Plane forum thread is a good place to look for more airfoils.
To install them, extract the .afl files from the downloaded archive into %XPlane-install-dir%\Airfoils. This will enable you to fly, at the very least, Vee-gull 005 and Houston Hawk.
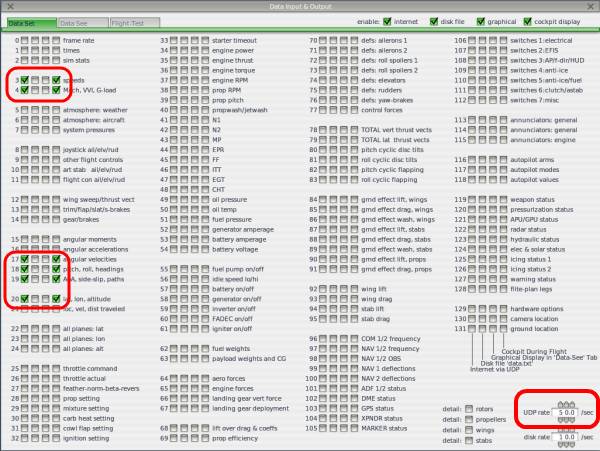
Configure X-Plane for communicating with ArduPilot.
X-Plane needs to be told about the IP addresses/ports where it can send data to and receive it from ArduPilot, as well as about the kinds data X-Plane and ArduPilot should exchange.
To enter this information, start X-Plane, and once X-Plane has loaded an aircraft hover the pointer near the top of the X-Plane window, click on Settings, choose Net Connections.

Then, click the Data tab in the Net Connections window. Copy all settings from:

Close the Net Connections window, again hover the pointer near the top of the X-Plane window, click on Settings, then Data Input & Output. Copy all settings from:
Setting up ArduPlane SITL
Install Mission Planner.
Mission Planner is the ground control station we will use to monitor the simulation, control the virtual aircraft’s flight modes, load flight routes/missions, etc. More info on it is available here.
Optional: Install and configure Cygwin.
The process is described in a section of the Setting Up SITL on Windows wiki. For the purposes of the soaring SITL, you don’t need to perform the steps in the Set up directories/paths in Cygwin and Install Required Python Packages sections of that wiki, but doing them won’t hurt.
Optional: Get ArduPilot and build ArduPlane for SITL.
Open a Cygwin terminal (or reopen it if you have one already open).
If you already have ArduPilot’s source code, in the Cygwin terminal simply switch to the root of your local ArduPilot repo. These instructions assume it is the ArduPilot directory.
If you don’t have ArduPilot’s source code yet, get it, e.g., by running the following command sequence in Cygwin:
git clone --recurse-submodules git://github.com/ArduPilot/ardupilot.git
cd ardupilot
Delete the contents of ArduPilot\Logs directory and, assuming you are in the ArduPilot directory in Cygwin, run
modules/waf/waf-light distclean
modules/waf/waf-light configure --board sitl
modules/waf/waf-light plane
Tip
Run waf-light distclean and erase the ArduPilot\Logs directory every time you make a build that you actually intend to use (as opposed to building just for the sake of checking whether your new code compiles and links without errors). Building the ArduPlane binaries with waf-light from scratch, as above, takes only a few minutes. Not doing full cleanup beforehand occasionally results in extremely bizarre behavior of the produced binaries that can take much more time to investigate.
Running soaring SITL with X-Plane
Launch ArduPlane SITL by running the following from the ArduPilot directory in Cygwin:
build/sitl/bin/arduplane --model xplane
Or by launching SITL from MissionPlanner’s Simulation screen.
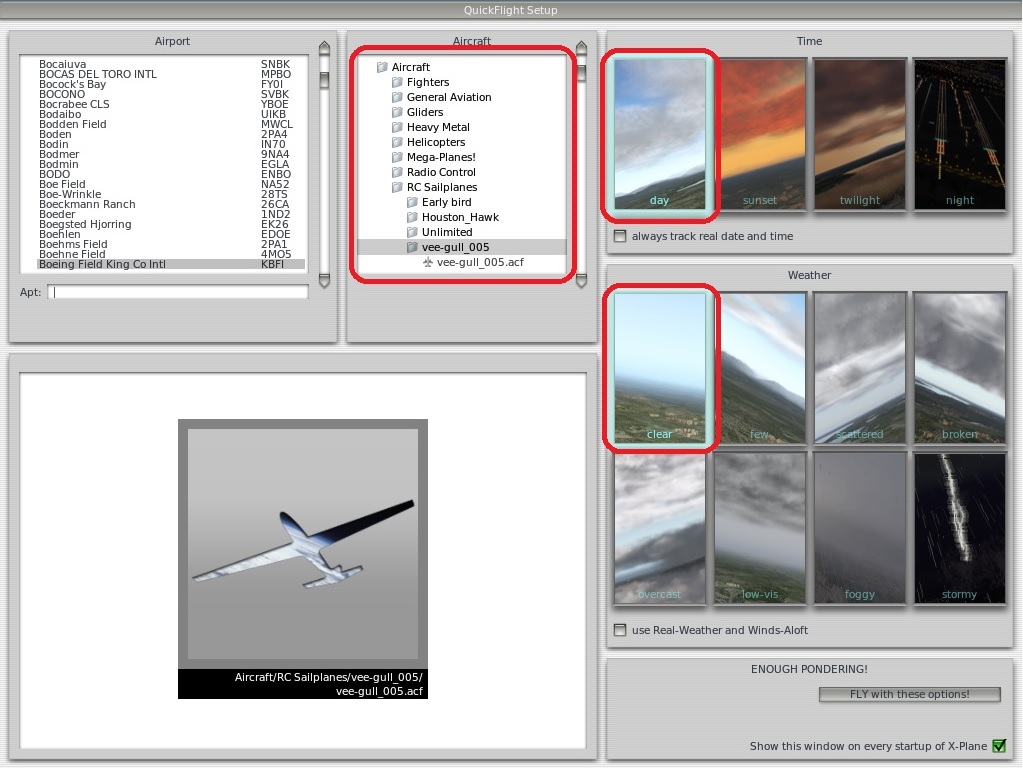
Launch X-Plane, choose an RC sailplane, and choose the environmental conditions.
Recall that in step 3 of Setting up X-Plane, you put your RC sailplane models into %XPlane-install-dir%\Aircraft\RC Sailplanes, so look for them there.
Tip
Start with the Vee-gull 005. It has a motor, making it easier to fly long missions.
Tip
Since RC sailplanes are much lighter than full-sized aircraft, they are much more affected by weather phenomena. X-Plane models this, to the point that your an RC sailplane can get flipped by a light wind gust while sitting on the ground! To avoid frustration, set environmental conditions in X-Plane to be calm and clear. See the selections in the screenshot below for an example:
Launch Mission Planner and connect it to SITL.
Mission Planner and SITL will talk via the TCP protocol. To establish the connection, choose “TCP” from the drop-down menu near the Connect button in the top right corner of the Mission Planner window, hit the Connect button, and specify port 5760:

Warning
The first time you establish a connection between Mission Planner and ArduPlane SITL after building ArduPlane, before you load ArduPlane parameters as described in the next step, your X-Plane RC plane (which is presumably on the ground when the connection is established) may flip over and crash or otherwise behave strangely. This is normal and won’t happen after you load a .param file for it.
Set ArduPilot’s parameters for the chosen RC sailplane.
This step needs to be done only the first time you run SITL after (re-)building ArduPlane.
The parameters can be set via Mission Planner either individually or by loading a .param file for your aircraft, if you have one available.
For the Vee-gull 005 model, the vee-gull 005.param file is in ArduPilot\Tools\autotest\default_params. To use it, in Mission Planner, go to the CONFIG/TUNING screen, Full Parameter List tab, and then (1) press Load from file to load the file and (2) press Write Params to actually write the parameters to ArduPlane’s memory, as shown on the following screenshot:
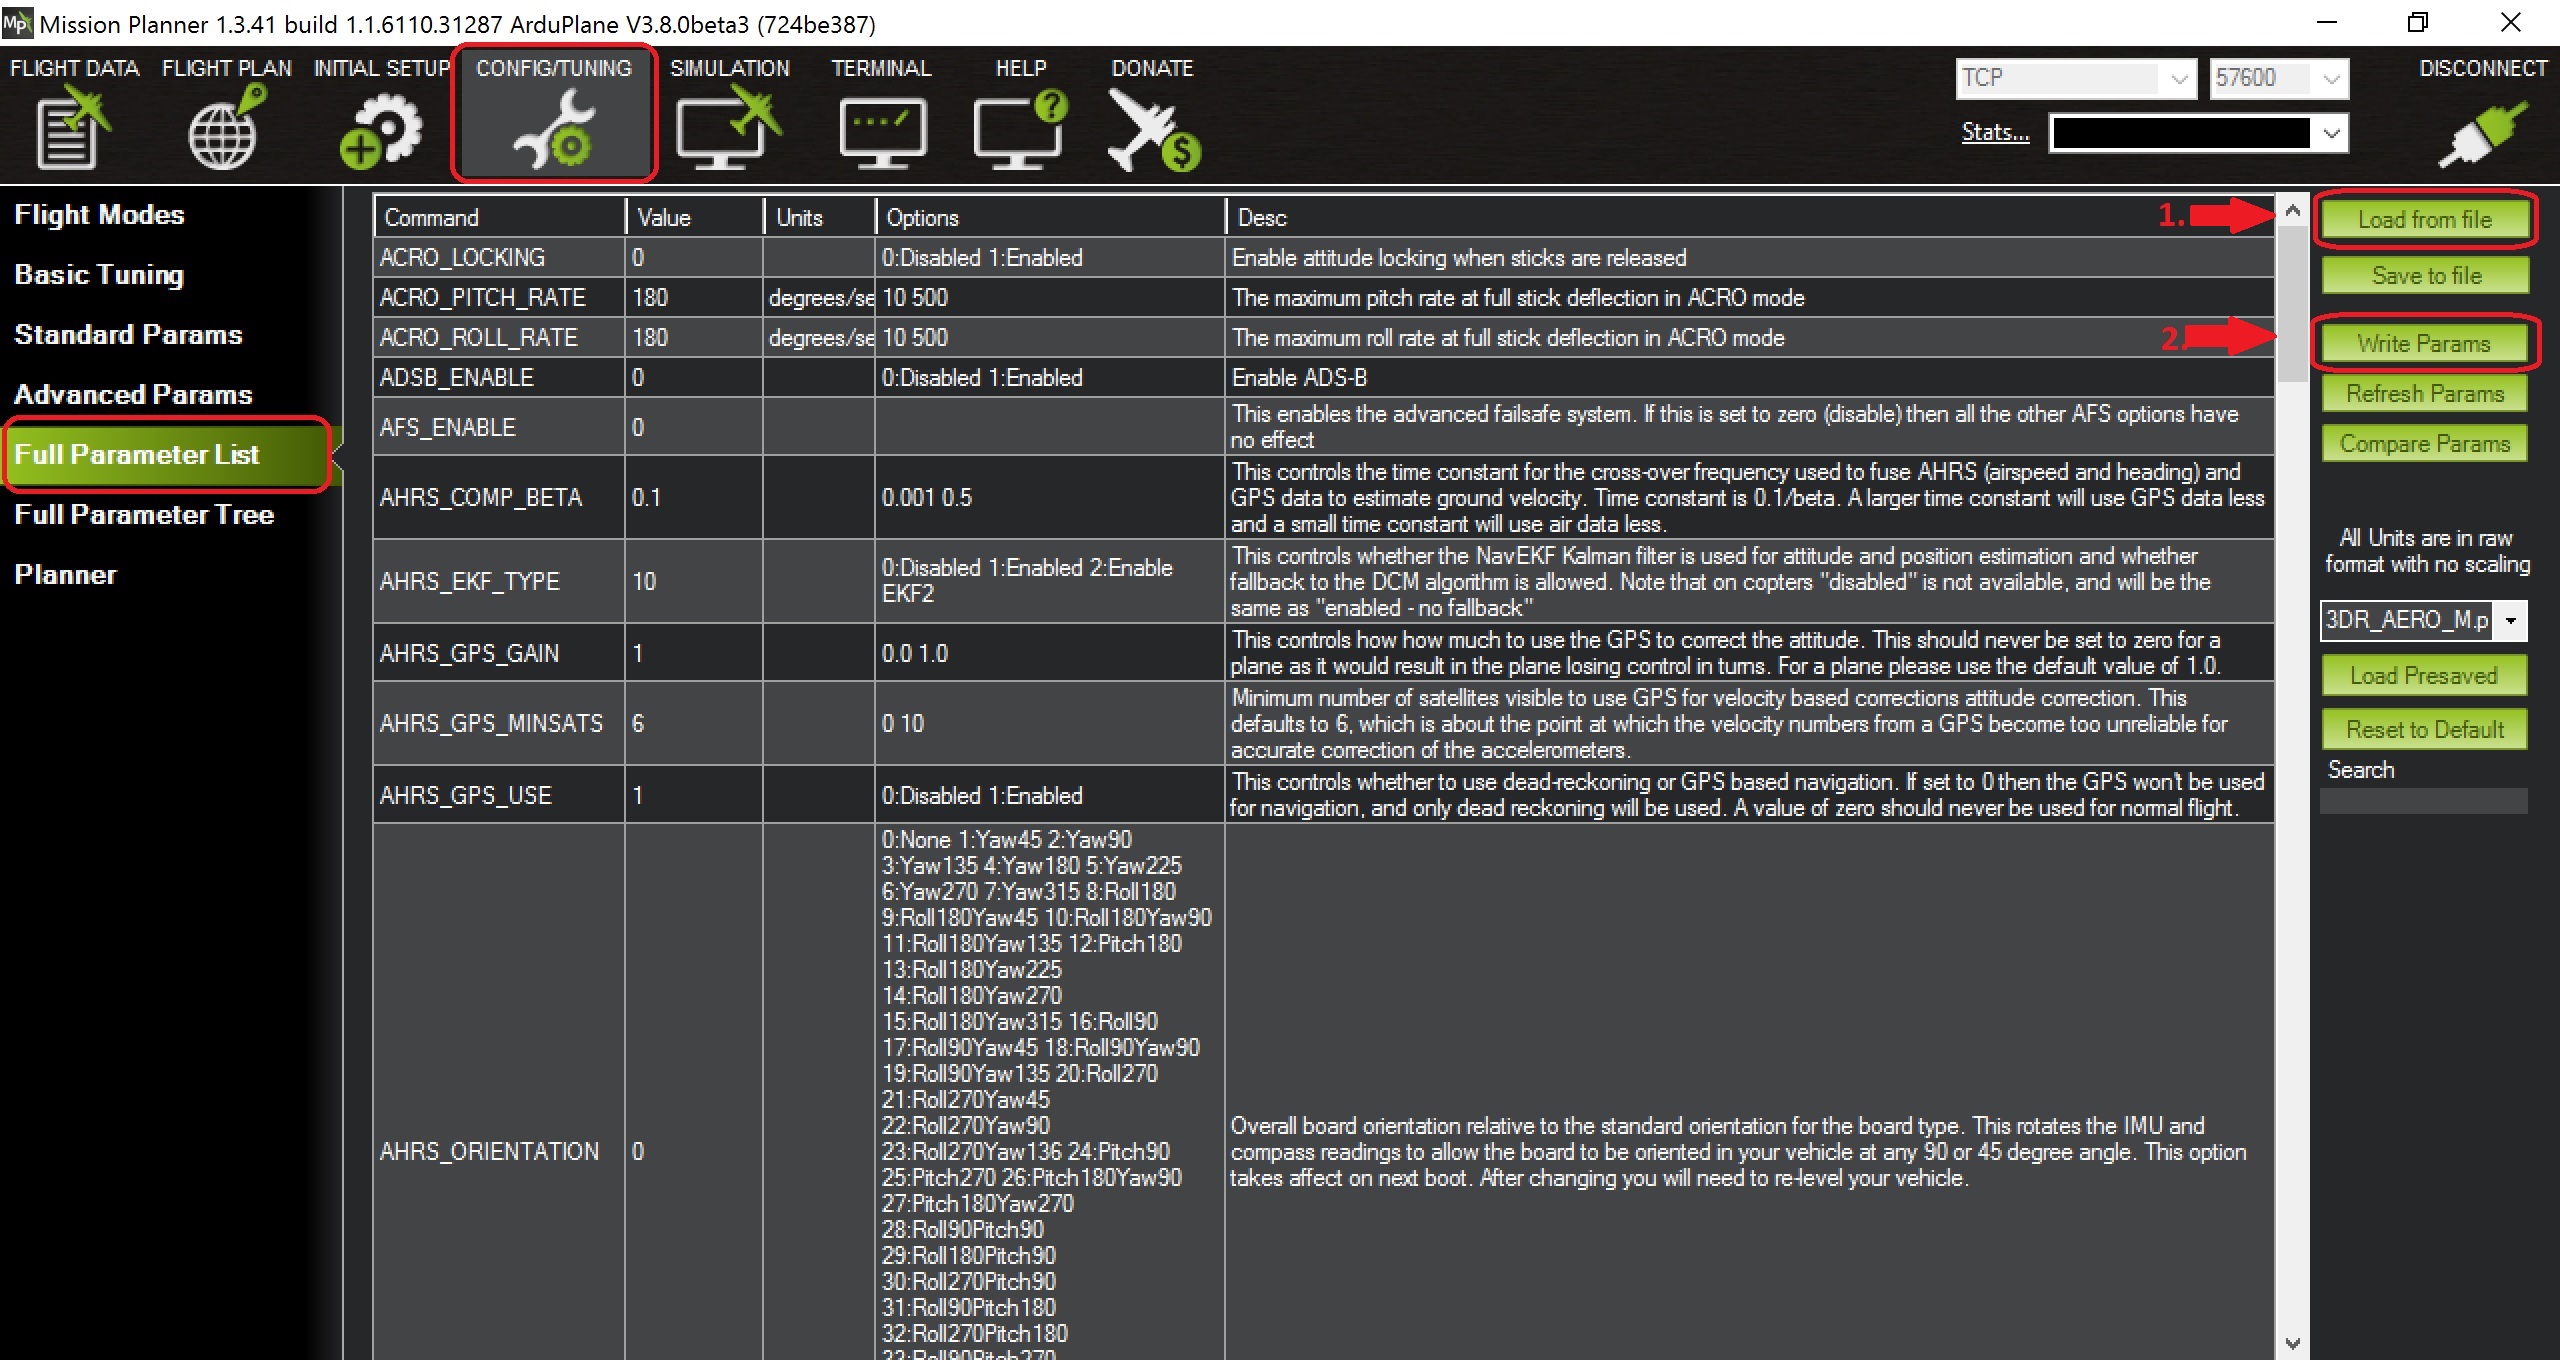
When you load and set parameters from a file for the first time after (re-)building ArduPlane, Mission Planner may display a message such as “Parameter refresh required — press F5”, and the simulation may even crash – you will see “ERROR: Floating point exception - aborting” in the Cygwin window where you started the simulation. This is not unusual. Just restart the simulation by running
build/sitl/bin/arduplane --model xplanein Cygwin, reconnect to it by pressing Connect in Mission Planner, and repeat the above process for loading parameters from a file. This time everything will work smoothly.Warning
ArduPilot’s parameters largely determine how an aircraft behaves, and setting them correctly is very important. This is especially true for soaring-specific parameters. Failure to choose appropriate values for them can cause a sailplane to miss all thermals or repeatedly try to catch a thermal where there is none. Refer to the instructions for calculating these parameters for your sailplane model.
If everything has worked correctly so far, you should see the Cygwin window where you launched SITL start getting filled with notifications of the kind
Data rate: 19.9 FPS Frame rate:466.9 FPS, like so: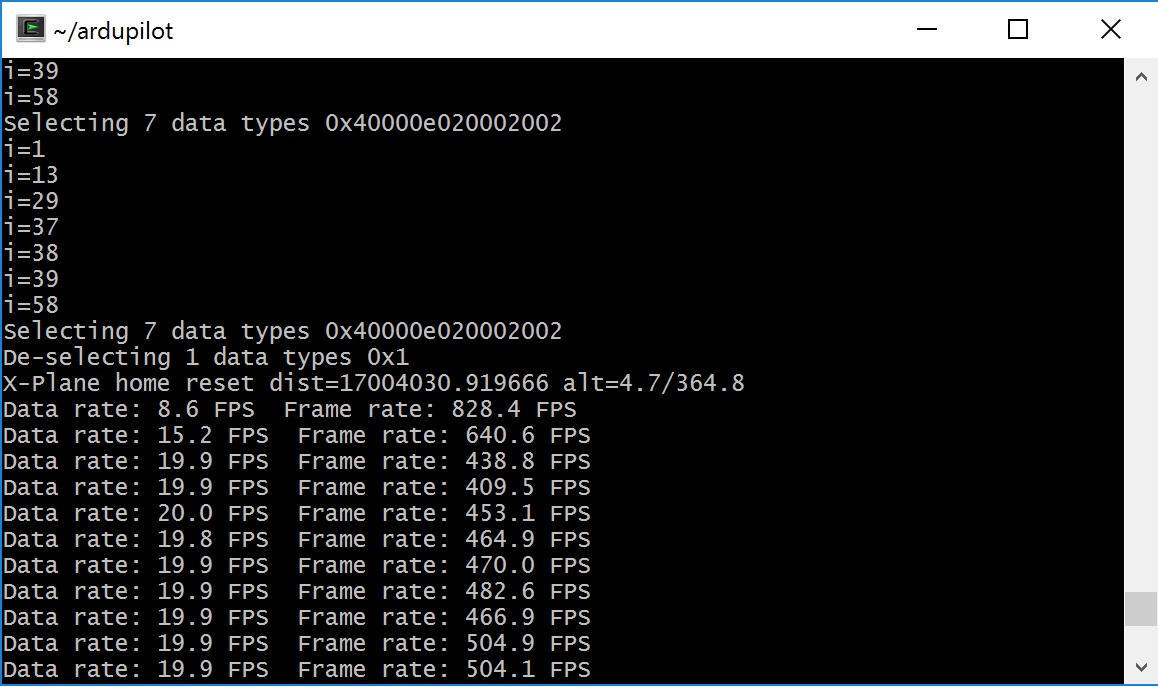
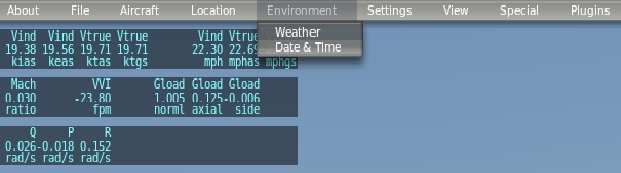
Activate thermals in X-Plane.
Go to the Environment menu in the menu bar at the top of the X-Plane window (if necessary, mouse over near the top of the window to make it appear) and choose Weather:
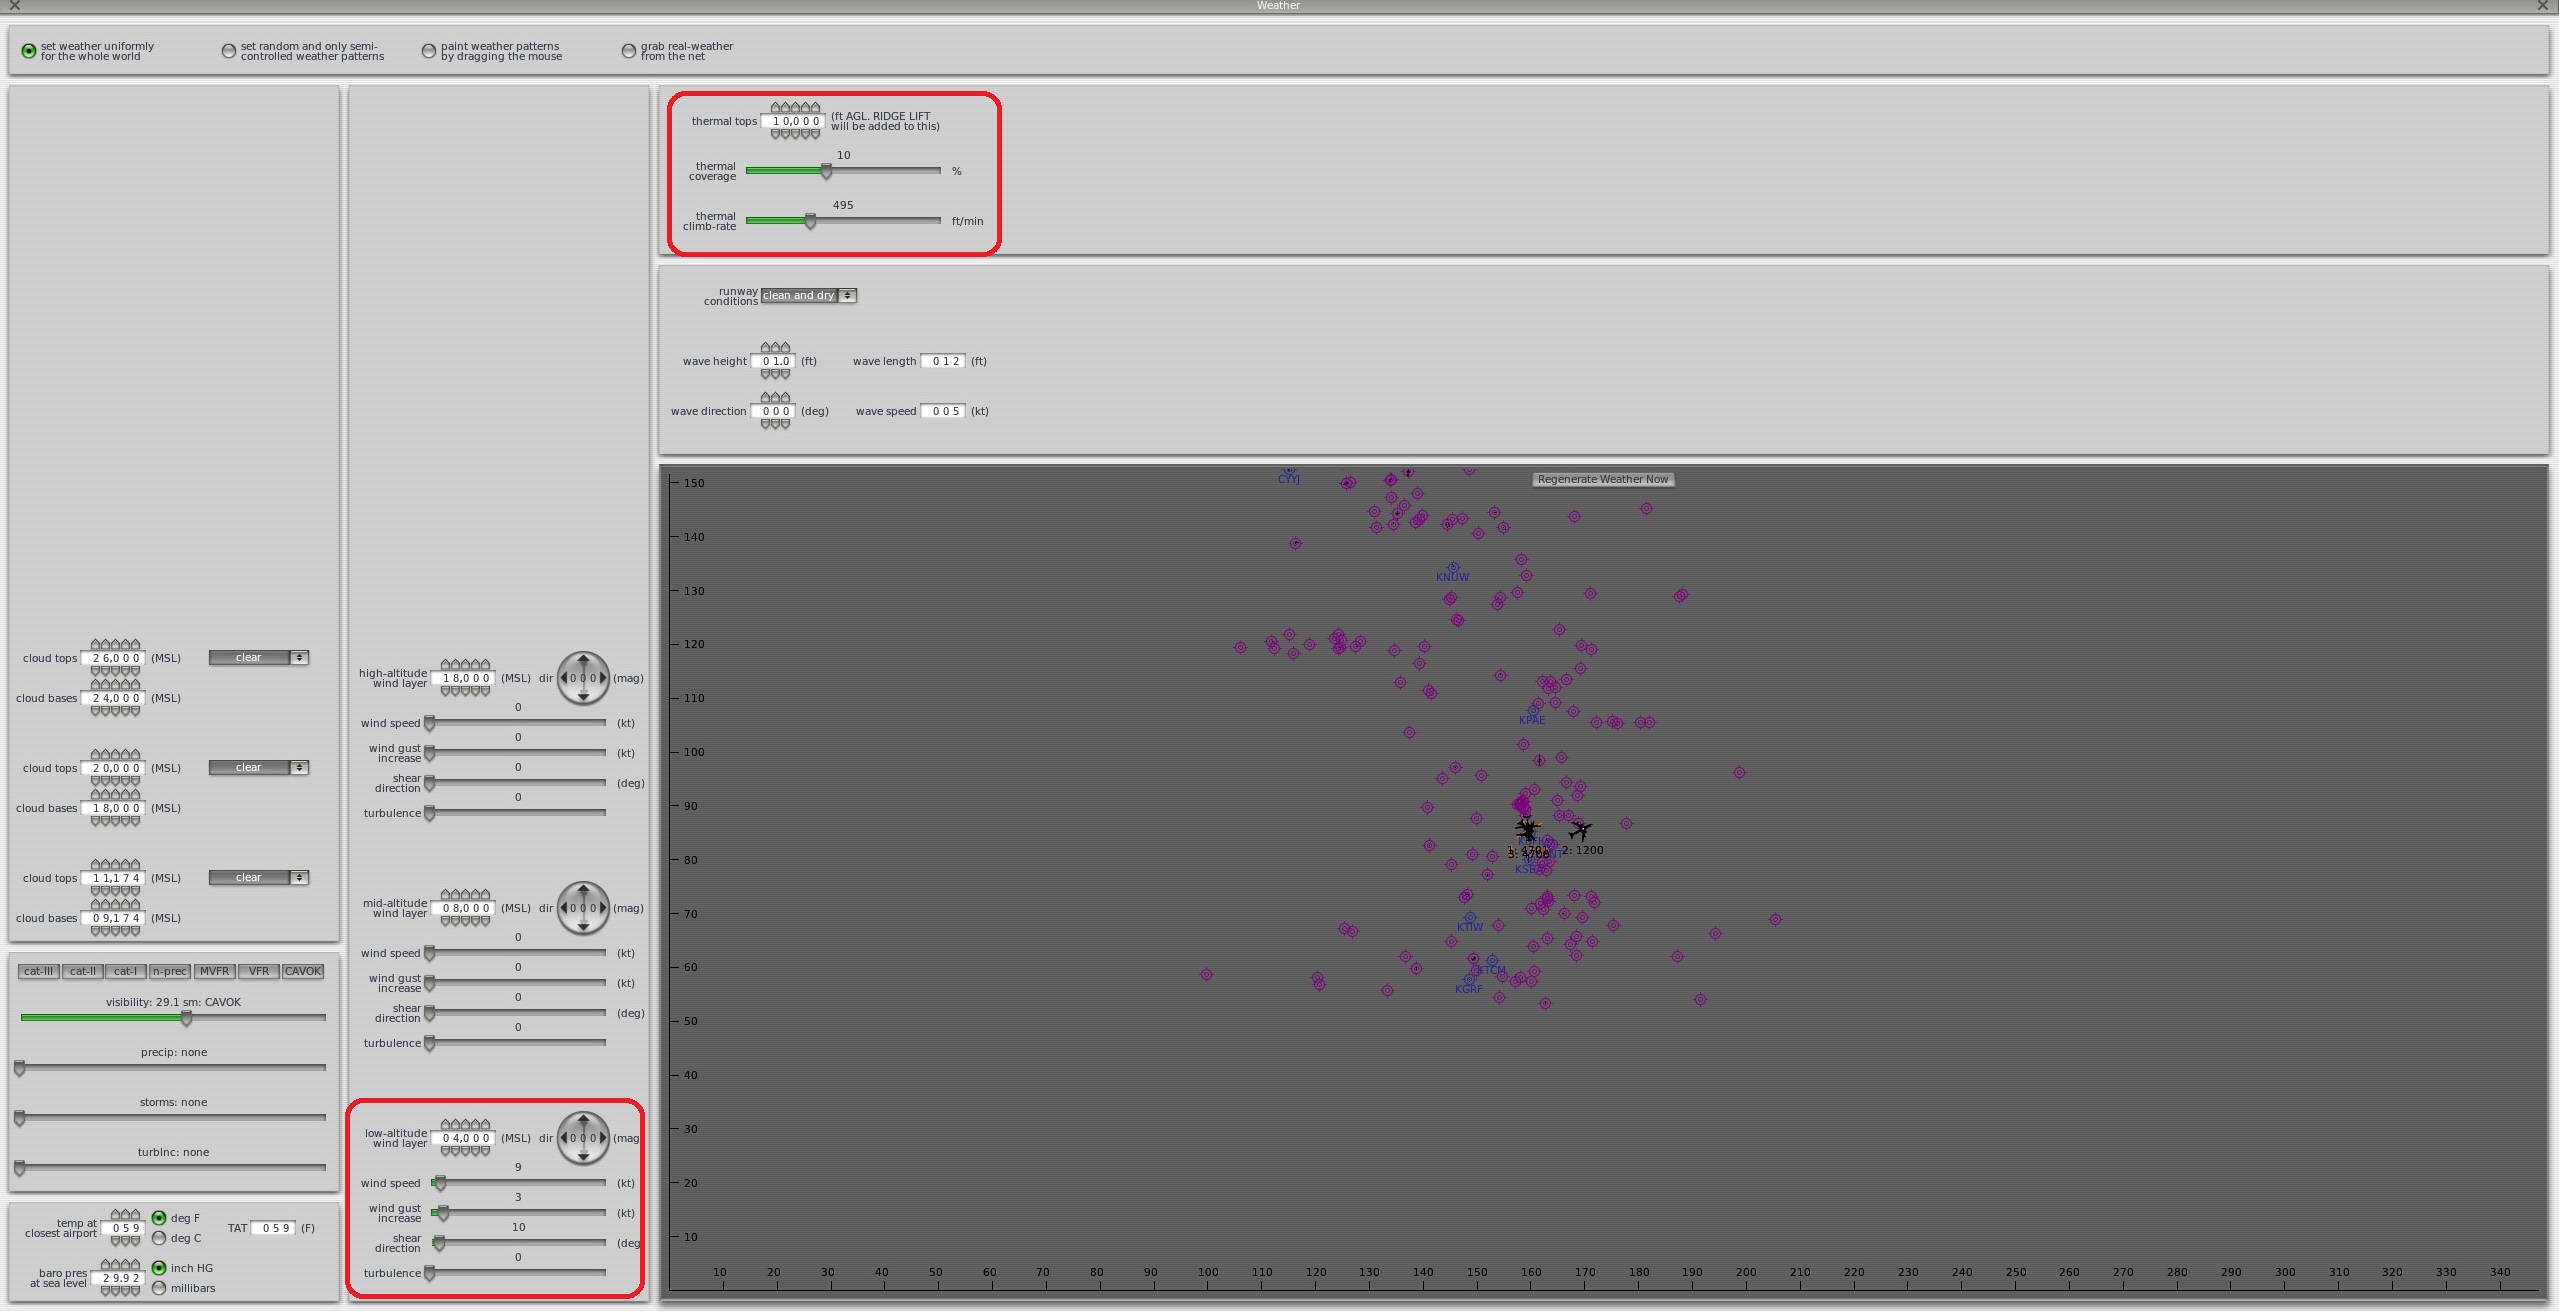
To enable thermals, set thermal coverage to something higher than 0 and possibly change thermal climb-rate. It should be higher than you sailplane’s SOAR_VSPEED parameter. To make the mission a bit more challenging, you can also set wind speed, gust, shear, and turbulence above 0, but don’t overdo it — setting turbulence higher than 1 will make an RC sailplane-sized aircraft very difficult to control.
The settings in the screenshot below are an example. The only changes from the defaults are in the thermal settings and low-altitude wind layer:
Warning
You must re-activate thermals and any other weather settings every time you restart the simulation in X-Plane, e.g., by crashing your plane!
Tip
If your aircraft does not seem to be detecting any thermals, the first thing to check is whether thermals are enabled in X-Plane.
Load a mission and fly!
To set your RC sailplane on a mission, load a mission file by going to Mission Planner’s FLIGHT PLAN screen, (1) clicking Load WP file to read in a mission, and (2) clicking Write WPs to send the mission specification to your virtual RC sailplane, as shown below.
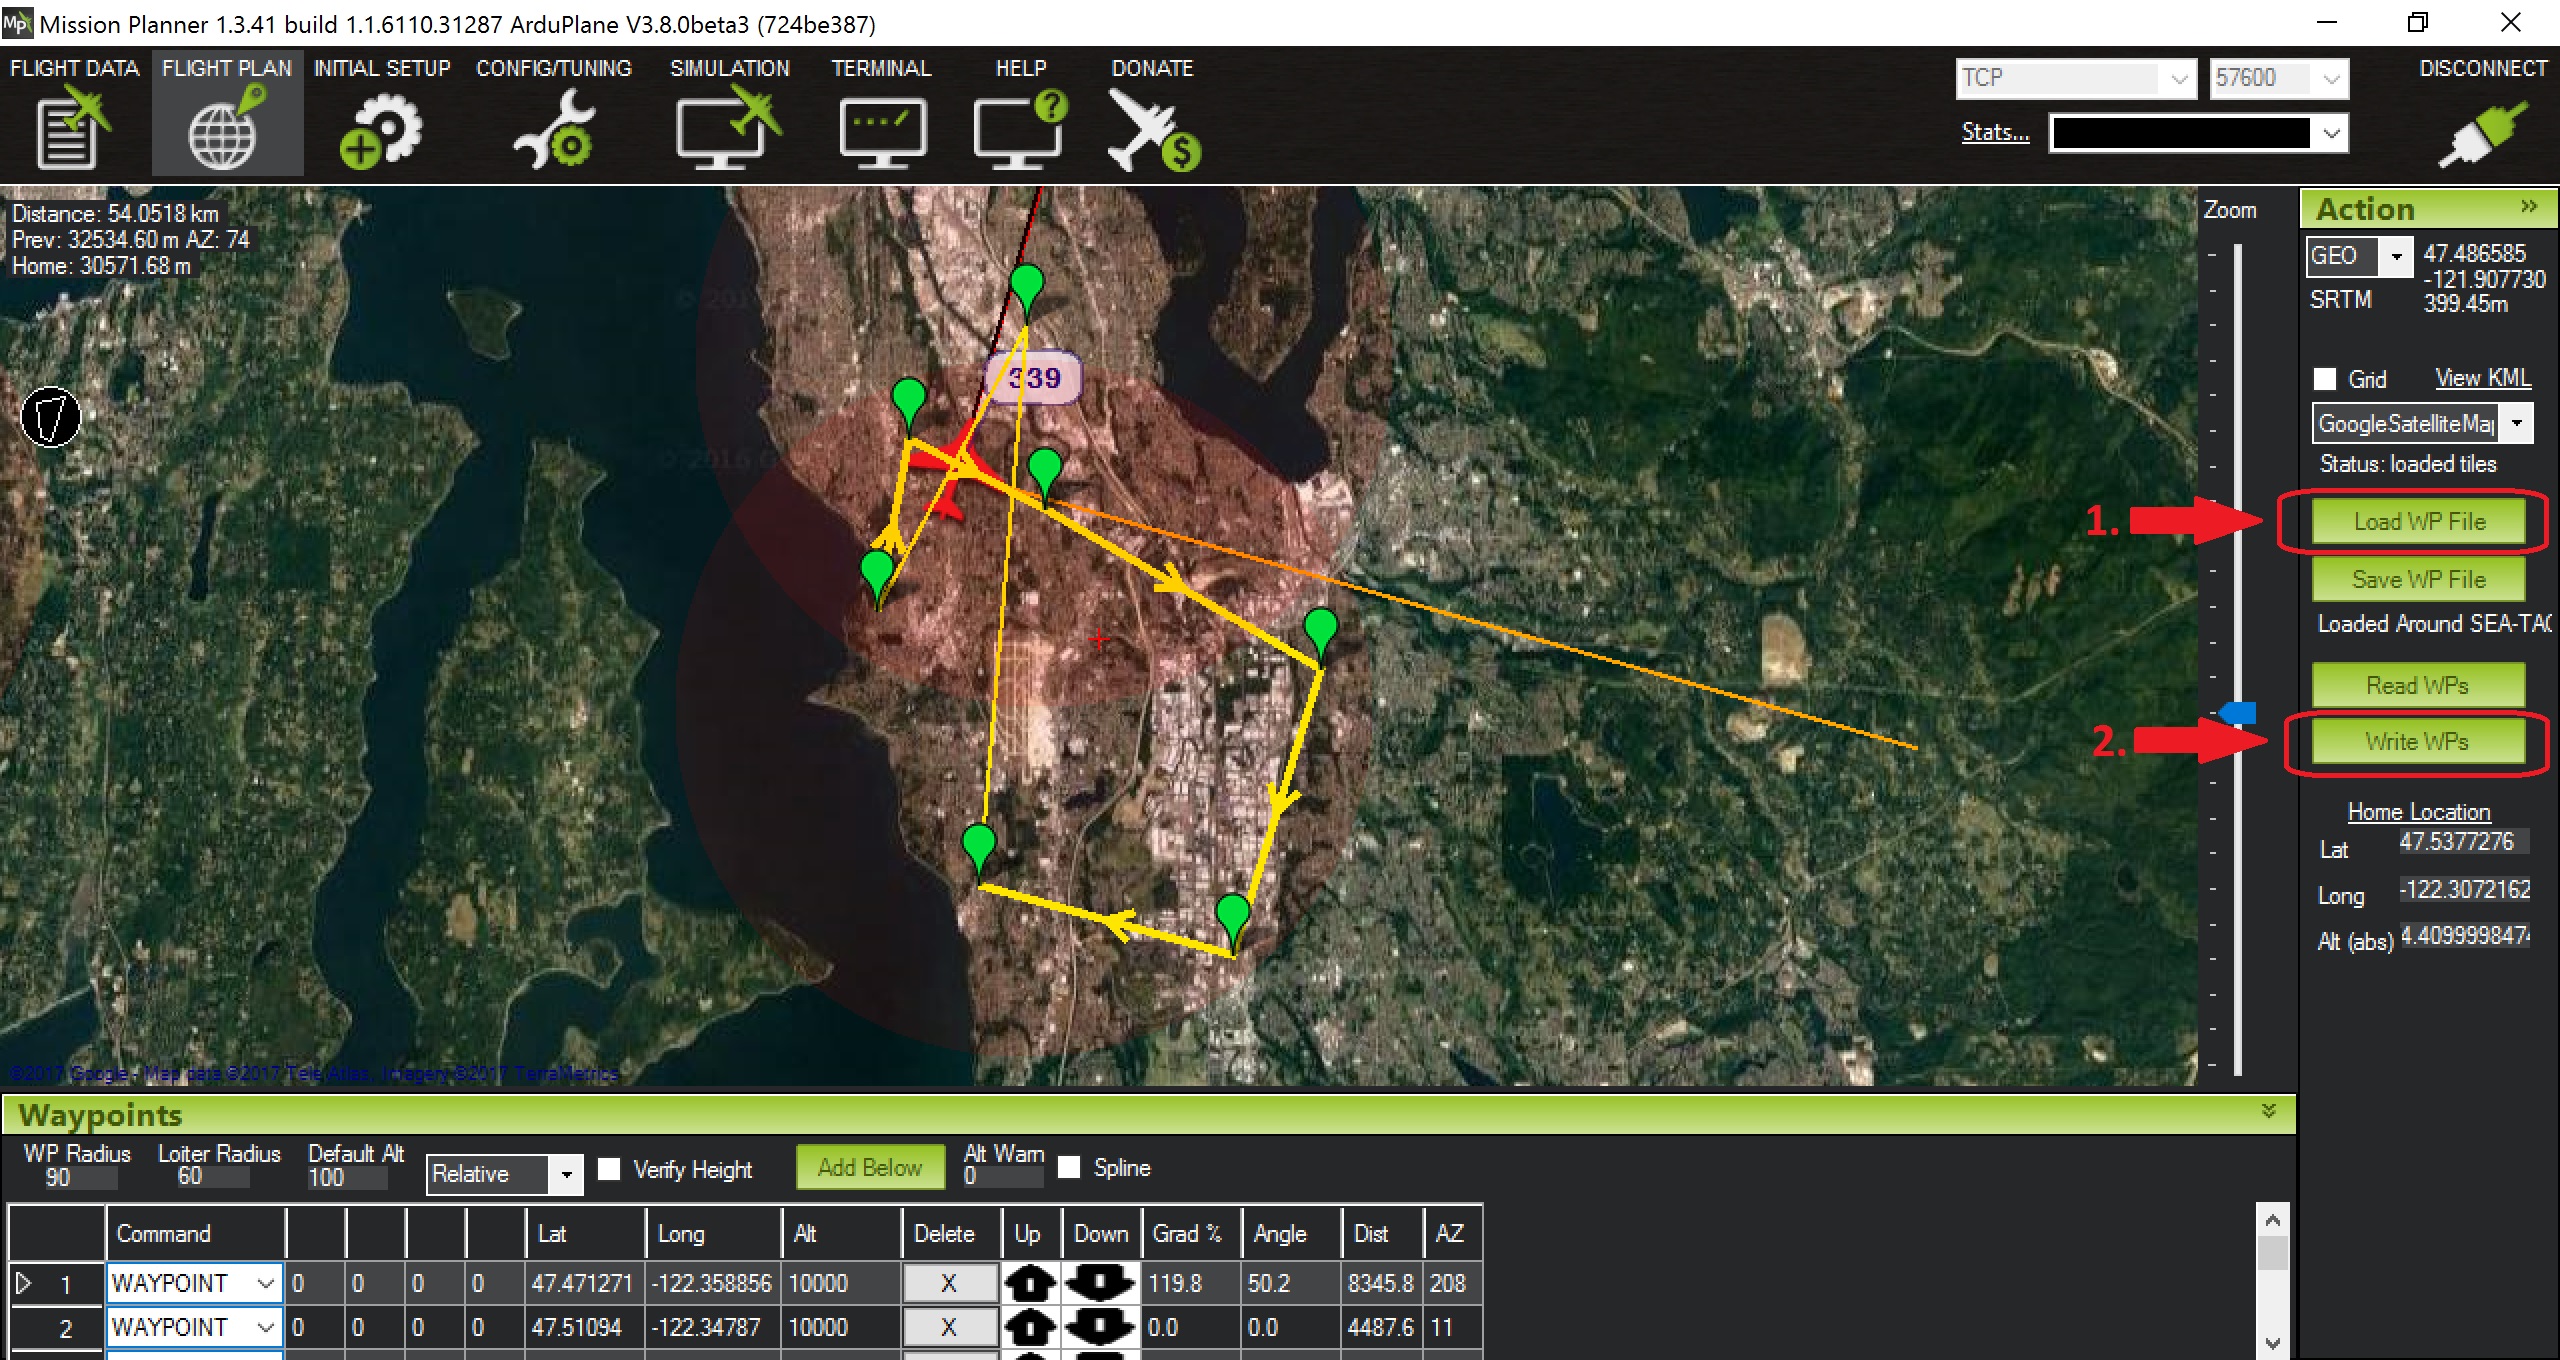
An example Soaring in Seattle.waypoints mission file is available in ArduPlane\Tools\autotest\X-Plane.
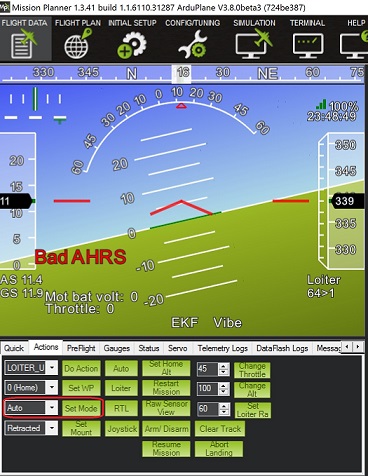
To fly a mission, have your RC sailplane take off in X-Plane, and then in Mission Planner set the mode to Auto:
Warning
Vee-gull 005 can be tricky to get into the air in the conventional way. It sits very low on the ground, and giving it a lot of throttle sharply, especially before releasing the brakes, will cause it to strike the prop against the ground. This may not have any immediate effects, but X-Plane’s damage model will make the engine lose effectiveness eventually, seemingly for no apparent reason.
Open the throttle very gently when taking off under power in a Vee-gull 005, and leave the ground just as soon as you gain enough speed!
Tip
To avoid the aforementioned risk of prop strike at takeoff when using Vee-gull 005, take off with a glider winch instead. To do so, in X-Plane go to the Aircraft menu and choose Aircraft & Situations:
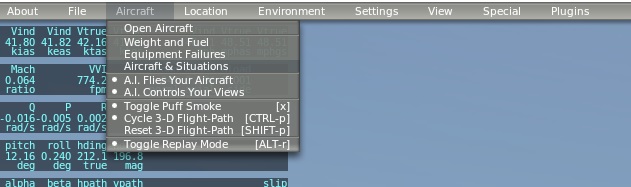
On the screen that appears, click Glider-Winch. Now, release the brakes and, when the aircraft takes off and stops gaining altitude, release the winch. Simultaneously, set the mode to Auto in Mission Planner.
Happy soaring!