Soaring SITL with Silent Wings
Silent Wings is a simulator that focuses specifically on sailplanes. In spite of being somewhat dated by now, as of April 2019 it still provides some of the most accurate simulations of sailplane flight and details of atmospheric phenomena that matter for it, such as thermal lifecycles, distribution of thermal and ridge lift over terrain, their dependence on weather, etc. This makes it a great tool for testing various aspects of autonomous soaring.
Overview
This document describes how to run ArduPlane software-in-the-loop (SITL) simulation with Silent Wings. Whether you are working on a soaring controller for a specific type of lift (e.g., thermal lift) or a cross-country sailplane navigation strategy, you may find it useful to test your approach in simulation. This is especially true for long-range navigation, whose evaluation in the open world is logistically difficult and expensive. SITL testing allows you to do exactly that by compiling ArduPlane code into a special binary that can run on your regular computer, receive sensor data from a simulator running on the same or different machine, and send inputs back to the simulator in order to control a simulated sailplane.
The following instructions have been tested on Windows 10.
Prerequisites
Install Silent Wings and at least one scenery package for it . The 2-week demo version can be used to try out these instructions. We suggest starting with Norway scenery packages; our example mission uses the Frya-Lillehammer-Starmoen map.
Configure Silent Wings to send sensor data and receive control inputs remotely. To do so, open
%USERPROFILE%\AppData\Local\VirtualStore\Program Files (x86)\Silent Wings\Silent Wings\data\options.datand replace the “UDP Output protocol” and “Remote control protocol” sections in it with#--------------------- # UDP Output protocol #--------------------- use_output_udp = true output_udp_protocol = binary output_udp_address = localhost output_udp_port = 6060 output_udp_rate = 90 #------------------------- # Remote control protocol #------------------------- use_remote_control = true remote_control_port = 6070 remote_control_mode = UDP
Also, set
screen_refresh = 60
Note that there is another options.dat file, in
C:\Program Files (x86)\Silent Wings\Silent Wings\data. It is not the one we need.The output_udp_rate = 90 value works well for screen_refresh = 60. When adjusting the latter, you will probably want to adjust the former as well for smoother control.
Install Mission Planner, a ground control station (GCS) software. Other ArduPilot GCS software may work as well.
Build the SITL flavor of ArduPlane. To do so, first install and configure Cygwin as described here. For the purposes of the soaring SITL, you don’t need to perform the steps in the Set up directories/paths in Cygwin and Install Required Python Packages sections of that wiki, but doing them won’t hurt. Then:
Open a Cygwin terminal (or reopen it if you have one already open).
If you already have ArduPilot’s source code, in the Cygwin terminal simply switch to the root of your local ArduPilot repo. These instructions assume it is the ArduPilot directory.
If you don’t have ArduPilot’s source code yet, get it, e.g., by running the following command sequence in Cygwin:
git clone --recurse-submodules https://github.com/ArduPilot/ardupilot.git
cd ardupilot
Run
./waf distclean
./waf configure --board sitl
./waf plane
Running Silent Wings SITL
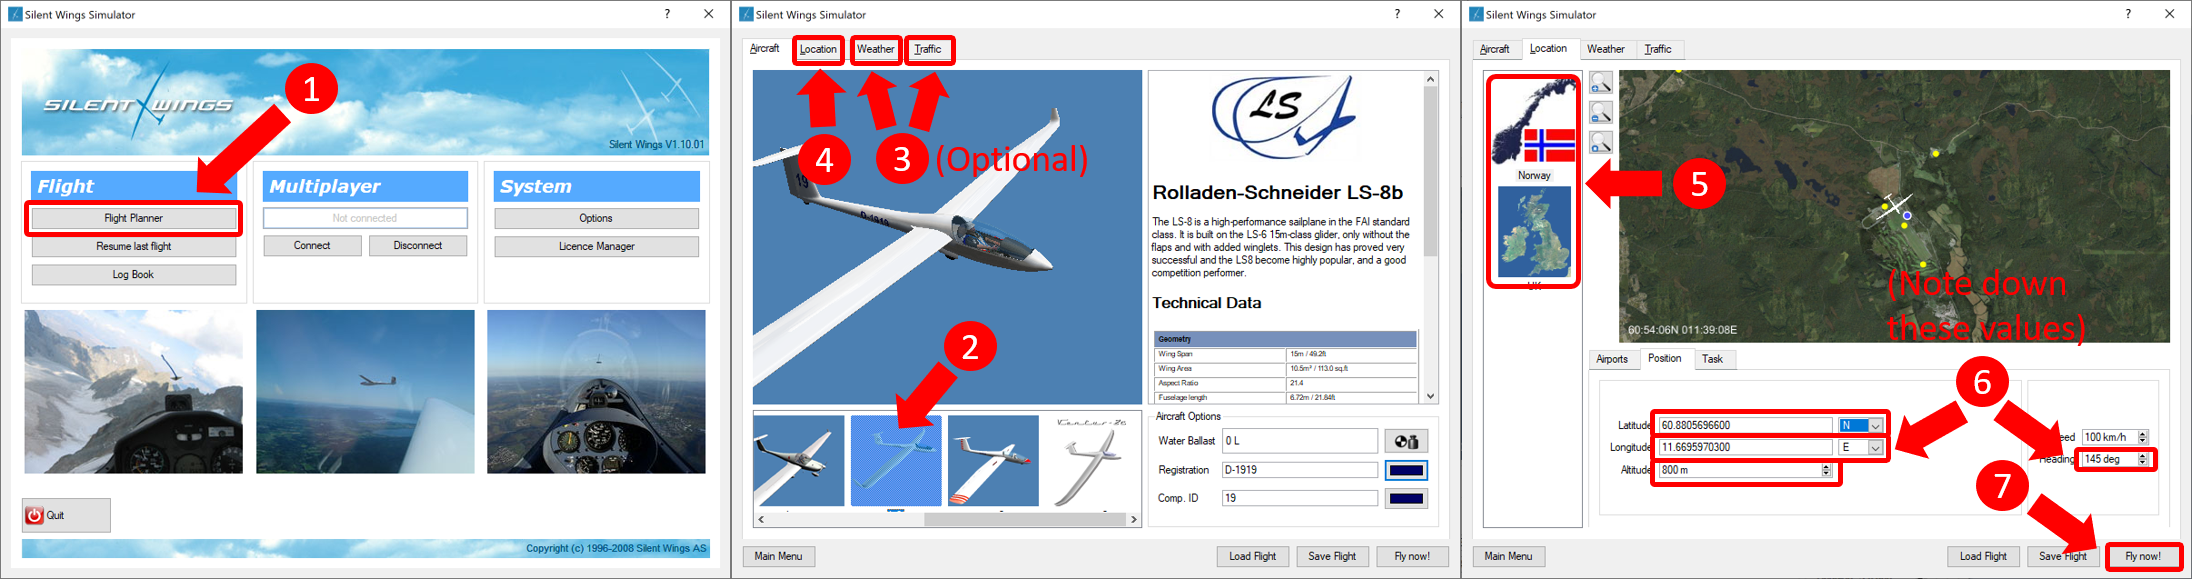
Launch Silent Wings. In Silent Wings’ Flight Planner section, on the Aircraft tab choose a sailplane. Note that each sailplane model has distinct characteristics, and ArduPlane needs a parameter (.param) file for that model in order to be aware of them. We provide a parameter file for Rolladen-Schneider LS-8b, and this is the sailplane we recommend as a start.
Set weather and air traffic conditions on the Weather and Traffic tabs respectively. On the Location tab, choose the map and starting location, and note its GPS coordinates, altitude, and heading. You will need this information when launching SITL. Then click the Fly Now! button on the bottom right. The game is going to start in a paused state. Keep it paused for now.
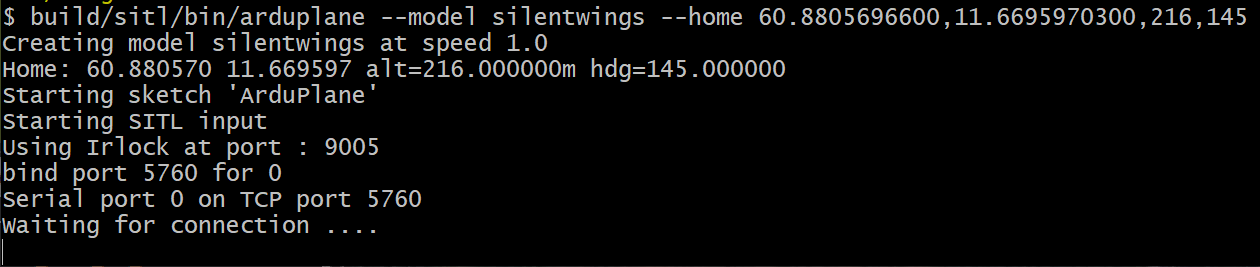
Launch ArduPlane SITL. To do so, open a Cygwin64 terminal, switch to your ArduPilot repository’s root directory, and run
build/sitl/bin/arduplane --model silentwings --home <lat>,<lon>,<alt>,<yaw>
e.g.,
build/sitl/bin/arduplane --model silentwings --home 60.8805696600,11.6695970300,216,145
Here, <lat> and <lon> are the start location’s latitude and longitude that you noted down when launching Silent Wings, with a “-” sign if latitude is S or longitude is W. However, `<alt>` should be the elevation of the start location’s terrain above sea level, even if you chose to start in the air. To determine it, subtract the starting altitude you noted down earlier (it is AGL) from the altitde you see in the top left corner of the Silent Wings window (it is MSL) when the mission starts. The result is the <alt> that you need to pass to the SITL. Thus, note that for the mission in the above screenshot, <alt> =216, not 800. <yaw> is the initial heading you picked for the Silent Wings mission.
Tip
We recommend start locations with near-zero terrain elevation above the sea level, because the SITL flavor of ArduPlane occasionally behaves quirky if the simulated aircraft descends below the home location’s <alt>.
At this point, the SITL should be waiting for a connection to the ground control station (Mission Planner):
Launch Mission Planner, connect a joystick, and set up the joystick in Mission Planner to configure its roll, pitch, and yaw axes (other axes will be ignored by Silent Wings).
Tip
Unfortunately, Mission Planner appears to forget joystick settings when it is shut down, so this step has to be redone every time Mission Planner is restarted or the joystick is reconnected. Alternatively, you can try controlling the plane using your keyboard.
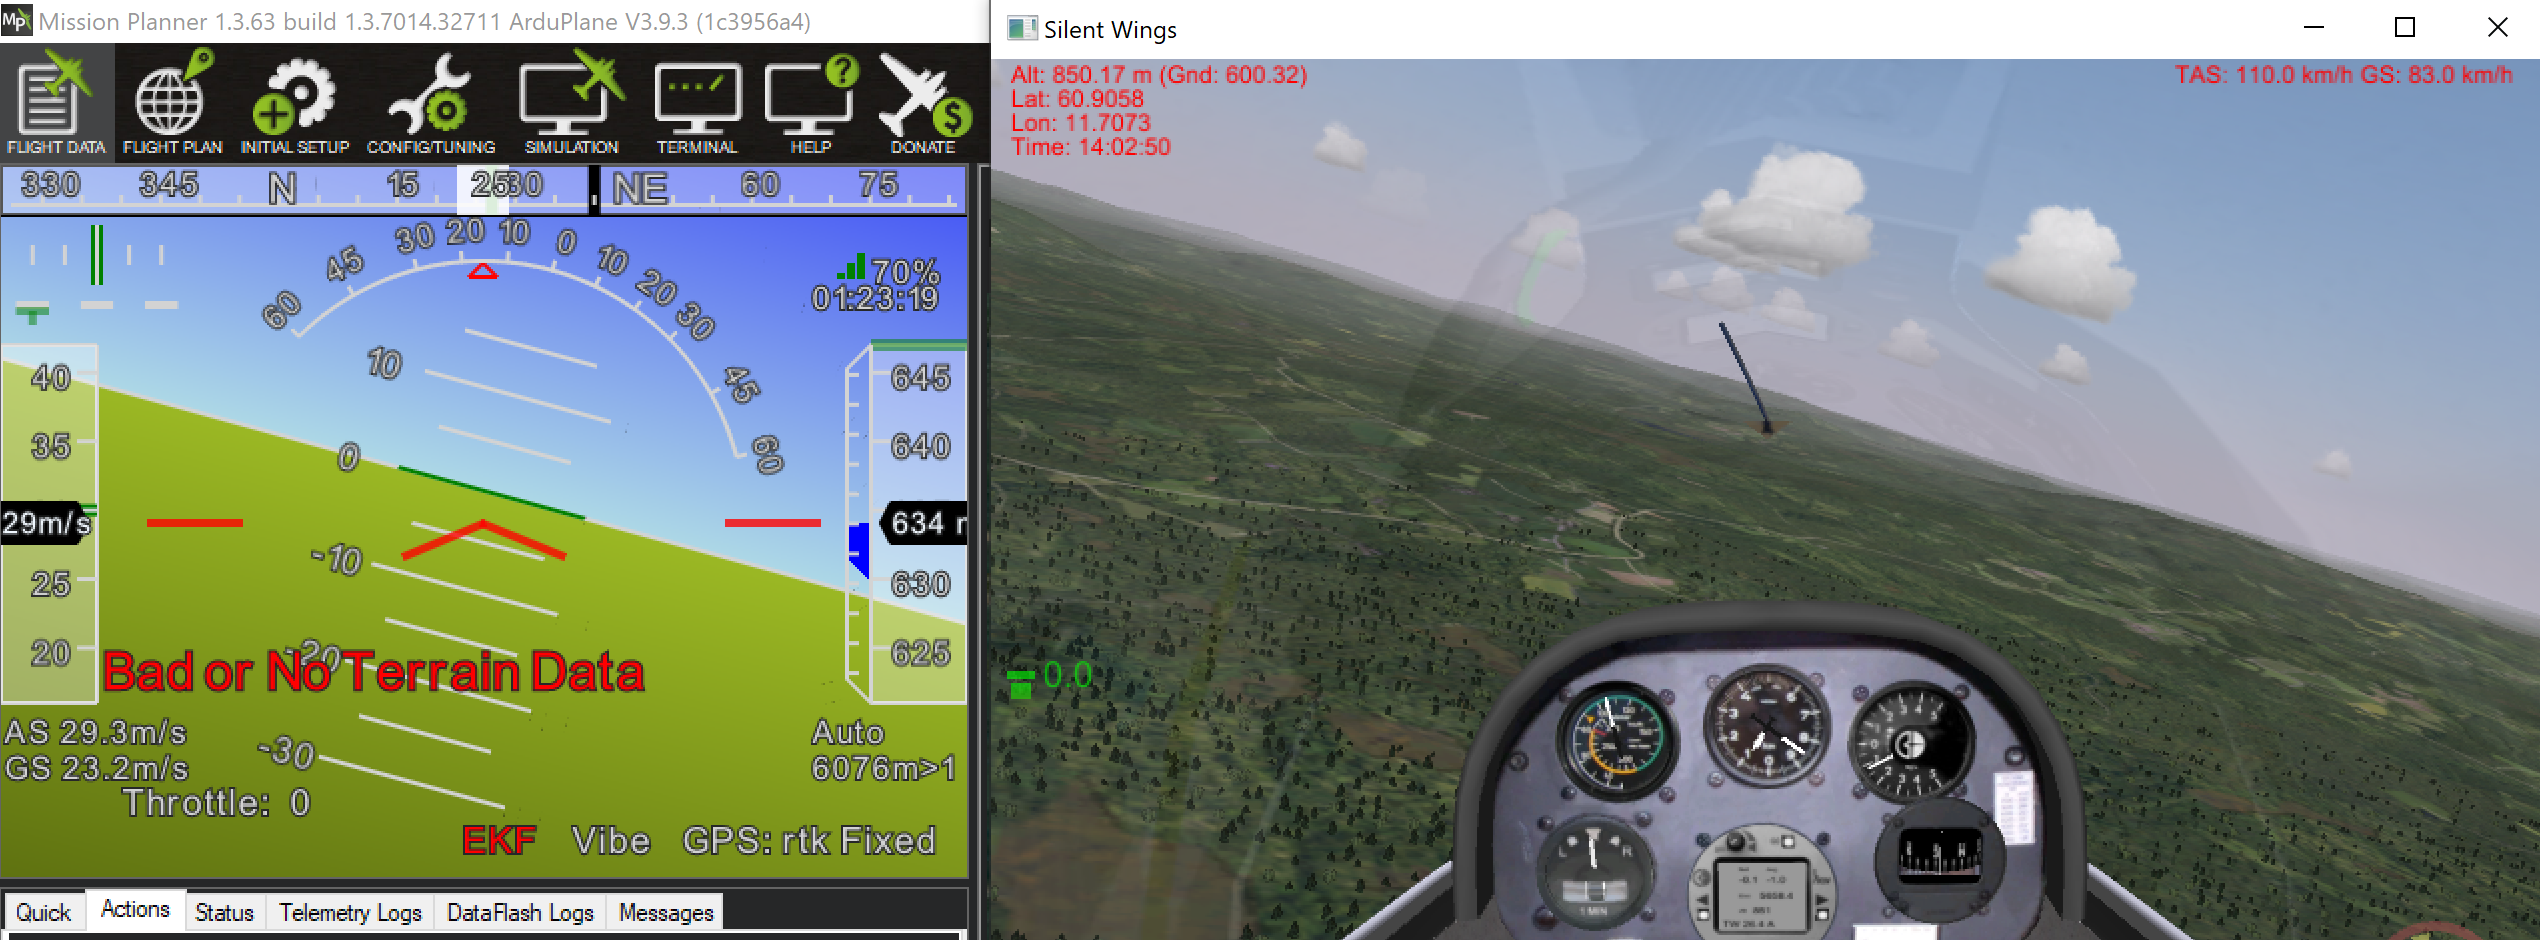
Have Mission Planner establish connections to Silent Wings and ArduPlane SITL. To do so, in Mission Planner’s top right corner choose TCP, click Connect, enter the IP address where Silent Wings is running (127.0.0.1 if it is on the same machine) in the window that pops up, and enter 5760 as the port number in the next window. Wait until the Connect Mavlink window disappears, all parameters are copied over, and all calibration messages in Mission Planner’s HUD disappear. You should see Mission Planner’s HUD report that the GPS has lock and the airspeed sensor reads a value around 0.
Now ArduPlane is ready to control the plane in Silent Wings.

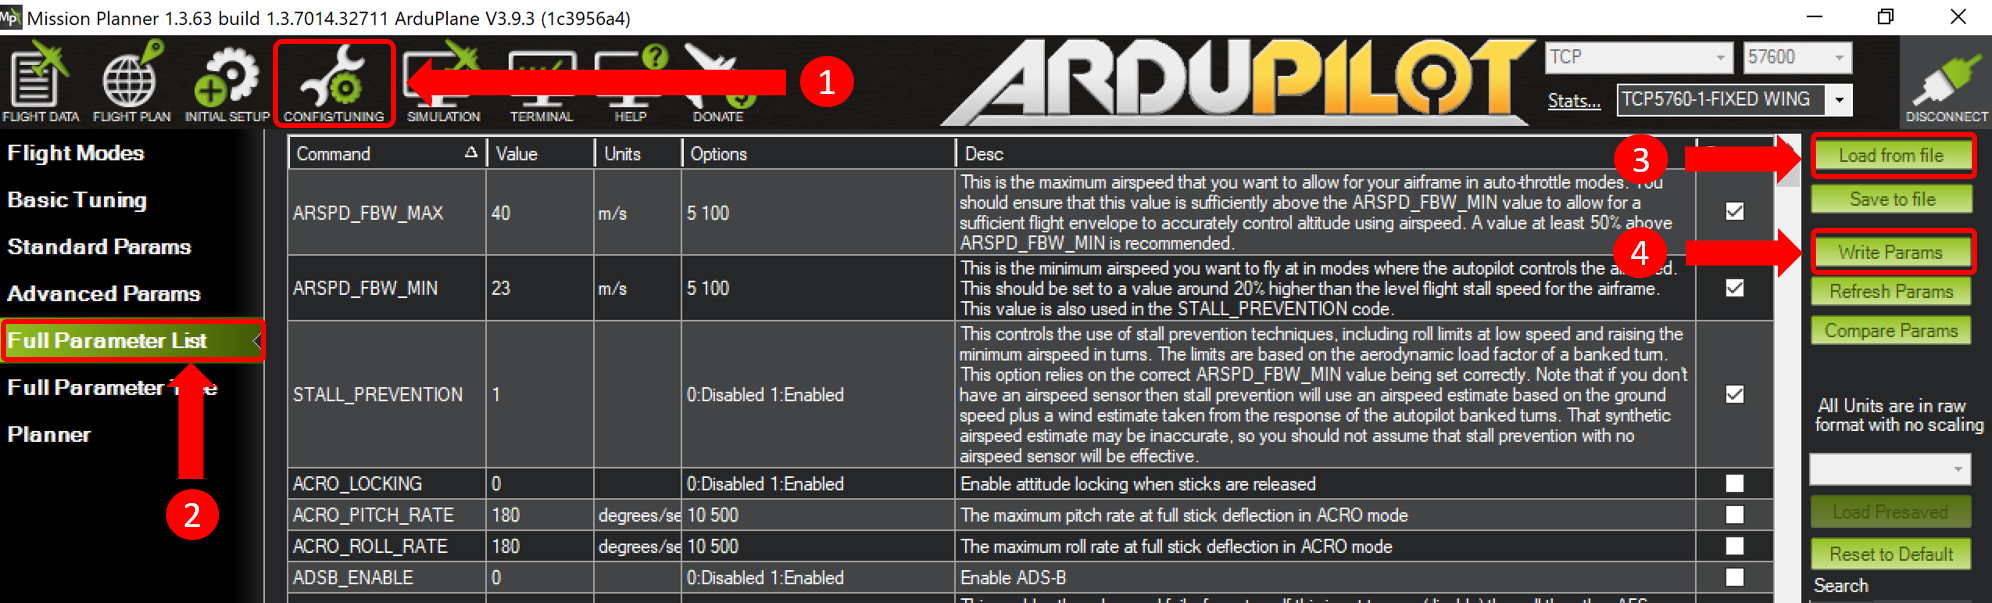
Load the parameter file for the chosen Silent Wings sailplane into ArduPlane via Mission Planner. (This step needs to be done only the first time you fly a given sailplane model in Silent Wings.) To do so, go to Mission Planner’s CONFIG/TUNING tab, choose Full Parameter List on the left, click Load from file on the right, locate the parameter file, and click Write Params on the right. After doing this, terminate ArduPlane SITL in the Cygwin64 terminal, close Mission Planner, and repeat steps 2 and 4.
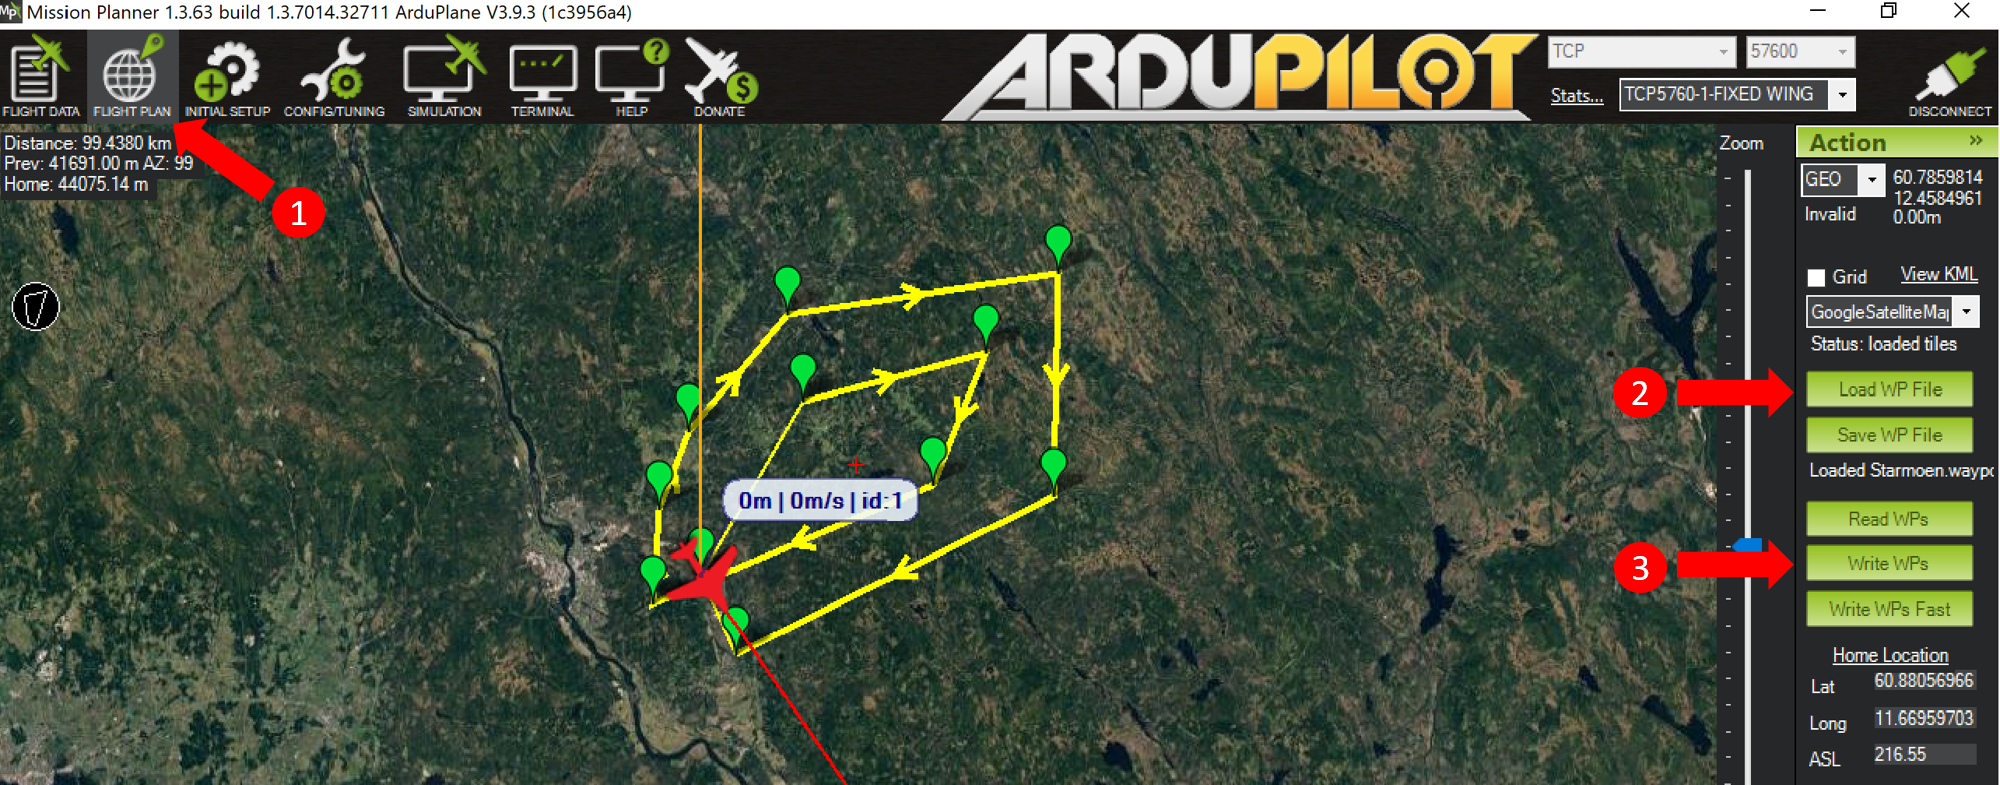
If desired, load a mission in Mission Planner. To do so, go to Mission Planner’s FLIGHT PLAN tab, click Load WP File on the right, locate the mission file, and click Write WPs. We provide a file for a test mission near Starmoen, Norway.
Start flying! By now, everything is ready to commence the flight. In the Silent Wings window, hit the “p” key to unpause the simulation. You should see airspeed, altitude, and AHRS readings in Mission Planner’s HUD closely match those in Silent Wings’ top right and left corners. To have Silent Wings’ sailplane follow the loaded mission, switch the flight mode to Auto in Mission Planner.
A big thanks goes to Sam Tabor and Thomas Sevaldrud of Silent Wings for their help with the development of this functionality, and to Jack Langelaan of Penn State University for providing valuable insights.