SITL setup on Windows using Cygwin (not recommended)
Warning
These instructions are out-of-date. We recommend Windows users follow the instructions for Setting up the Build Environment using WSL and Setting up SITL on WSL
SITL was originally developed on Linux, but can also be built and run natively on Windows. It can also be run on a virtual machine (Linux) hosted on Windows, Mac OSX, or Linux or by using the Windows Subsystem for Linux (WSL).
Currently, the simplest way to run SITL on Windows is to build the code and simulate using WSL: in Windows 10 Setting up the Build Environment on Windows 10 using WSL
Prerequisites: ‘Windows 10 64bit’ at a minimum, this will not work on , for example, Windows 7. It also will not run on any 32bit windows installation.
The remainder of this article shows how to build and run SITL (Software In The Loop) natively on Windows using Cygwin. These commands were tested on Windows 10 with MAVProxy and Copter-4.0.0-dev.
MAVProxy Map: Guiding a SimulatedCopter
Installation steps
Install Cygwin as described here
Download MAVProxy for Windows (latest build), install the executable including accepting the license and all default installation options
Tip
Make sure that Cygwin is in your PATH. As for troubleshooting, you may add a Windows environment variable called CYGWIN_HOME in your path pointing to your c:cygwinbin (if you installed at “C:”). You may check it by doing a Right-click on “My Computer” -> Properties -> Advanced -> Environment Variables. In Windows Terminal using PowerShell use the command bash to access cygwin from PowerShell.
Running SITL
Open a Cygwin64 terminal from the start menu
Navigate to one of the vehicle directories (in this case Copter) and call
sim_vehicle.pyto start SITL. If you get a windows security alert for the firewall, allow the connection.cd ~/ardupilot/ArduCopter ../Tools/autotest/sim_vehicle.py --map --console
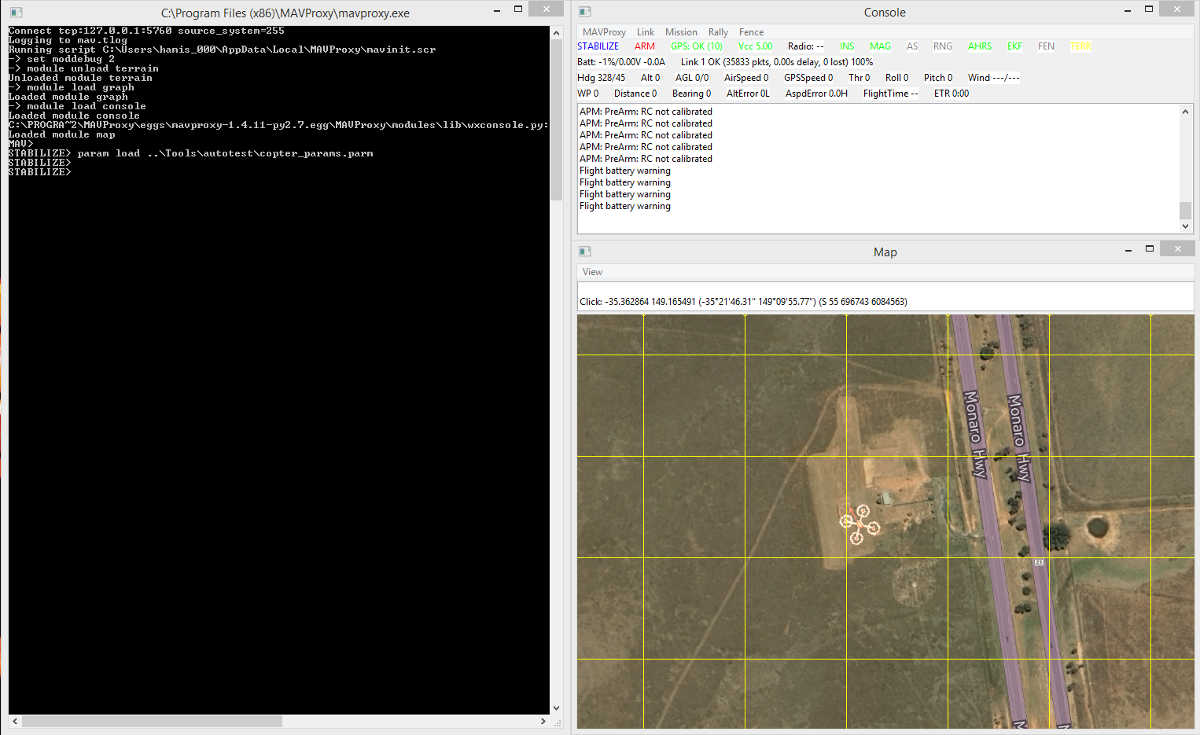
SITL and MAVProxy will start. MAVProxy displays three windows:
A command prompt in which you enter commands to SITL
A Console which displays current status and messages
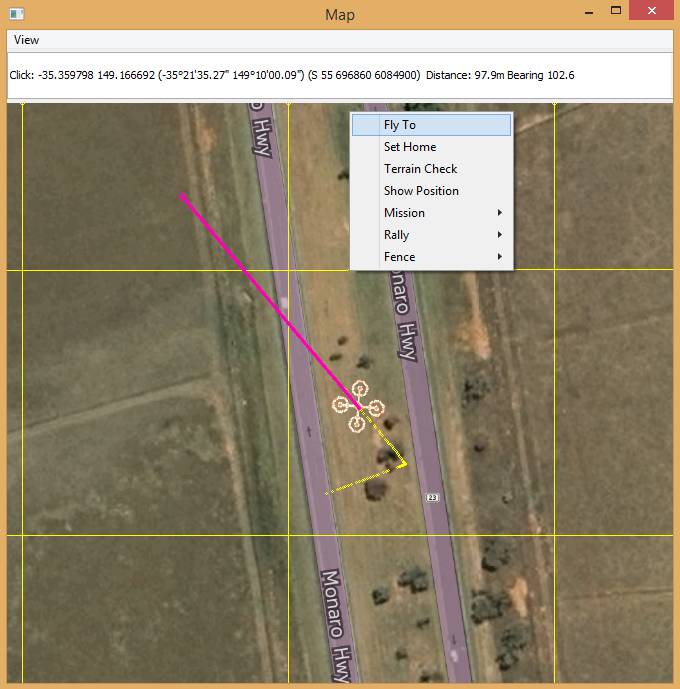
A map that shows the current position of the vehicle and can be used (via right-click) to control vehicle movement and missions.
Tip
It is useful to arrange the windows as shown above, so you can observe the status and send commands at the same time.
Send commands to SITL from the command prompt and observe the results on the map.
Change to GUIDED mode, arm the throttle, and then takeoff:
mode guided
arm throttle
takeoff 40
Watch the altitude increase on the console.
Note
Takeoff must start within 15 seconds of arming, or the motors will disarm.
Change to CIRCLE mode and set the radius to 2000cm
rc 3 1500
mode circle
param set circle_radius 2000
Watch the copter circle on the map.
When you’re ready to land you can set the mode to RTL (or LAND):
mode rtl
This is a very basic example. For links to more information on what you can do with SITL and MAVProxy see the section: Next Steps.
Tip
Use batch files to simplify the running of SITL down to a single double-click. See here for some examples.
FlightGear 3D View (Optional)
FlightGear Flight Simulator can also be used as a viewer to display a 3D simulation of the vehicle and its surroundings. This provides a much better visualization than the 2D maps and HUD flight displays provided by MAVProxy and Mission Planner.
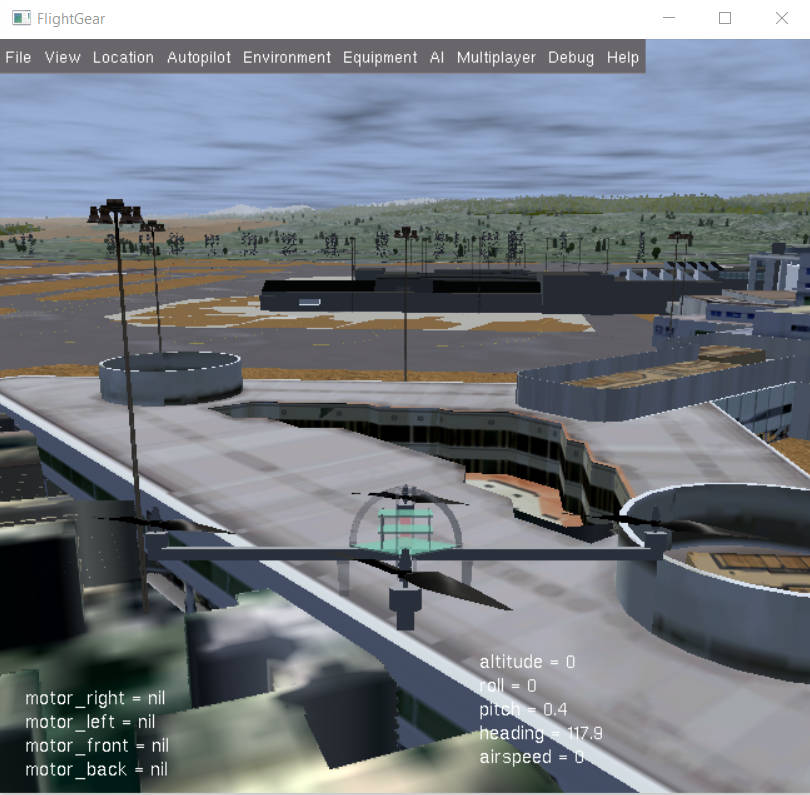
FlightGear:Simulated Copter at KSFO (click for larger view).
SITL outputs FlightGear compatible state information on UDP port 5503. We highly recommend you start FlightGear before starting SITL (although this is not a requirement, it has been found to improve stability in some systems).
The main steps are:
Download FlightGear 3.4.0
Warning
- At time
of writing version 3.4.0 is required on Windows.
Open a new command prompt and run the appropriate batch file for your vehicle in /ardupilot/Tools/autotest/: fg_plane_view.bat (Plane) and fg_quad_view.bat (Copter).
This will start FlightGear.
Start SITL in Cygwin in the normal way. In this case we’re specifying the start location as San Francisco airport (KSFO) as this is an interesting airport with lots to see:
sim_vehicle.py -L KSFO
Note
- FlightGear will always initially start by loading scenery at
KSFO (this is hard-coded into the batch file) but will switch to the scenery for the simulated location once SITL is started.
Tip
- If the vehicle appear to be hovering in space (no
scenery) then FlightGear does not have any scenery files for the selected location. Choose a new location!
You can now takeoff and fly the vehicle as normal for Copter or Plane, observing the vehicle movement including pitch, yaw and roll.
Connecting with another GCS
You can attach multiple additional ground control stations to SITL from MAVProxy. The simulated vehicle can then be controlled and viewed through any attached GCS.
First use the output command on the MAVProxy command prompt to
determine where MAVProxy is sending packets:
GUIDED> output
GUIDED> 2 outputs
0: 127.0.0.1:14550
1: 127.0.0.1:14551
This tells us that we can connect Mission Planner to either UDP port 14550 or 14551, as shown on the dialog below.
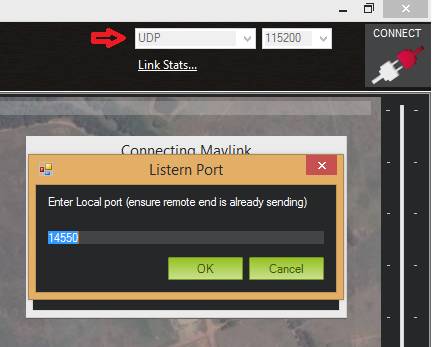
Mission Planner: Connecting to a UDPPort
Tip
We could connect APM Planner 2 to the remaining port. If we needed a third port, we could add it as shown:
GUIDED> output add 127.0.0.1:14553
Mission Planner can then be used to control the simulated vehicle in exactly the same way as though it were a real vehicle. We can reproduce the previous “takeoff-circle-land” example as shown below:
Change to GUIDED mode, arm the throttle, and then takeoff
Open the FLIGHT DATA screen and select the Actions tab on the bottom left. This is where we can change the mode and set commands.

Mission Planner: Actions Tab (Set Mode, Arm/Disarm)
Select Guided in the Mode selection list and then press the Set Mode button.
Select the Arm/Disarm button
Right-click on the map and select Takeoff. Then enter the desired takeoff altitude
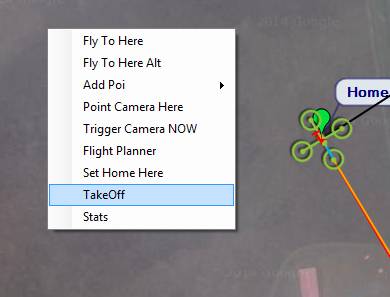
Mission Planner Map: Takeoff Command
Note
Takeoff must start within 15 seconds of arming, or the motors will disarm.
Change to CIRCLE mode on the Action tab and watch the copter circle on the map.
You can change the circle radius in the CONFIG/TUNING screen. Select Full Parameters List, then the Find button and search for
CIRCLE_MODE. When you’ve changed the value press the Write Params button to save them to the vehicle.When you’re ready to land you can set the mode to RTL.
Running SITL with a GCS without MAVProxy
It is also possible to interact with SITL without using MAVProxy at all using ArduCopter.elf (in the ArduCopter directory).
Run the file in the Cygwin Terminal, specifying a home position and vehicle model as shown below:
hamis_000@XPS12ultra ~/ardupilot/ArduCopter
$ ./ArduCopter.elf --home -35,149,584,270 --model quad
Started model quad at -35,149,584,270 at speed 1.0
Starting sketch 'ArduCopter'
Starting SITL input
bind port 5760 for 0
Serial port 0 on TCP port 5760
Waiting for connection ....
The command output shows that you can connect to SITL using TCP/IP at port 5760.
In Mission Planner we first change the link type to TCP and then press the Connect button. Click through the remote host and remote Port prompts as these default to the correct values.

Mission Planner: Connecting toSITL using TCP
Mission Planner will then connect and can be used just as before.
Tip
ArduCopter.elf has other startup options, which you can use using the -h command line parameter:
./ArduCopter.elf -h
Updating ArduPilot
See advice on this wiki page regarding how to “Rebase” on ArduPilot’s master branch.
Updating MAVProxy
Warning
The MAVProxy 1.4.19 *installer does not properly remove all parts of preceding installations. Before installing a new version you must first delete the old directory: C*:\Program Files (x86)\MAVProxy\**.
Download and Install MAVProxy for Windows (this link always points to the latest version!)
Next steps
SITL and MAVProxy can do a whole lot more than shown here, including manually guiding the vehicle, and creating and running missions. To find out more:
Read the MAVProxy documentation.
See Using SITL for ArduPilot Testing for guidance on flying and testing with SITL.
Troubleshooting
Some users have reported build errors related to Windows not setting paths correctly. For more information see this issue.