Cartographer SLAM for Non-GPS Navigation
This page shows how to setup ROS and Google Cartographer SLAM using an RPLidarA2 lidar to provided a local position estimate for ArduPilot so that it can operate without a GPS.
These instructions were tested on an NVidia TX2 flashed with APSync and then ROS and MAVROS were installed as described here.
Note
these pages are a work-in-progress
Mounting the RPLidar and Pixhawk

The RPLidar should be oriented so that its USB cable wire is pointing forward in the same direction as the arrow on the flight controller.
The USB cable should be plugged into a USB port on the companion computer running ROS.
Check the RPLidar’s serial port
plug the RPLidarA2 into the companion computer. If using a TX2 mounted on an AUVidea J120 board, ensure the lidar is plugged into the lower USB port.
ls -l /dev/tty*
the lidar should appear as /dev/ttyUSB0 or /dev/ttyACM0.
if you type “lsusb” the device should also be listed as “Cygnal Integrated Products, Inc. CP210x UART Bridge / myAVR mySmartUSB light”
allow anyone to read from the device by entering just one of the following two commands depending upon which serial port was found above
sudo usermod -a -G dialout
Install more packages
install the ROS desktop full:
sudo apt-get install ros-<distro>-desktop
OR install each of these individual packages (this list is not yet complete):
sudo apt-get install ros-<distro>-tf ros-<distro>-tf-conversions ros-<distro>-laser-geometry
sudo apt-get install ros-<distro>-cv-bridge ros-<distro>-image-transport
sudo apt-get install qt4-qmake qt4-dev-tools
sudo apt-get install protobuf-compiler
Create a Catkin WorkSpace
In your home directory:
cd $HOME
mkdir -p catkin_ws/src
cd catkin_ws
catkin_init_workspace
Install RPLidar node
Install the RPLidar node in the workspace
cd $HOME/catkin_ws/src
git clone https://github.com/Slamtec/rplidar_ros.git
Install Google Cartographer
Install some more packages
sudo apt-get install python-wstool python-rosdep ninja-build
Re-initialise the workspace with wstool then merge the cartographer_ros.rosinstall file and fetch code for dependencies.
cd $HOME/catkin_ws
wstool init src
wstool merge -t src https://raw.githubusercontent.com/googlecartographer/cartographer_ros/master/cartographer_ros.rosinstall
wstool update -t src
Install proto3 and deb dependencies
src/cartographer/scripts/install_proto3.sh
sudo rosdep init   # if error message appears about file already existing, just ignore and continue
rosdep update
rosdep install --from-paths src --ignore-src --rosdistro=${ROS_DISTRO} -y
Clone the Robot Pose Publisher package into the workspace
cd $HOME/catkin_ws/src
git clone https://github.com/GT-RAIL/robot_pose_publisher.git
Create the cartographer_ros launch file using your favourite editor (like “gedit”)
cd $HOME/catkin_ws/src/cartographer_ros/cartographer_ros/launch
gedit cartographer.launch
Copy-paste the contents below into the file
<launch>
   <param name="/use_sim_time" value="false" />
   <node name="cartographer_node"
         pkg="cartographer_ros"
         type="cartographer_node"
         args="-configuration_directory $(find cartographer_ros)/configuration_files -configuration_basename cartographer.lua"
         output="screen">
         <remap from="odom" to="/mavros/local_position/odom" />
         <remap from="imu" to="/mavros/imu/data" />
   </node>
   <node name="cartographer_occupancy_grid_node"
         pkg="cartographer_ros"
         type="cartographer_occupancy_grid_node" />
   <node name="robot_pose_publisher"
         pkg="robot_pose_publisher"
         type="robot_pose_publisher"
         respawn="false"
         output="screen" >
         <param name="is_stamped" type="bool" value="true"/>
         <remap from="robot_pose" to="/mavros/vision_pose/pose" />
   </node>
   <node pkg="tf" type="static_transform_publisher" name="base_to_laser_broadcaster" args="0 0 0 0 0 0 base_link laser 100" />
</launch>
Create the cartographer.lua script using our favourite editor (like “gedit”)
cd $HOME/catkin_ws/src/cartographer_ros/cartographer_ros/configuration_files
gedit cartographer.lua
Copy-paste the contents below into the file
include "map_builder.lua"
include "trajectory_builder.lua"

options = {
  map_builder = MAP_BUILDER,
  trajectory_builder = TRAJECTORY_BUILDER,
  map_frame = "map",
  tracking_frame = "base_link",
  published_frame = "base_link",
  odom_frame = "odom",
  provide_odom_frame = true,
  publish_frame_projected_to_2d = false,
  use_odometry = false,
  use_nav_sat = false,
  use_landmarks = false,
  num_laser_scans = 1,
  num_multi_echo_laser_scans = 0,
  num_subdivisions_per_laser_scan = 1,
  num_point_clouds = 0,
  lookup_transform_timeout_sec = 0.2,
  submap_publish_period_sec = 0.3,
  pose_publish_period_sec = 5e-3,
  trajectory_publish_period_sec = 30e-3,
  rangefinder_sampling_ratio = 1.,
  odometry_sampling_ratio = 1.,
  fixed_frame_pose_sampling_ratio = 1.,
  imu_sampling_ratio = 1.,
  landmarks_sampling_ratio = 1.,
}

MAP_BUILDER.use_trajectory_builder_2d = true

TRAJECTORY_BUILDER_2D.min_range = 0.05
TRAJECTORY_BUILDER_2D.max_range = 30
TRAJECTORY_BUILDER_2D.missing_data_ray_length = 8.5
TRAJECTORY_BUILDER_2D.use_imu_data = false
TRAJECTORY_BUILDER_2D.ceres_scan_matcher.translation_weight = 0.2
TRAJECTORY_BUILDER_2D.ceres_scan_matcher.rotation_weight = 5
TRAJECTORY_BUILDER_2D.use_online_correlative_scan_matching = true
TRAJECTORY_BUILDER_2D.real_time_correlative_scan_matcher.linear_search_window = 0.1
TRAJECTORY_BUILDER_2D.real_time_correlative_scan_matcher.translation_delta_cost_weight = 1.
TRAJECTORY_BUILDER_2D.real_time_correlative_scan_matcher.rotation_delta_cost_weight = 10
TRAJECTORY_BUILDER_2D.motion_filter.max_angle_radians = math.rad(0.2)
-- for current lidar only 1 is good value
TRAJECTORY_BUILDER_2D.num_accumulated_range_data = 1

TRAJECTORY_BUILDER_2D.min_z = -0.5
TRAJECTORY_BUILDER_2D.max_z = 0.5

POSE_GRAPH.constraint_builder.min_score = 0.65
POSE_GRAPH.constraint_builder.global_localization_min_score = 0.65
POSE_GRAPH.optimization_problem.huber_scale = 1e2
POSE_GRAPH.optimize_every_n_nodes = 30

return options
Note
Instead of manually modifying the above packages, clone this repository and install the dependencies.
Build the Packages
cd $HOME/catkin_ws
catkin build
source devel/setup.bash
Start Cartographer
Plug the RPLidarA2 into the companion computer and then open up four terminals and in each terminal type:
cd catkin_ws
source devel/setup.bash
Then in Terminal1:
roscore
In Terminal2:
roslaunch rplidar_ros rplidar.launch
In Terminal3:
roslaunch cartographer_ros cartographer.launch
In Terminal4:
Start mavros as described on the Connecting with ROS page which involves running a command like below:
roslaunch mavros apm.launch fcu_url:=udp://:14855@
Configure ArduPilot
Connect to the flight controller with a ground station (i.e. Mission Planner) and check that the following parameters are set as shown below:
AHRS_EKF_TYPE = 3 to use EKF3
EK2_ENABLE = 0 to disable EKF2
EK3_ENABLE = 1 to enable EKF3
EK3_SRC1_POSXY = 6 to set position horizontal source to ExternalNAV
EK3_SRC1_POSZ = 1 to set position vertical source to Baro
EK3_SRC1_VELXY = 6 to set velocity horizontal source to ExternalNAV
EK3_SRC1_VELZ = 6 to set vertical velocity source to ExternalNAV
EK3_SRC1_YAW = 6 to set yaw source to ExternalNAV
GPS1_TYPE = 0 to disable the GPS
VISO_TYPE = 1 to enable visual odometry
ARMING_SKIPCHK = 8 (optional, to disable GPS checks)
After changing any of the values above, reboot the flight controller.
If all is working, vision position estimates should begin flowing in from ROS to ArduPilot. This can be confirmed by connecting to the flight controller using the Mission Planner (or similar) and check the Flight Data screen’s Messages tab (bottom left) for messages from the EKF like below:
EKF2 IMU1 initial pos NED = 0.0,0.0,0.0 (m)
EKF2 IMU1 is using external nav data
EKF2 IMU0 initial pos NED = 0.0,0.0,0.0 (m)
EKF2 IMU0 is using external nav data
Using the Mission Planner (or similar) go to the Flight Data screen and right-mouse-button click on the map and select “Set Home Here” >> “Set EKF Origin”. The vehicle should appear immediately on the map where you clicked.
Testing
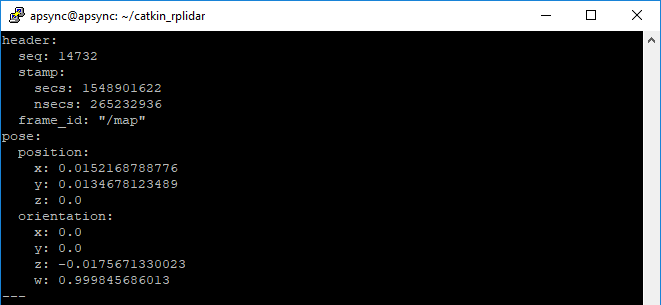
To confirm the ROS side is working correctly type the command below and live updates of position estimates from cartographer should be displayed
rostopic echo /robot_pose
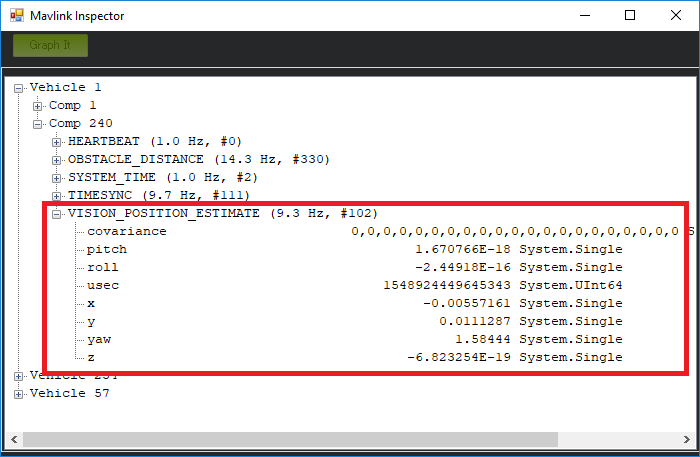
Mission Planner’s MAVLink Inspector (press Ctrl-F and then press the “MAVLink Inspector” button) can be used to check if VISION_POSITION_ESTIMATE messages are being successfully sent to the flight controller
Video
Note
We are keen to improve ArduPilot’s support of ROS so if you find issues (such as commands that do not seem to be supported), please report them in the ArduPilot issues list with a title that includes “ROS” and we will attempt to resolve them as quickly as possible.