ROS 2 on Raspberry Pi
Note
ROS2 (via DDS) is not part of the standard ArduPilot build. Use the Custom Build Server and ensure “MicroXRCE DDS support for ROS 2” is checked.
Purpose
Learn how to install the ROS onto a companion computer and run a sample ROS 2 application that communicated with ArduPilot over Micro XRCE DDS. For this demonstration, a Raspberry Pi Zero 2W will be used, however other Linux computers are also capable.
Required Hardware
A Linux computer to flash an SD card and configure the Pi
Initial Configuration
For the first section, we will follow Ubuntu’s tutorial , with specifics noted below.
Use rpi-imager.
When selecting the operating system, we will install Ubuntu 22 Server. Find it in “Other general-purpose OS -> Ubuntu -> Ubuntu Server 22.04.5 LTS (64-bit) which is supported by ROS 2 humble. When prompted to do “OS Customisation”, select that.
In “General”, Configure wireless LAN
In “Services”, enable SSH
Save and flash the image onto the device
Install the SD card, let it boot for 2 minutes, then either through a HDMI display and keyboard, or by plugging the Pi’s SD card back into your computer, edit the file:
/etc/avahi/avahi-daemon.conf and change the line that has publish-workstation to publish-workstation=yes.
Now, put the SD card back into the Pi, boot it up with the USB, and you can now connect.
# Find the address of the PI
avahi-resolve -n ubuntu.local
# SSH into it (the first time)
ssh ubuntu@ubuntu.local
Once you SSH, create your username and password, and test you can still login, it’s time to set up ROS 2. We’ll install all the packages before it’s wired into the drone.
ROS 2 Install
When using Ubuntu 22.04, it’s easiest to install ROS 2 through binaries.
First off, if you can’t use apt update due to “Waiting for cache lock: Could not get lock /var/lib/dpkg/lock-frontend. It is held by process 912 (unattended-upgr)”,
try removing unattended upgrades
sudo systemctl stop unattended-upgrades
sudo apt-get purge unattended-upgrades
When installing ROS 2, install ros-humble-ros-base and ros-dev-tools.
Finally, source the ROS environment automatically by adding it to your .bashrc:
LINE='source /opt/ros/humble/setup.bash'
FILE=~/.bashrc
grep -qF -- "$LINE" "$FILE" || echo "$LINE" >> "$FILE"
. $FILE
Finally, check you have the ROS 2 CLI:
ros2 --help
Serial Connection
Now, wire a serial connection to your flight controller. Ensure your power supply is capable of powering the Pi Zero 2W. The simplest solution is to wire an open telemetry port.
Warning
Do not abuse the power supply for the flight controller. For robust applications, it is recommended to power non-flight-critical devices, such as a Raspberry Pi, with a separate 5V power supply. Although many flight controller power supplies may support the power draw of a Raspberry Pi Zero 2W, a problem on the PI can bring down the entire vehicle.
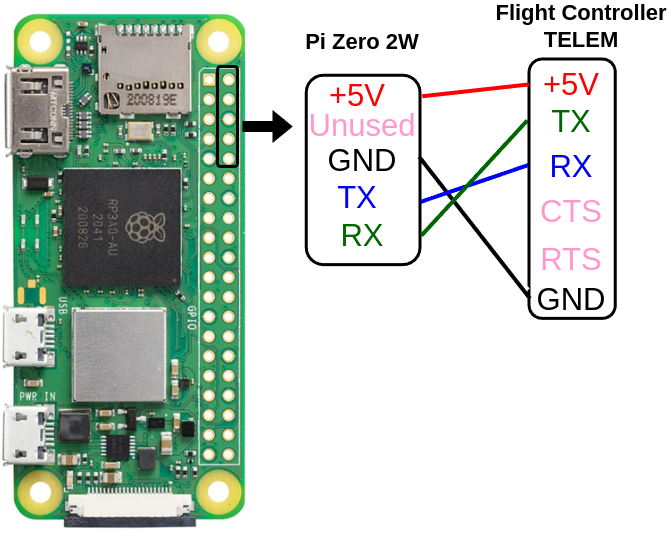
This allow GPIO14 and GPIO15 (/dev/ttySO) to communicate with ArduPilot.
Cross Compile an application with Docker
In order to run applications on a Raspberry Pi, we can cross compile them for the ARM architecture. Docker allows an easy way to cross compile. Because of the Pi’s limited memory, it is not recommended to attempt compiling on target hardware. If you have a more powerful computer, see the next section for direct compilation on ARM64.
First, create a dockerfile like so on your laptop called Dockerfile
FROM arm64v8/ros:humble

RUN --mount=target=/var/lib/apt/lists,type=cache,sharing=locked \
    --mount=target=/var/cache/apt,type=cache,sharing=locked \
    apt-get update && apt-get -y --no-install-recommends install \
        git cmake build-essential

WORKDIR /ws
RUN git clone  --depth 1 --branch humble https://github.com/micro-ROS/micro-ROS-Agent.git
WORKDIR /ws/micro-ROS-Agent
RUN --mount=target=/var/lib/apt/lists,type=cache,sharing=locked \
    --mount=target=/var/cache/apt,type=cache,sharing=locked \
    apt-get update && \
    rosdep update && \
    rosdep install --from-paths . --ignore-src -y --dependency-types build && \
    apt-get -y --no-install-recommends install ros-humble-fastcdr

RUN . /opt/ros/humble/setup.sh && colcon build
Next, use Docker’s multi-platform build support to set up a cross compile in an ARM64v8 environment: https://docs.docker.com/build/building/multi-platform/#install-qemu-manually
docker run --privileged --rm tonistiigi/binfmt --install all
cat /proc/sys/fs/binfmt_misc/qemu-arm | grep flags
Now, the following steps build the docker image and copy the ROS 2 install directory to the target.
# Build with multiplatform support.
docker build . --platform linux/arm64 -t micro_ros_agent

# Copy the installation directory from the docker image to the host.
docker create --name dummy micro_ros_agent
docker cp dummy:/ws/micro-ROS-Agent/install install
docker rm -f dummy

# And now, from host to target's home directory, but ignore COLCON_IGNORE.
rsync -aRv --exclude install/COLCON_IGNORE install ubuntu@ubuntu.local:/home/ubuntu
Installing Dependencies
Although we have copied the executable(s) over, the runtime dependencies are not installed.
Let’s use rosdep to install those.
The target only needs runtime dependencies, which are denoted with tag exec.
After SSH’ing into the target, run:
cd ~
sudo rosdep init
apt update
rosdep update
rosdep install --from-paths install --dependency-types exec
Compiling the Micro ROS agent directly on ARM64
Instead of cross compiling, some more powerful companion computers can support local compilation.
Note
Instructions coming soon
Test the Micro ROS Agent
Now that you have a cross-compiled installation of the Micro ROS Agent along with its dependencies, let’s check we can run it.
source ~/install/setup.bash
ros2 run micro_ros_agent micro_ros_agent serial -v4 -b 115200 -D /dev/ttyS0
Starting the Micro ROS Agent automatically
Rather than having to SSH into the companion computer and manually start all ROS 2 nodes in terminal, let’s use systemd to start the service automatically on boot. For this tutorial, we will use systemd user services because they do not require root to run.
First, create a script on the companion computer that sources the ROS 2 workspace and runs the Micro ROS Agent.
mkdir -p ~/.config/systemd/user
nano ~/.config/systemd/user/micro-ros-agent.service
Place the following contents inside:
[Unit]
Description=Micro-ROS Agent over serial /dev/ttyS0
After=network-online.target
Wants=network-online.target

[Service]
WorkingDirectory=/home/ubuntu
Type=simple
ExecStart=/home/ubuntu/.local/lib/start-micro-ros-agent.sh
Restart=on-failure

[Install]
WantedBy=default.target
Note
If you are not using ubuntu as your username, be sure to change the WorkingDirectory and ExecStart fields above!
Also, create the start script:
mkdir -p ~/.local/lib/
nano ~/.local/lib/start-micro-ros-agent.sh
And, place the following script inside:
#!/bin/bash

source "$HOME/install/setup.bash"
exec ros2 run micro_ros_agent micro_ros_agent serial -v4 -b 115200 -D /dev/ttyS0
Finally, make it executable, reload services, and start the new Micro ROS Agent systemd service.
chmod +x ~/.local/lib/start-micro-ros-agent.sh
systemctl --user daemon-reload
systemctl --user enable micro-ros-agent.service
systemctl --user start micro-ros-agent.service
systemctl --user status micro-ros-agent.service
The MicroROS agent should show it has started. It is now waiting on a connection from the autopilot. Once the autopilot is configured for the same baud rate as the Micro ROS Agent, it should connect.
Because systemctl user services won’t start until someone logs in, enable linger for login.
loginctl enable-linger $USER
Once you start adding more service, you can check status like so:
systemctl --user status
Now, reboot, and verify your systemd service is up.
Coming Soon
Building and installing your own nodes alongside the Micro ROS Agent
Using DroneBridge as an alternative DHCP Server
Compiling ArduPilot with DDS, applying a custom hwdef to tune rates, and configuring parameters
Using the CLI to subscribe to topics on the remote laptop and ARM64 target
References
For more information on any of the above content, see the following references: