Communicating with ODroid via MAVLink
Overview
This page introduces how to connect and configure an ODROID U3 (Discontinued) , ODROID-C1+ or ORDOID-XU4 so that it is able to communicate with a Pixhawk flight controller using the MAVLink protocol over a serial connection. The capabilities are very similar to the Raspberry Pi except that the ODroid has a much faster CPU (performance is roughly 10x faster than the RPi).

Recommended parts
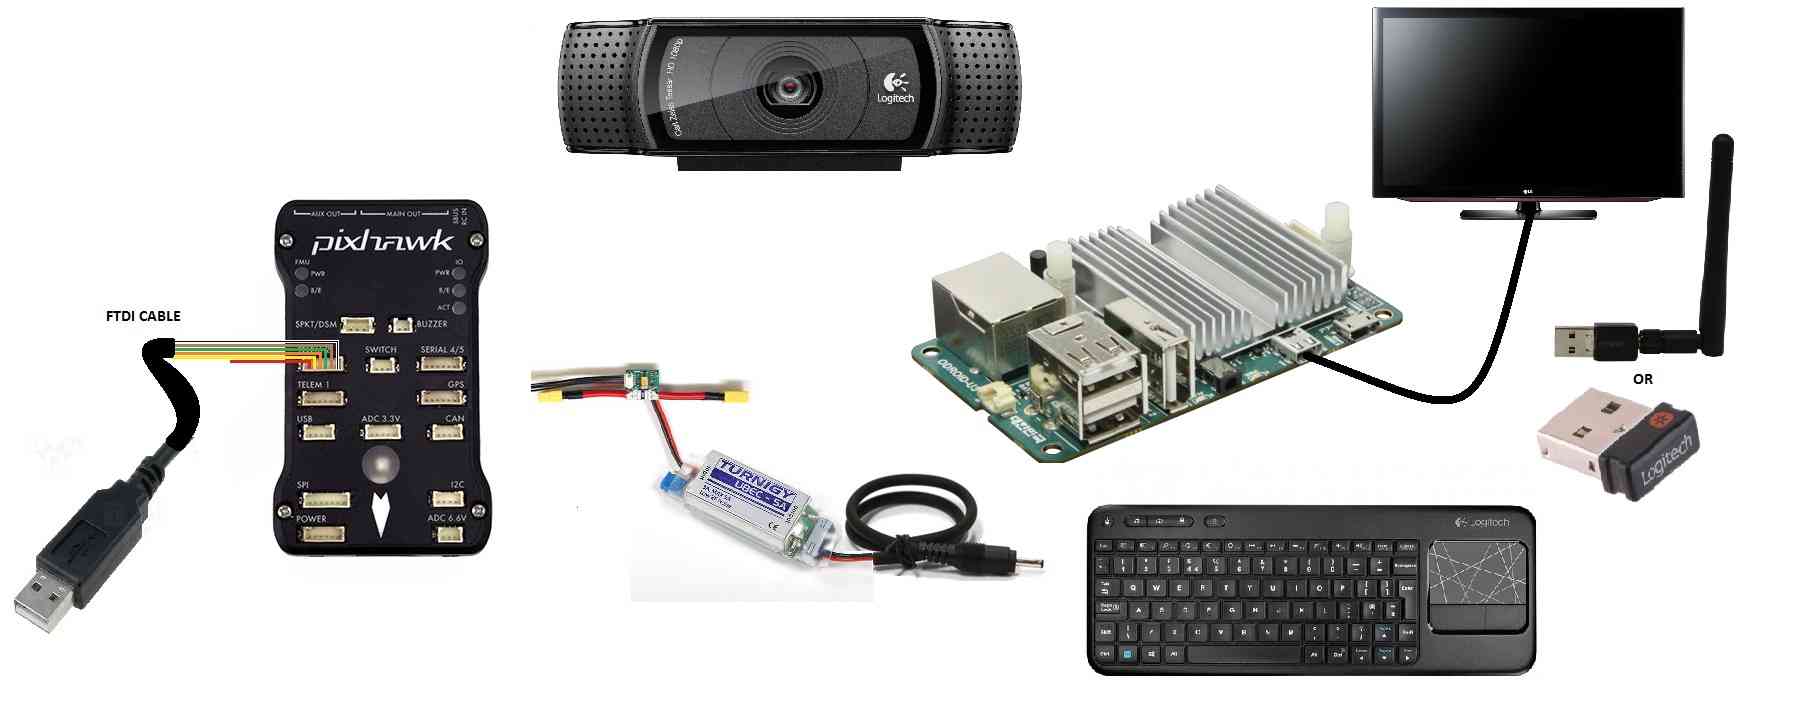
These parts are required:
ODROID board (ODROID-C1+, ORDOID-XU4 or ODROID U3 (Discontinued))
8GB MicroSD Card OR 8GB eMMC Module preloaded with Linux (the EMMC module is about 4x faster which may be useful for image processing)
FTDI Cable or USB to Serial interface like this. This link provides an overview of USB-TTL modules.
These optional items may also be useful:
Logitech HD Pro Webcam C920 is the recommended camera for image processing applications because it natively encodes images using the h264 format.
Note
The usable resolution of this webcam is limited to 640 x 480 (or perhaps 1280 x 720) because no official Linux driver has been written for this camera yet.
HDMI Type-A cable in case you wish to connect the ODroid to a computer monitor
Wifi module if you wish to connect to the ODroid from your desktop computer using WiFi
Serial Debug cable if you wish to connect to the ODroid console with a direct connection to your desktop computer
Cat6 cable for connection while on the ground
Initial ODROID Setup
It is easier to manage the odroid after it has a connection to your network. We’ve used the following steps to complete the initial setup of the board:
Discovering IP Address
Using Keyboard/Mouse/Monitor
Plug the preloaded eMMC or MicroSD card into the board
(Temporarily) attach a mouse and keyboard to the USB ports
Plug power into the board (at this point the boot LED should light up blue)
Attach micro-HDMI cable to the board (this must be done after the board starts to boot, or the monitor may backpower the board / keeping it from booting)
A text menu will appear
Choose advanced settings and enable the SSH server
Choose the option to expand the root filesystem to fill the card
Select save and reboot
The board will reboot into a fairly standard looking Ubuntu
Go to the network setup icon in the upper right and join your wifi network
Type “ifconfig” to see the IP address your board was assigned
Using command line
You can discover the ip address of devices on your network using a utility called nmap
$ sudo nmap -sn 10.0.1.0/24
This will return a list of discovered devices on your network for and you will see an entry like
*(this example is RPi - will update to ODROID)
Nmap scan report for 10.0.1.17
Host is up (0.00056s latency).
MAC Address: B8:27:EB:0A:26:9D (Raspberry Pi Foundation)
Common Setup with known IP Address
From some other computer type “ssh -Y odroid@IPADDRESS” with password odroid. Confirm you can login and get a ssh shell
At an odroid shell type “sudo adduser odroid dialout” - this gives the odroid account access to the serial (pixhawk) port.
At an odroid shell type “sudo adduser odroid plugdev” - this gives the odroid account access to the USB camera.
Now you can unplug the keyboard/mouse/hdmi cables and just use ssh if you want. As long as you use the -Y option with SSH you can even run graphical applications on the odroid and they will appear on your desktop computer (assuming you are running something that understands X-Windows)
Connecting the Pixhawk and ODroid
If using an FTDI cable, connect as shown in the picture below, DO NOT connect the power wire.

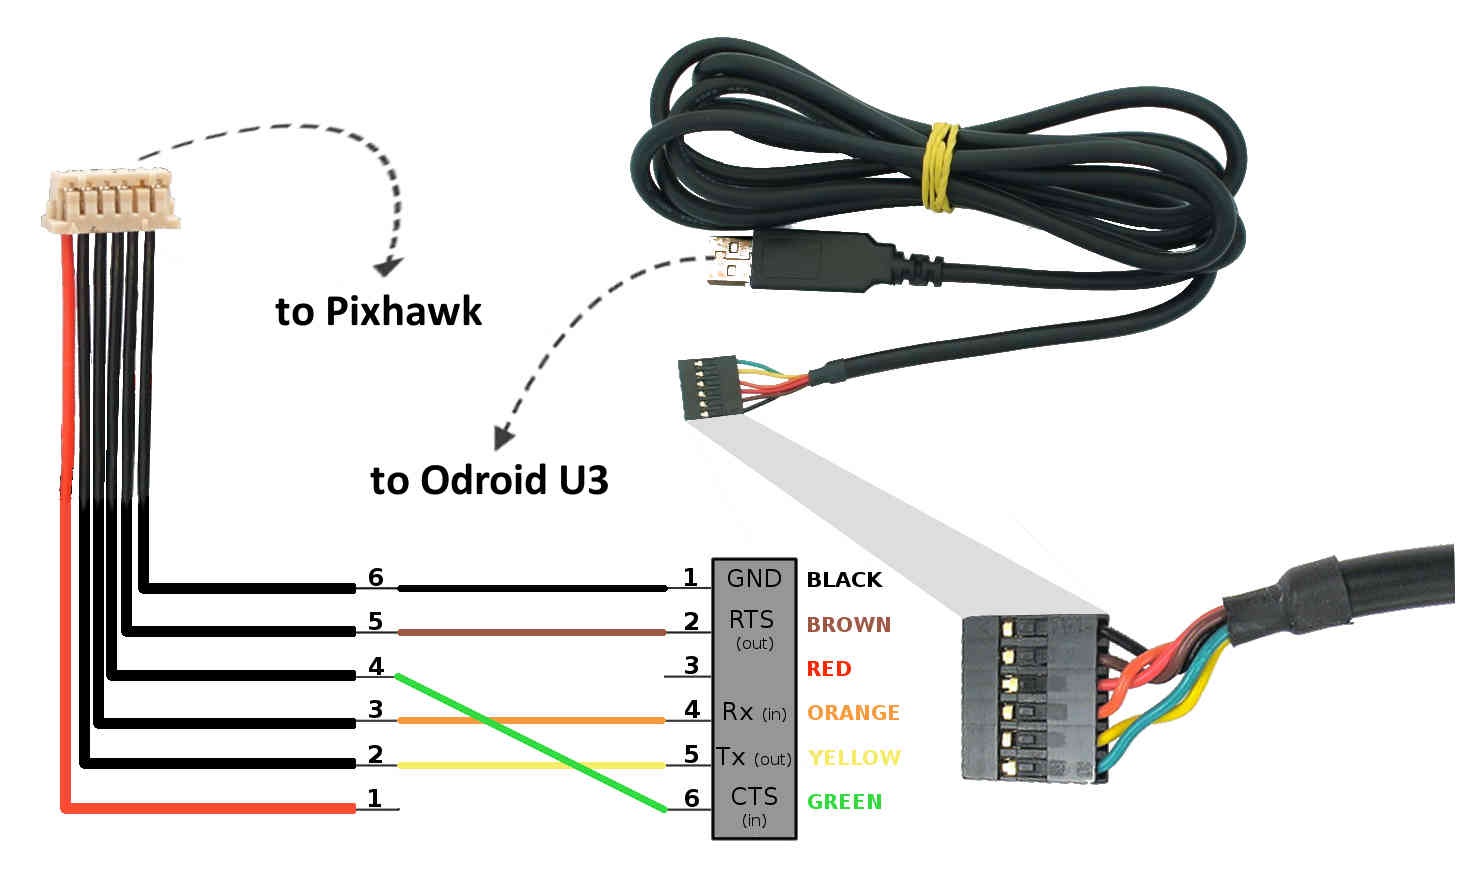
Odroid FTDI/USB cable (detailview)
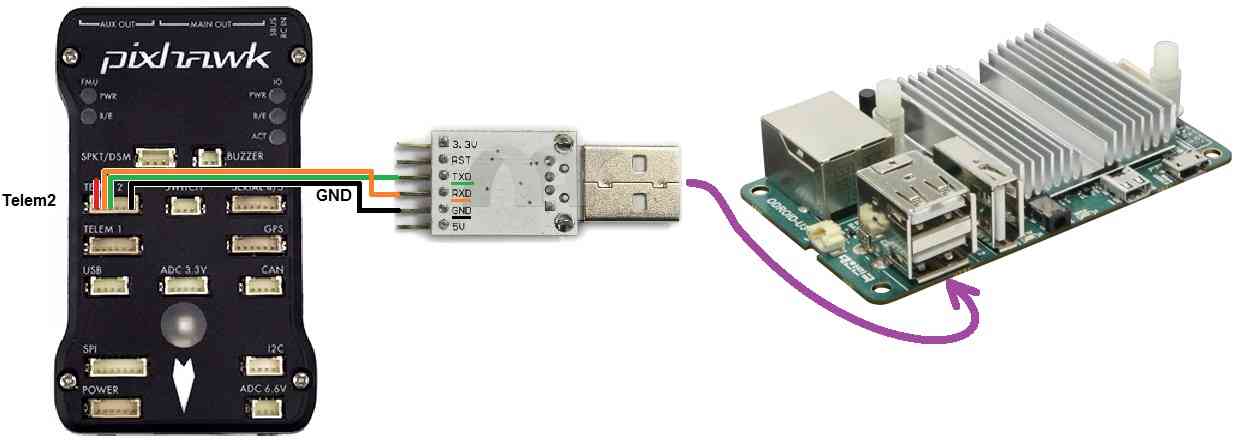
If using a USB to Serial interface, connect as shown below.
Power connections are shown below:
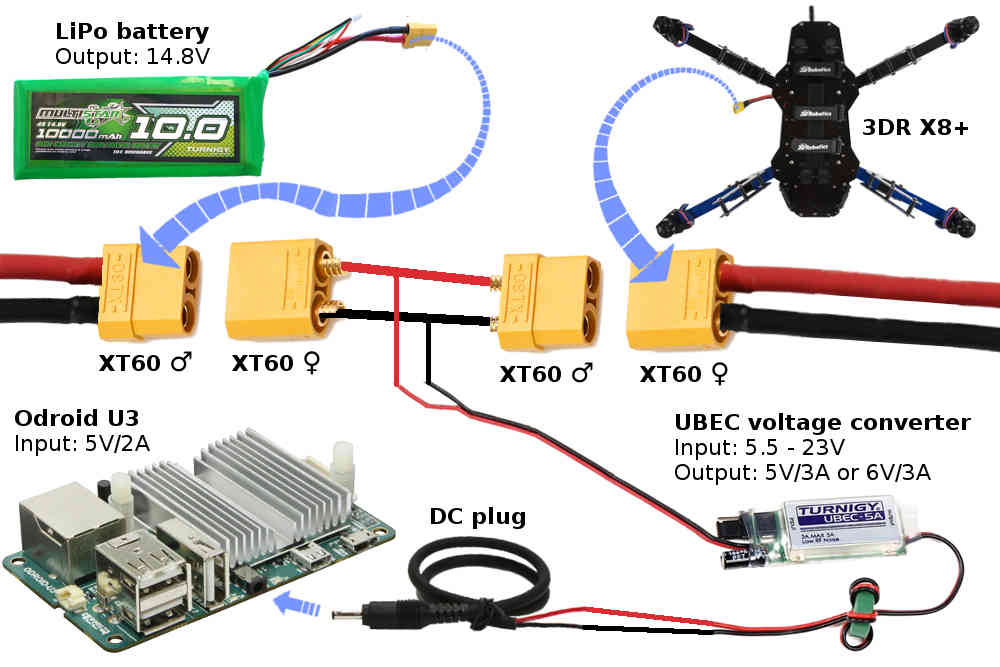
Odroid Power Connections
Connecting to ODroid with an SSH/Telnet client
Installing the required packages
This assumes you have a SSH connection to the Pi.
See the MAVProxy Documentation for install instructions
Testing the connection
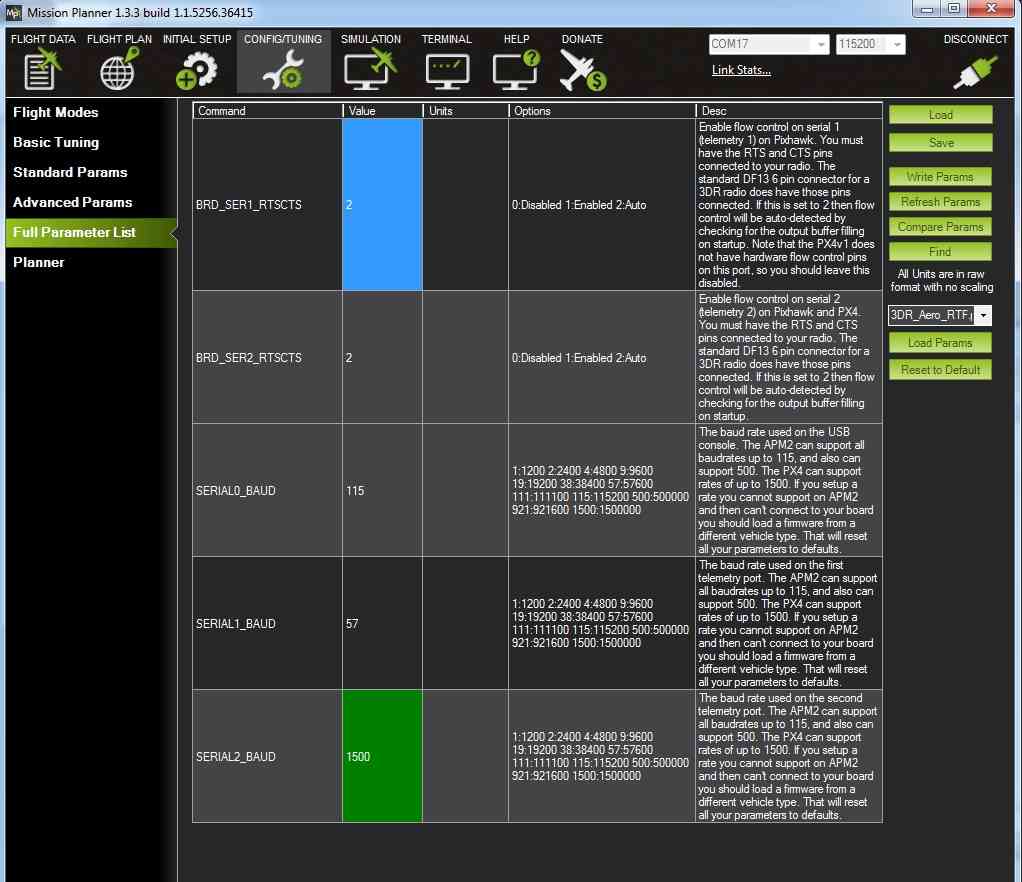
Before attempting this, you will need to connect to your Pixhawk via mission planner with the USB cable.
Set SERIAL2_BAUD (telemetry 2 baud rate) to 1500 (1.5Mbit)
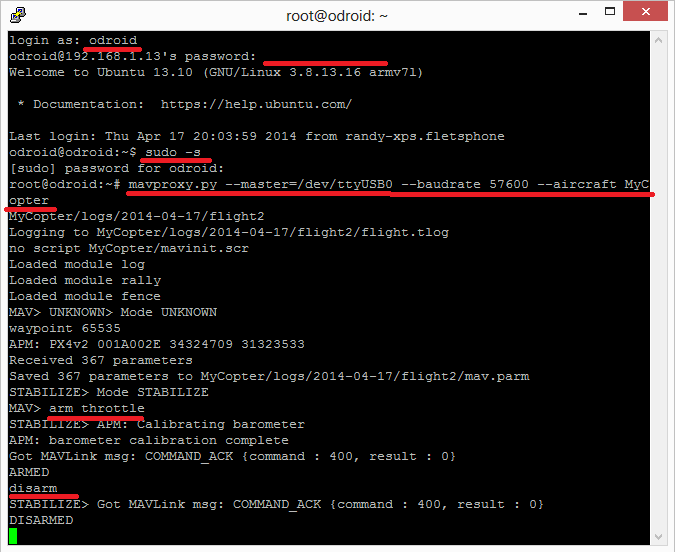
To test the ODroid and Pixhawk are able to communicate with each other first ensure both are powered, then in a console on the Odroid type:
mavproxy.py --master=/dev/ttyUSB0 --baudrate 1500000 --aircraft MyCopter
once mavproxy has started you should be able to type in the following commands to arm and then disarm the copter.
arm throttle
disarm
Configure mavproxy to always run
This is accomplished by adding the following to the end of your “/home/odroid/.bashrc” file. The Pixhawk is connected via “ttyUSB0”. The last section of the file should look like below. Change the IP address to that of your ground station (this also starts the balloon finder, comment that line out if you don’t want it to run)
export PATH=$PATH:$HOME/GitHub/ardupilot-balloon-finder
export PATH=$PATH:$HOME/GitHub/ardupilot-balloon-finder/scripts
export PYTHONPATH=$PYTHONPATH:$HOME/GitHub/ardupilot-balloon-finder/scripts
if screen -list | grep -q "MavProxy"; then
 echo "MavProxy is already running"
else
 cd /home/odroid
 screen -S MavProxy -d -m -s /bin/bash mavproxy.py --master=/dev/ttyUSB0 --baudrate 1500000 --out 192.168.1.11:14550 --aircraft MyCopter
 python /home/odroid/GitHub/ardupilot-balloon-finder/scripts/colour_finder_web.py
 echo "started MavProxy type screen -x to view"
fi
Connecting with the Mission Planner
Example Projects
Red Balloon Finder
The Red Balloon Finder project was written to enable an Odroid to control an Copter based quadcopter to hunt down and pop 1m red balloon for the Sparkfun 2014 AVC. The python code that runs on the odroid can be found here. The slightly modified Copter-3.2 code can be found here. Installation instructions are below.
Set the following parameters on the Pixhawk:
SERIAL2_BAUD to 921 (921600 bits per sec)
SR2_EXTRA1 to 20 (20hz update rate for attitude from Pixhawk to Odroid)
Create a home/odroid/GitHub directory where we will install the required source code:
cd /home/odroid/
mkdir GitHub
cd GitHub
Type the following commands to download the ardupilot-balloon-finder source code:
git clone https://github.com/rmackay9/ardupilot-balloon-finder.git
Add the ardupilot-balloon-finder to the PATH and PYTHONPATH by doing the following:
cd /home/odroid/
nano .bashrc     #Note that "nano" can be replaced by your favourite editor such as "vi"
scroll to the bottom of the file and add the following as the very last items
export PATH=$PATH:$HOME/GitHub/ardupilot-balloon-finder
export PATH=$PATH:$HOME/GitHub/ardupilot-balloon-finder/scripts
export PYTHONPATH=$PYTHONPATH:$HOME/GitHub/ardupilot-balloon-finder/scripts
Drone API
To install the latest Drone API, run the following:
sudo pip install --upgrade droneapi
next setup mavproxy to start the DroneAPI each time it is started:
nano /home/odroid/MyCopter/.mavinit.scr
then add the following to the file (correct the path of the balloon_strategy.py to your path)
module load droneapi.module.api
api start /home/odroid/GitHub/ardupilot-balloon-finder/scripts/balloon_strategy.py
Cherrypy
Cherrypy is a simply python webserver used by ardupilot-balloon-finder to show what the camera is currently seeing on a web page. Install cherrypy by entering the following in an Odroid terminal:
sudo pip install cherrypy
Can’t get it to work? Try posting your question in the Companion Computer discussion board.