Parachute

This topic describes how to set up manual and automatic parachute release.
Warning
A parachute ejection can be dangerous. This feature should be used with caution
Video above is from Henri’s DIYDrones discussion that led to this feature being added to Copter.
What you will need
A complete parachute mechanism like one of these:
OR if you prefer a DIY solution, parachute release mechanism that can be triggered by a PWM signal (i.e. a Servo) and a parachute large enough to slow your multicopter’s decent to less than 5m/s. Some recommended parachute vendors:
Connecting to the Autopilot
The parachute release mechanism can be triggered from either a Relay or a PWM (i.e. Servo). If a Relay pin is used, use a release mechanism that requires a high output level to trigger, since GPIOs are forced low during the bootloader period, and set the corresponding RELAYx_DEFAULT to OFF or No Change to avoid triggering the release during autopilot initialization.
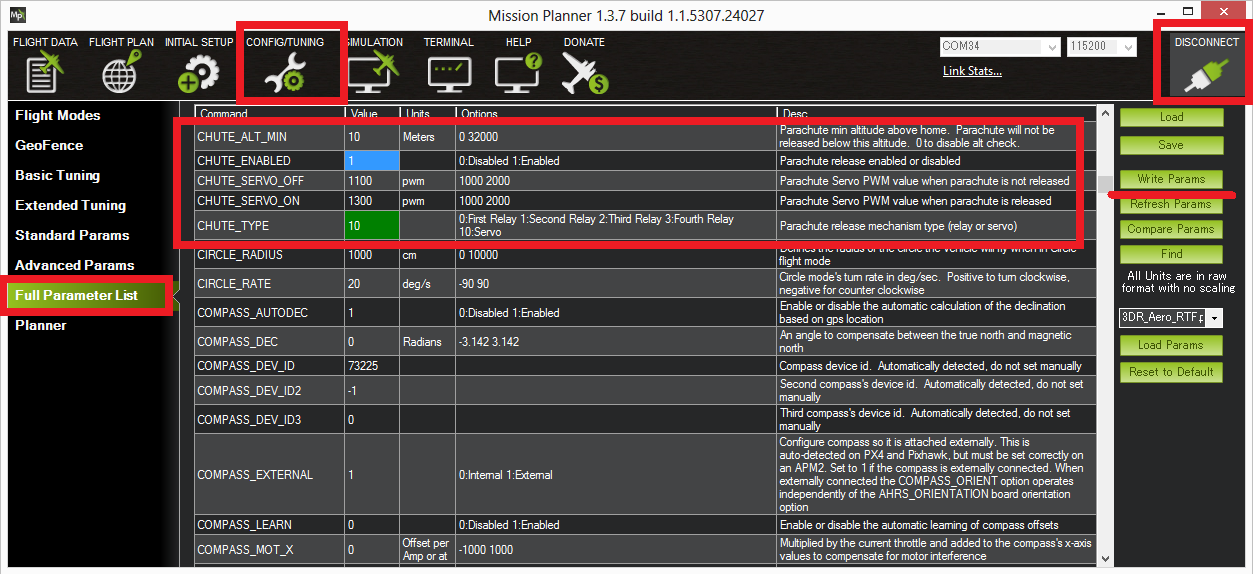
Setup through the Mission Planner
To configure the parachute release, first connect to the autopilot with Mission Planner, and then open the CONFIG->Full Parameter List tab and set the following parameters.
CHUTE_ENABLED = “1”. Then refresh parameters, or reboot, to see the Chute parameters.
CHUTE_CRT_SINK should be set to the sink rate in m/s that will trigger the chute release.
CHUTE_ALT_MIN determines the minimum altitude above HOME required for automatic parachute release to occur when loss of control is first detected .
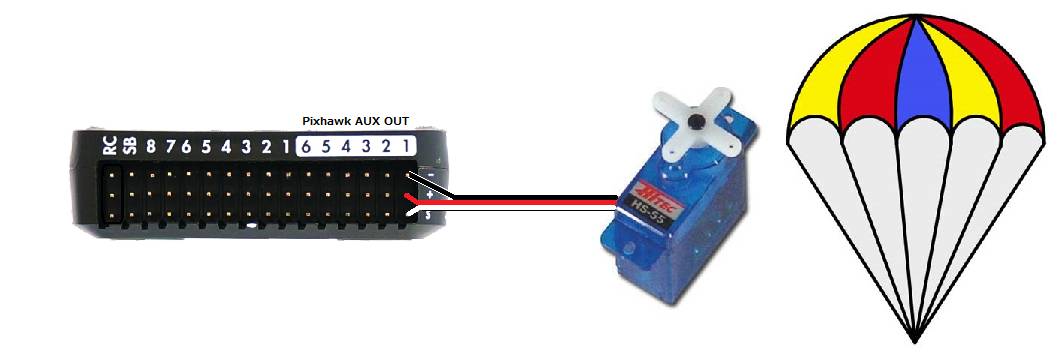
Servo Release
CHUTE_TYPE = “10” to release with a servo
CHUTE_SERVO_ON should be set to the servo position required to release the parachute
CHUTE_SERVO_OFF should be the “resting” servo position. I.e. the position the servo is in before the parachute is released
set SERVO9_FUNCTION = “27”. On autopilots with an IOMCU (Outputs labeled MAIN and AUX),
SERVO9refers to the Pixhawk’s AUX OUT 1. To use AUX OUT2 instead set SERVO10_FUNCTION to 27, etc.
Relay Release
Determine/Configure a pin to be a GPIO (see GPIOs).
Set that pin number as one of the RELAY outputs and assign that relay to the parachute function. For example, for GPIO pin 51 using the first relay, set RELAY1_PIN = 51 and RELAY1_FUNCTION = 3 (Parachute).
Since GPIOs are always set low initially during the bootloader period, to avoid accidental release, always use a release mechanism that needs a high output level to trigger and set.
CHUTE_TYPE = 0 to release with a relay. Set the corresponding relay function parameter, such as RELAY1_FUNCTION (for RELAY1), to 3 (Parachute) to choose which relay output is used.

Manual Release
The pilot can manually release the parachute using an RC channel/switch: set an RCx_OPTION to either 22 (Parachute Release) or 23 (Parachute 3Pos). Either function, when the RC channel is high, above CHUTE_ALT_MIN, and is armed (Copter) or flying (Plane). See following section for requirements.
MAVLink Command Release
The parachute may also be released/enabled/disabled via Ground Control Station command: MAV_CMD_DO_PARACHUTE (cmd id #208). This command has a parameter1 field that determines the action:
param1 |
Action |
|---|---|
0 |
Disable Parachute release |
1 |
Enable Parachute release |
2 |
Release Parachute |
This command can be part of an AUTO mission as a DO_PARACHUTE waypoint.
Failsafe Action
Plane also provides for a parachute release failsafe action for FS_LONG_ACTN and BATTx_FS_CRT_ACT.
Parachute Options
An option to force the release servo or relay to remain active forever (until reboot) once triggered. This used in high altitude situations where the servo or relay may be frozen due to extremely low temperatures, until lower altitude, and warmer temperatures allow operation. This can be enabled by setting the CHUTE_OPTIONS bit 0 high.
Setting bit 1 high of CHUTE_OPTIONS will not disarm the vehicle before releasing the chute.
RC Disable/Enable of Parachute
You can disable or enable parachute release using an RC channel/switch: set an RCx_OPTION to 21. A high position enables parachute release; other positions disable it. If an RCx_OPTION is set to 23 (Parachute 3Pos), the low position disables parachute release, middle position enables operation, and a high will attempt to force release, as explained above, assuming the enabling conditions described below.
When will the parachute deploy?
Automatic parachute release can occur when the vehicle has lost attitude control and has begun falling. The following must all be true for a full 1 second for automatic release to trigger:
The motors are armed (Copter) or flying (Plane)
The vehicle is not landed (Copter only)
The vehicle is not in FLIP or ACRO flight mode (Copter only)
the roll and/or pitch angle of the vehicle is 30 degrees off from the target lean angle (Copter only)
the barometer shows the vehicle is not climbing (excessive baro noise CAN prevent release in some cases) (Copter & Plane)
the vehicle is above the CHUTE_ALT_MIN altitude when loss of control is first detected (Copter only). In a fast descent, the actual release may occur below this altitude. A value of “0” disables this check.
Testing the chute
Depending upon the release mechanism a parachute deployment can be dangerous so please take care when performing these tests, removing the parachute and vehicle propellers as is appropriate.
To test manual deployment:
Enable parachute release, if using a switch to disable release
Set the CHUTE_ALT_MIN parameter to zero to disable the minimum altitude check
Arm the vehicle in stabilize mode and raise the throttle above minimum (disconnect motors or remove props) (not required for Plane)
Use one of the above manual RC channel switch activation methods or use Mission Planner SERVO/RELAY tab to switch the release Relay, MAVLink command, or set the PWM of the release servo.
You should see the motors stop, the parachute release mechanism activate, and if telemetry is attached, “Parachute: Released!” should appear on the Flight Data screen’s HUD.
To test the automatic deployment:
Set the CHUTE_ALT_MIN parameter to zero to disable the minimum altitude check
Arm the vehicle in stabilize mode and raise the throttle above minimum
somehow tilt the vehicle over by at least 30 degrees while lowering it (the barometer shows the vehicle is descending)
After 1 seconds, the motors should stop, the parachute servo will move and if Mission Planner is attached, “Parachute: Released” should appear on the Flight Data screen’s HUD.
After the test is complete, return the CHUTE_ALT_MIN to the desired altitude (default is 10m)