Ethernet Adapters
Ardupilot has the ability to use Ethernet peripherals and networking (see Ethernet / Network Setup). This page includes various switches and adapters known to work
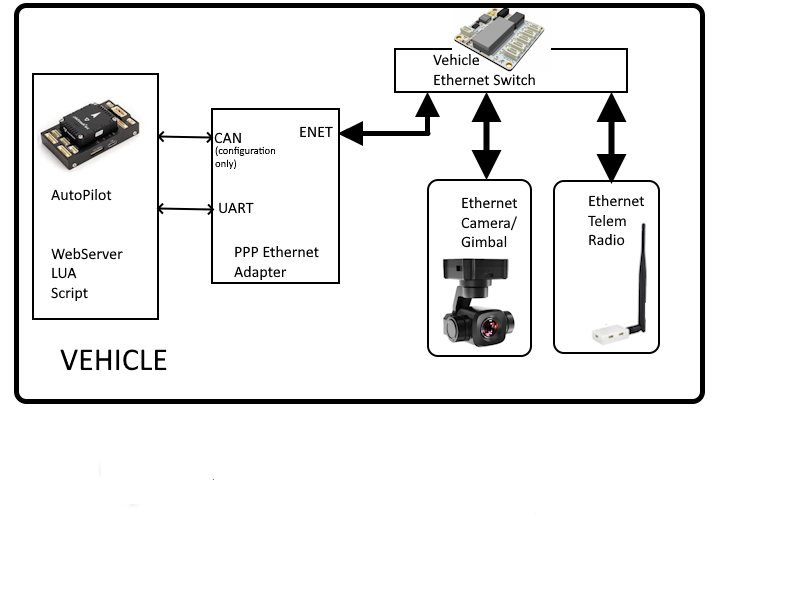
Most H7 based autopilots do not include native ethernet support but ethernet networking capability can be added using an Ethernet Adapter (see BotBlox DroneNet and CubeLAN 8-Port Switch below) which provide connectivity using PPP protocol over the autopilot’s serial port
Hardware
BotBlox SwitchBlox for Ardupilot : ethernet switch to allow connecting multiple devices together
BotBlox DroneNet for Ardupilot : ethernet switch with CAN, USART, RS485, and GPIO/PWM adapters allowing non-ethernet devices including autopilots to work over ethernet
BotBlox SwitchBlox Cable Adapter for Ardupilot : adapter to ease the ethernet port differences across different device manufacturers
CubeNode ETH : serial to ethernet adapter to allow non-ethernet autopilots to work over ethernet using PPP
CubeLAN 8-Port Switch : ethernet switch using the CubePilot preferred 5-pin connector
PPP Setup
PPP capability is not included by default on standard H7 autopilot firmware, so the Custom Firmware Build Server must be used to build an firmware that includes it
Note
if using a local build environment (Building the code), you can include PPP capability by using the \-\-enable-PPP
waf configuration option when building the code for an autopilot locally.
Connect one of the H7 based autopilot’s serial ports to the ethernet switch’s or Ethernet-to-PPP-adapter’s USART port. For optimum performance a serial port with flow control should be used (e.g. normally SERIAL1 or SERIAL2). In the following instructions SERIAL2 is used
Autopilot Setup
See PPP configuration
and ArduPilot Port Configuration
sections of Ethernet / Network Setup. Be sure to set NET_ENABLE = 1 and reboot first. The Ethernet MAC configuration is internal to the Adapter itself.
Adapter Setup
Currently available adapters use DroneCAN to change or setup the Ethernet interface parameters such as MAC and IP addresses, NET mask, etc. Once setup/changed, the DroneCAN connection can be removed, if desired. When attached to a DroneCAN enabled port on the autopilot, you can use Mission Planner or the DroneCAN GUI tool to explore/change its Ethernet parameters.
In addition, it may implement its own Web Browser interface for status and configuration on the network similar to: