X-Plane Hardware in the Loop Simulation
Note
Archived, no longer supported
This article explains how to set up X-Plane Hardware in the Loop Simulation.
Note
This simulator is Plane specific.
Overview
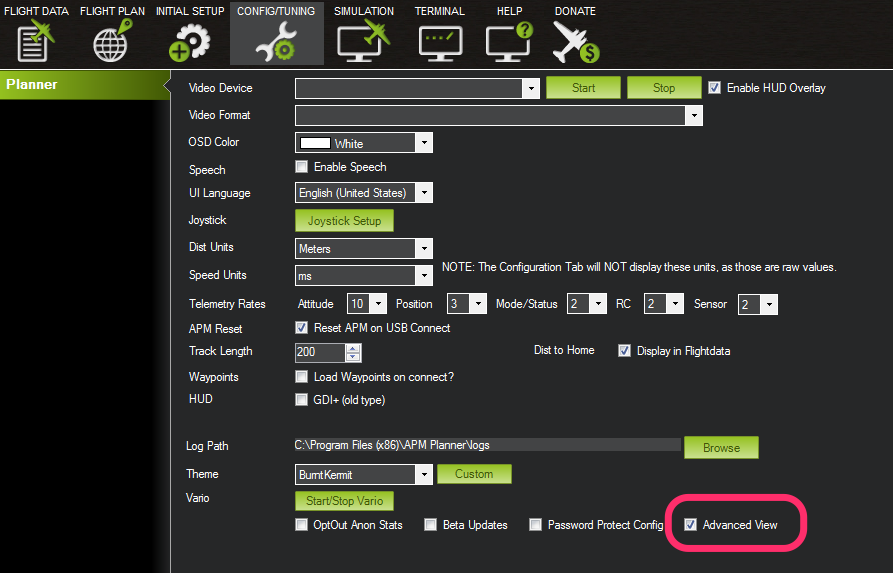
The Simulation tab is visible on the top icon row when “Advanced View” is checked in the Config tab.
How to set up a full hardware-in-the-loop simulation with X-Plane
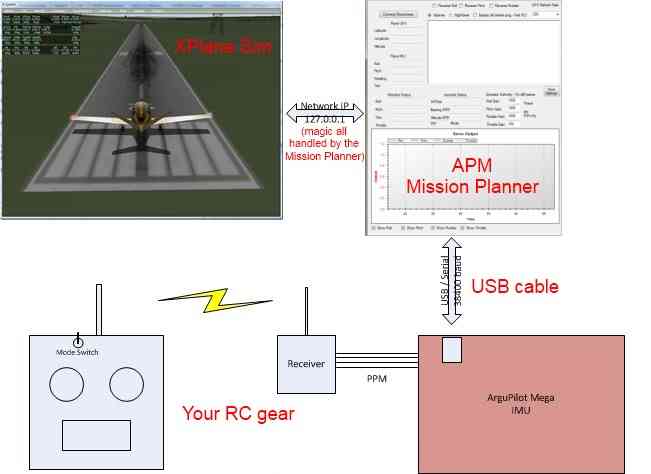
It’s easy to create a powerful “hardware in the loop” simulator with APM, with a Flight Simulator “fooling” APM with sensor and GPS data like it would experience in flight, and then APM flying the plane accordingly.
The overall setup looks like this:
Setup
Download the X-Plane 10 flight simulator, if you don’t already have it. The demo is free but times out after ten minutes. It’s well worth buying the full version, which is just $29.99. We support the 10.x versions.
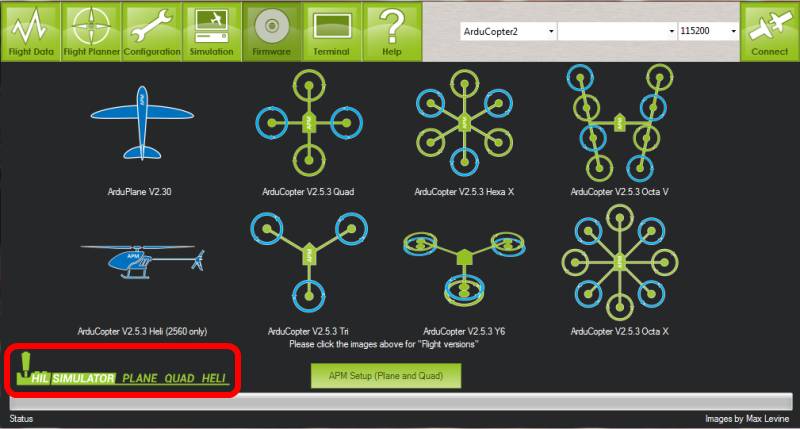
Load the HIL Simulations version of the APM software with the Mission Planner (circled in red below; pick the one for the aircraft you want to simulate).
If you haven’t done a setup already, press “APM Setup” on the Mission Planner Firmware page, which opens another dialog. Follow the instructions on the “Reset”, “Radio Input” and “Mode” tabs of the dialog. Then you’re ready to sim!
Connecting APM and X-Plane
The Mission Planner will serve as your bridge to X-plane and will send the output from your APM’s serial port connection to the flight simulator.
NOTE: If you’re using a Mac, you can use a Perl-based solution (this also works on Windows, if you prefer Perl). Here’s what you need: X-Plane.pl
X-Plane Settings
X-Plane communicates over a network interface to the Flight Planner. Because of this you can run X-Plane and the Flight Planner on different computers. This is helpful if X-Plane running on a slower computer. Frame rate is very important.
You can choose any aircraft in X-Plane, but the most realistic one for our purposes is the PT-60 RC airplane. These are the screen shots that show the necessary settings you need to set in the Settings Menu – Data Input and Output:

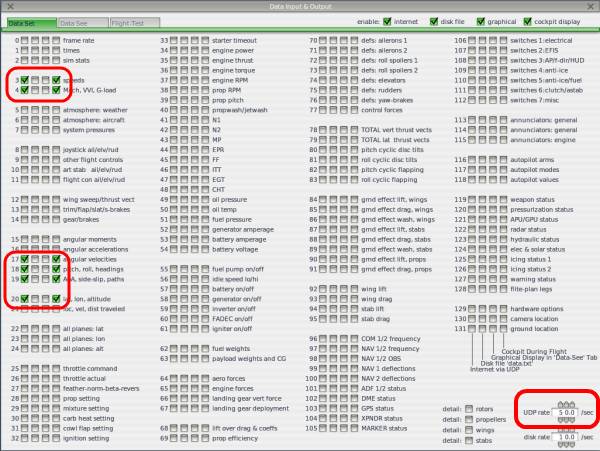
You may also want to turn on the Frame Rate to display on the screen.
On the IP screen on Xplane, change the UDP data port to 49005 as shown below. (The Mission Planner also has an advanced IP setting dialog, but leave it at the default of 49000. 49005 is the UDP port coming in from Xplane, 49000 is the UDP port going out from the Mission Planner.)
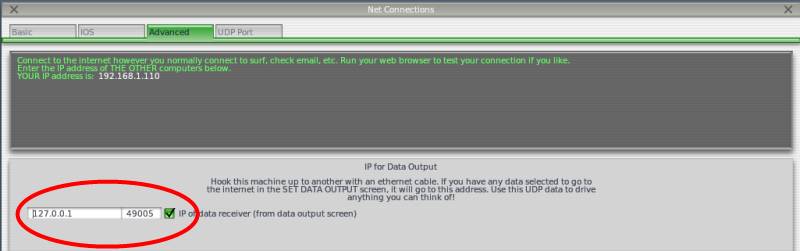
If you are running X-plane on the same computer as APM Mission Planner, then enter the loopback IP address (127.0.0.1) as shown above. If you are running X-plane on a different computer, enter the IP address of the other computer here(for example 192.168.1.1).
Flight planner settings
Now you’re ready to run the simulation. Start the Mission Planner, selecting the COM port APM is assigned to and 115200 baud as the speed. Click on the Simulation tab and you will be taken to this screen:
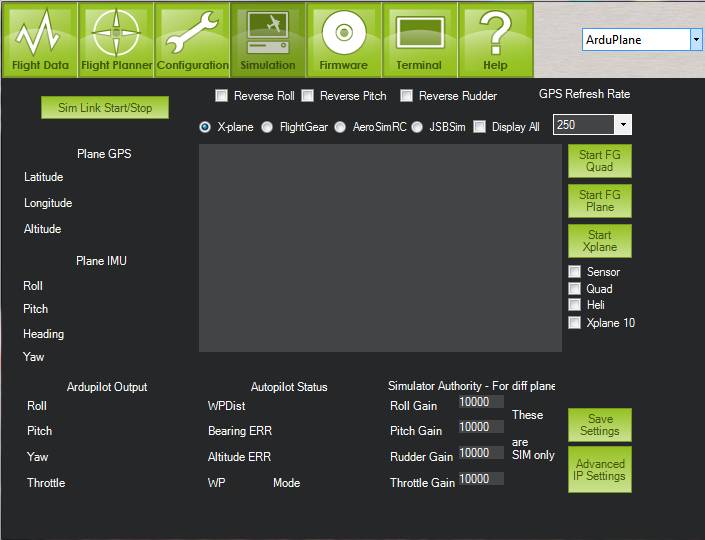
If you are using X-Plane 10.x, you must check the “XPlane 10” checkbox shown here:

If you are running APM Mission Planner on the same computer as X-Plane, then the default IP settings should be fine. But if you’re in doubt, you can check the “Advanced IP Settings”. The IP address should be 127.0.0.1 and the port should be 49000, as shown. If you are running X-plane on a different computer, though, enter the IP address of the other computer here (for example 192.168.1.2). The port should be 49000 in either case.
Once you’ve selected Sim Link Start/Stop, if APM is connected and Xplane is running, you should see the Mission Planner Sim screen fill with data.
Turn your transmitter on and check your link to your receiver. (Remember that if you’re using APM 1 you must plug an ESC and LiPo into the RC pins of APM to power the RC receiver; this is not necessary on APM 2, where the radio is powered by the USB). When you move the sticks you should see the APM outputs change on the Flight Planner Simulator window.
For first testing, set your three RC toggle switch modes to Manual, Stabilize and RTL. You can do that via the Mission Planner’s MAVLink setup. Hit control-G in the Mission Planner once you’re connect to go to the setup screen, where you will find the Modes setup.
Flight test
Now fly the plane in the sim with your RC transmitter. First, hit the “C” key so you can see your plane up close and from the side. Try each stick on your RC transmitter and make sure that the control surfaces go in the right direction in manual mode. If they don’t, reverse them at your RC transmitter as you would with a normal RC airplane.
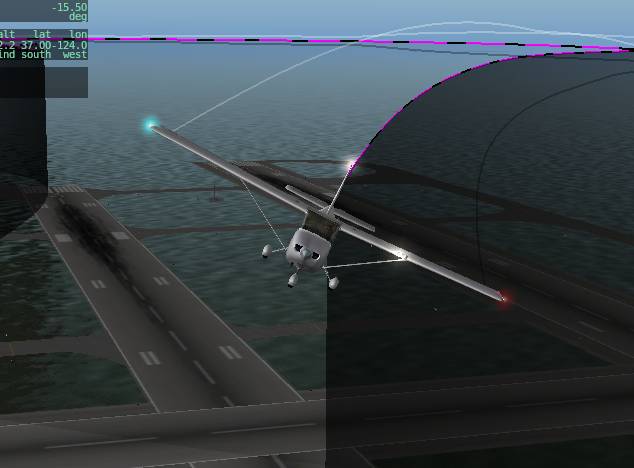
You can now try a flight. Reload the aircraft in Xplane, hit “Shift-8” so you can see it from behind, and hit “b” to release the brakes. The aircraft should begin moving forward. You can steer it on the ground with your rudder stick. Once it’s picked up speed, give it a little up elevator to take off. You should be able to fly it like a RC flight simulator.
If it’s flying well, try moving your toggle switch into stabilize mode. The aircraft should immediately start flying flat and level. If it rolls upside down and wants to fly that way, you’ll need to reverse the ailerons on the SIM model on your transmitter. Likewise for diving.
If stabilization works well, try RTL. The aircraft should return to the start of the runway and circle there at 100m.
Once that is working, trying entering some waypoints and flying an auto mission. In the Mission Planner read the stored waypoints and let it reset home to the stored position (which will now be the airport in your Xplane simulator that you’re flying from). Click to add a few waypoints and switch into auto to watch the show!
In general, the correct order to load and run everything is as follows:
Use the Mission Planner to load the Simulator version of the APM code and perform the setup.
Start Xplane. After it is initialized and while the plane is sitting on the ground hit the “a” key for a rear view and then the “p” key to pause.
Start the Mission Planner, select the right port and baud for your APM board and connect to APM.
In the Mission Planner simulation tab, click the button in ArduPilotSim to connect. You should see values appear in the output fields. Switch your TX mode switch to the manual position and verify that the outputs are moving with your TX sticks.
Make sure your throttle stick is down.
Switch to Xplane. You are ready to go. Click the “p” key to unpause. Hit the “b” key to unlock the brakes. Advance the throttle and take off!
Notes
I have been using the stock PT-60 in Xplane with good results. I would recommend a cruise airspeed of 15 m/s
One quirk of the PT-60 is that it bounces around a lot on the ground and if you are not careful it has prop-strikes followed by simulated engine failure, which is really annoying. If the engine has stopped, reload the plane. Hold the pitch stick for a modest climb and go to full throttle.
Remember that APM always sets its “home” location automatically at the field, which in this case is whichever airport you’ve set Xplane to start at. It will overwrite any home you may have set in the Mission Planner. If you want the flight sim to start at a different airport, you must select that from Xplane’s “Location” menu. You can only select the provided airports, not just any place in the world you want to fly.
If you want to play with the code and load it via Arduino.
, rather than the pre-compiled hex file in the Mission Planner, you can. You just need to change your APM_config.h file to the following:
#define HIL_MODE HIL_MODE_ATTITUDE
HIL_MODE_SENSORS is not currently (Jan 2012) working. HIL_MODE_ATTITUDE informs Plane of the attitude of the plane but not the accelerations or roll rates. HIL_MODE_SENSORS originally was going to inject the lower level physics into the real sensor code, from which would (hopefully) be derived the same or similar attitude figures, plus more information from the Barometer and so on.
Software-in-the-loop (SITL) sim has taken this further, emulating !Arduino registers and injecting the sensor information at the lowest level possible. It is therefore the better option if you want to sim with the most realistic inputs.
Error messages and fixes
Can’t open serial port : The com port has not been selected or the port is in use. Do you have a terminal open to the APM? Note that the mission planner loads the connection window coms port menu with every port it finds. If the USB driver failed to hook up and did not promote a port into !Windows, then this menu will be missing the actual port or may default to another port.
Socket (IP) setup problem. Do you have this open already? : You have another program running that is using the IP Port and conflicting with the data communications between Xplanes and APM Planner.
Xplane Data Problem - You need DATA IN/OUT 3, 18, 19, 20 : Please redo the setup and make sure all the boxes are ticked. You may need to restart X-Plane.
Bad Gains!!! : One of the simulator gain numbers is invalid.
NO SIM data : ArduPilot Mega Planner is not receiving any data from Xplane. Please check your Xplane settings.
The radio has no control–you push the sticks and nothing happens. Are your PID setting zero? Have you setup up your Radio inputs? The configuration defaults may not be appropriate for your radio. Please review the minimum, maximum and trim figures and if necessary use the radio Setup mode either from the mission planner or from the command line setup mode.
Flight controls are way off. You need to push the sticks way over to fly the plane. Check your Radio setup in the APM. Did you configure the Radio? See (7).
Debug
The on-screen status details only update after a valid connection to the APM has been made.
Open Terminal, and verify what you see. If the text is readable go to the second point below, if it is not look at the first point
When you click Connect you should see the APM header printed in the text box. If you don’t you may not have the correct Comport or Baudrate
Verify the setup by opening the Terminal in APM Planner and see what it prints out. it should start with the APM header and continually spit out AAA???? forever. If you don’t see the AAA’s then you may have uploaded the wrong firmware (not simulation mode) or if you’re loading the code manually, not made the necessary changes to the APM_Config.h file.
Try re-doing the radio calibration after selecting the simulation, and make sure the throttle gain is set to 10,000 in the simulation tab.
Python Scripting with XPlane
This section shows how to use Python for some basic scripted acrobatic moves for fixed-wing airplanes (including a left roll, a right roll and most of a loop). The instructions come from the tutorial Scripted Fixed-Wing Acrobatics.
You need a python based script. You can start with the one I’ve put together. It’s attached here. “simple_script.txt“
With X-plane, the APM Mission Planner (MP) and the script open, get your plane in the air and press “p” for pause. “a” will put you in chase view (“w” to go back in the plane) and “-” and “=” will zoom your view of the plane in and out.
In the MP click on the “Flight Data” button, then select the “Actions” tab underneath the Heads-Up-Display.
Click on the “Script” button. This will bring up another window with a preloaded script (for Copter). Switch to the already open “simple_script.txt” and select-all then copy.
Go to the python script window and paste “simple_script.txt” in the python script window. DO NOT close it yet.
Go to X-plane, and press “p” again to un-pause the plane.
Go back to your python script window and close it. This will trigger the execution of the script when you click “yes” in the pop-up.
Watch your plane do some rolls, and most of a loop.