• Home
    • Copter
    • Plane
    • Rover
    • Blimp
    • Sub
    • AntennaTracker
    • Mission Planner
    • APM Planner 2
    • MAVProxy
    • Companion Computers
    • Developer
  • Downloads
    • Mission Planner
    • APM Planner 2
    • Advanced User Tools
    • Developer Tools
    • Firmware
  • Community
    • Support Forums
    • Facebook
    • Developer Chat (Discord)
    • Developer Voice (Discord)
    • Contact us
    • Getting involved
    • Commercial Support
    • Development Team
    • UAS Training Centers
  • Stores
  • About
    • News
    • History
    • License
    • Trademark
    • Acknowledgments
    • Wiki Editing Guide
    • Partners Program
Copter Logo
  • Introduction to Copter
  • Choosing an Autopilot
  • Ground Control Stations
  • First Time Setup
  • First Flight and Tuning
  • Traditional Helicopters
  • Mission Planning
  • If A Problem Arises
  • Advanced Configuration
    • Analog Pins
    • Autopilot Output Mapping
    • AutoTune
    • Auxiliary Function Switches
    • Baro Temperature Compensation
    • Boat mode
    • Bootloader Update
    • BLHeli ESCs
    • CAN Bus Setup
    • Compass Setup (Advanced)
    • Compass-less Operation
    • Current Limiting and Voltage Scaling
    • DisplayPort
    • DroneCAN Setup
    • EKF (Extended Kalman Filter)
    • EKF Affinity & Lane Switching
    • EKF Sources and Selection
    • Ethernet/Network Setup
    • Fence Failsafes
    • Flight Options
    • Flight Time Recorder
    • FPort Setup
    • GPIOs
    • GPS for Yaw (aka Moving Baseline)
    • GPS for Altitude
    • GPS/Non-GPS Transitions
    • Ground Control Station Only Operation
    • Ground Effect Compensation
    • In-Flight FTT and filter control
    • IMU Temperature Calibration
    • Independent Watchdog
    • Limit Cycle Prevention
    • LUA Scripting
    • Magnetic Interference
    • Magnetometer GeoPhys Array
    • MAVLink2 Packet Signing (Security)
    • Motor Thrust Scaling
    • Moving Vehicle Initialization
    • Multiple Radio Control Receivers
    • Non-GPS Navigation
    • Notification Devices (LEDs,Buzzer,etc.)
    • Notch Filter Configuration
    • Object Avoidance
    • Optical Flow Sensor
    • On Screen Displays (OSD)
    • OSD Parameter Editor
    • Parameter List (Full)
    • Parameter Reset
    • Precision Landing and Loiter
    • RC Input Channel Mapping (RCMAP)
    • RC Options
    • Redundant Telemetry
      • Mission Planner
      • MAVProxy
    • RunCam Camera Configuration and Control
    • Safety Switch
    • Sensor Position Offset Compensation
    • Sensor Testing
    • Serial Forwarding to DroneCAN
    • Serial Port to Port Passthrough
    • Serial Port Configuration
    • Slung Payload
    • Surface Tracking
    • Telemetry Port Setup
    • Terrain Following (Autonomous modes)
    • Tuning
    • Video Stabilization (Gyroflow)
    • Video Transmitter Control
    • UBlox GPS Configuration
    • Weathervaning
    • Windspeed Estimation and Baro Compensation
  • Peripheral Hardware
  • Additional Information
  • User Alerts


Individual Partners SWAG Shop
Copter
  • Advanced Configuration
  • Redundant Telemetry Links
  • Edit on GitHub

Redundant Telemetry Links

Many high value vehicles utilize a single telemetry link for vehicle RC control, telemetry, and, often, video. While a properly setup GCS failsafe, will often return a vehicle safely, it may not allow a safe landing if that link remains non-operational upon the return.

Therefore, having redundant telemetry links is often a wise investment. For example, if the primary link is LTE based, an additional long range 900 Mhz or 433Mhz link may be a worthwhile investment. Even a shorter range WIFI link would allow re-establishing control upon return to home from a properly setup GCS failsafe in order to allow control for a safe, controlled landing.

Both Mission Planner and MAVProxy provide means of establishing redundant links to the vehicle, and switching between them in their display and control consoles. In the case of MAVProxy, that switching is automatically done based on best link performance, and can be done manually in Mission Planner.

Mission Planner

Establishing the primary link is explained elsewhere. In order to establish the second (or third or forth, etc.) link to the vehicle:

  • right click the DISCONNECT button in order to get a connection options menu drop down

../_images/connection-options.jpg
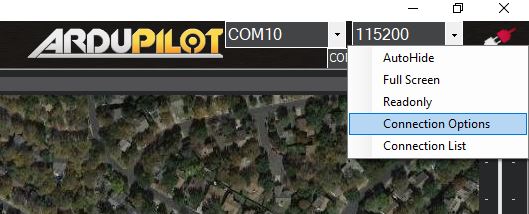
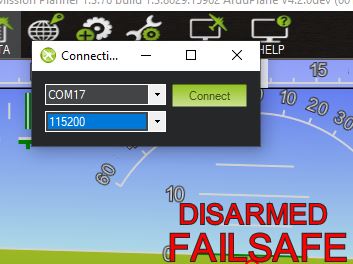
  • select connection options and fill in the dialog for the next link’s specifics

../_images/1st-connect.jpg
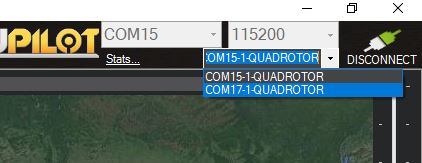
  • the link to be shown in the various tabs/views/menus can then be selected by this drop down box:

../_images/2nd-connect.jpg

MAVProxy

See MAVProxy Link Management for information on adding telemetry links.

To list all the links:

link list

To force a link as the active one to receive commands, parameter changes, etc.

set link x

To send commands to all links:

alllinks <cmd>

for example: allinks mode rtl

Previous Next

Questions, issues, and suggestions about this page can be raised on the forums. Issues and suggestions may be posted on the forums or the Github Issue Tracker.

Creative Commons License© Copyright 2024, ArduPilot Dev Team.