MSP OSD
ArduPilot supports the MSP OSD protocol which allows displaying flight data on the DJI goggles, much like with external MAVLink OSDs or the internal integrated analog OSD in many autopilots. It can also be used with external OSDs , such as the MWOSD, if its configured for MSP telemetry, as is used with iNav or Betaflight.
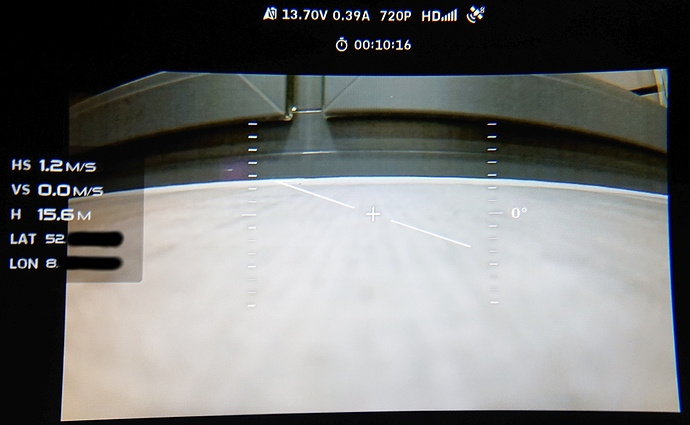
DJI V1 FPV Goggles
DJI Goggles RE
Features
ArduPilot currently supports many, but not all, of the OSD panel items as noted in the section below.
Changing display units other than metric and imperial are not currently supported.
Multiple screens and remote switching of those screens is not supported.
Warning levels for RSSI, Voltage, etc. currently not supported
Configuration
To enable MSP OSD, set the following parameters (example below is using SERIAL port 2 as the port to attach to the DJI Air unit using both TX and RX lines):
OSD_TYPE = 3 (only required to obtain statistics information panels). Can be set to 1 if autopilot has integrated analog OSD to use that feature in addition to the MSP OSD feature for DJI goggles.
SERIAL2_PROTOCOL = 33
MSP_OPTIONS = 0 (polling mode)
Note
DJI OSD must be enabled: in SETTINGS->DISPLAY->CUSTOM OSD menu of goggles
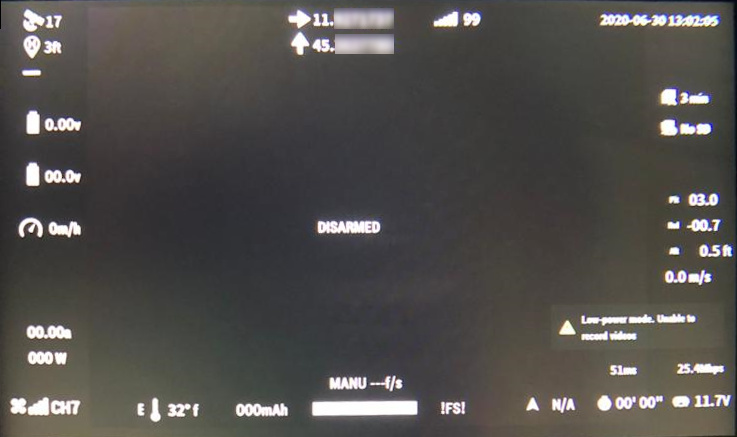
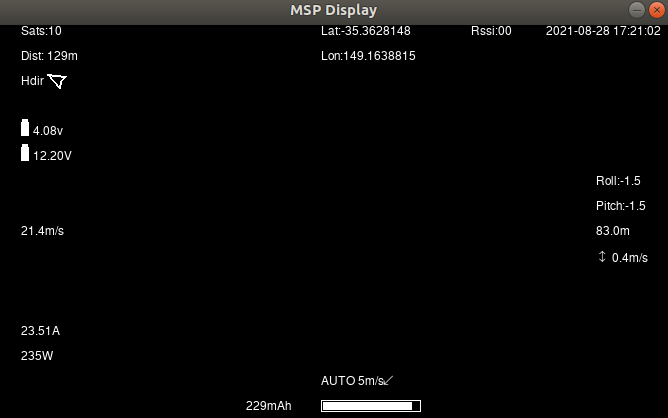
MSP OSD Panel Items ==================+
OSD Parameter |
Notes |
|---|---|
OSDn_ALTITUDE |
Home relative altitude |
OSDn_ARMING |
Arming status, hidden when armed otherwise showing DISARMED |
OSDn_ASPEED |
Please refer to OSDn_GSPEED for more info on enabling airspeed display |
OSDn_BAT_VOLT |
First battery voltage |
OSDn_BATTBAR |
First battery remaining percentage rendered as a bar based on declared capacity and consumed mAh |
OSDn_BATUSED |
First battery consumed mAh |
OSDn_CELLVOLT |
First battery average cell voltage, if automatic cell detection fails please override with MSP_OSD_NCELLS |
OSDn_CLK |
Realtime clock (requires GPX fix) |
OSDn_CRSSHAIR |
Artificial horizon is not supported so crosshair is often kept hidden |
OSDn_CURRENT |
First battery current |
OSDn_ESCTEMP |
On DJI V1/V2 Goggles this will report the highest ESC temperature |
OSDn_FLTMODE |
DJI hardware does not support ArduPilot’s flight modes! This item will generally be blank and only show !FS! while in failsafe! |
OSDn_GPSLAT |
GPS Latitude in decimal format |
OSDn_GPSLONG |
GPS Longitude in decimal format |
OSDn_GSPEED |
This item shows ground speed unless |
OSDn_HEADING |
Not supported by DJI V1/V2 Goggles |
OSDn_HOMEDIR |
Rotating arrow pointing to home |
OSDn_HOMEDIST |
Distance from home |
OSDn_HORIZON |
Not supported by DJI V1/V2 Goggles |
OSDn_MESSAGE |
This will display status text messages as rolling text. Status text messages will be hidden after a couple seconds and the panel will show the current flightmode. If |
OSDn_PITCH |
Pitch angle |
OSDn_POWER |
Instant power calculated as voltage * current |
OSDn_ROLL |
Roll angle |
OSDn_RSSI |
Rssi as configured in RSSI_TYPE: RSSI Type |
OSDn_SATS |
On DJI V1/V2 Goggles when there’s no fix it will report 14 sats, this is a known DJI bug |
OSDn_SIDEBARS |
Not supported by DJI V1/V2 Goggles |
OSDn_VSPEED |
Vertical speed |
OSDn_WIND |
Please refer to OSDn_MESSAGE for wind speed and direction rendering |
OSD Panel Item Configuration
Each OSD panel item uses a set of three variables to be set:
OSDn_<ITEM>_EN- activates the respective panel item on screen “n” when set to 1.OSDn_<ITEM>_XandOSDn_<ITEM>_Yset the horizontal and vertical position of the item, starting withX = 0andY = 0in the upper left corner of your screen.
Note
ArduPilot calculates a sensor-less airspeed estimate that is used if no sensor is present or fails. ARSPD_TYPE must be set to zero in order to display this value as the airspeed item, if no sensor is present.
Testing OSD with SITL
OSD functionality can be tested and panel items adjusted without autopilot or video hardware using the Software In The Loop (SITL) simulator setup. Follow those SITL-Instructions to setup a simulation environment. Run the simulator on current source code using --osdmsp option to build the OSD code into the simulator. For example, for a plane simulation:
sim_vehicle.py -v ArduPlane --console --osdmsp
A graphical DJI style MSP OSD simulation in a separate window will be opened with the other simulation windows using a typical set of OSD panel parameters, located at libraries/AP_MSP/Tools/osdtest.parm . Then the OSD elements can be customized by their parameters using the MSP OSD emulation program to visualize the OSD.
Note
You could also use these parameters to initially setup the MSP OSD configuration for use with goggles, but you may have to change the SERIALx_PROTOCOL parameter to match the actual serial port that you will be using.
Note
The emulation does not support multiple screens or units other than metric
By changing the OSD panel items’ parameters, a live update on their placement can be seen in this emulator.
Using Mission Planner to Configure the Layout
Mission Planner(MP) has a tab in its CONFIG menu to configure the on-board OSD many autopilots integrate. This same configuration tab can be used to configure the OSD panels. In fact, you can do that while the SITL program and MSP OSD emulation window are active by connecting Mission Planner running on the same computer, or networked computer, to MAVProxy, using this command in MAVProxy:
output add <ip address of box running Mission Planner>:14550
Note
if MP is running on the same PC, the ip address would be 127.0.0.1 (local host address)