BlueOS Live Video Setup
BlueOS supports live video visible in Cockpit, Mission Planner and QGC ground stations. This page explains the setup assuming this setup has already been completed.
BlueOS’s official wiki is here
Video Manager for Cockpit
Power on the vehicle and wait about 1 minute to allow BlueOS to start
On the PC, open a chrome browser and connect to BlueOs running on the vehicle by entering the vehicle’s IP address (see 4G/LTE telemetry setup) or try http://blueos-wifi.local/
From the left menu select “Video Streams”
under “Redirect source” push the “Add Stream” button
Set the “Stream nickname” to something like “Siyi A8” (anything is fine)
From the lower-left drop-down change select “RTSP”
Under “Stream endpoint” enter the RTSP URL for your camera. Please refer to the ArduPilot wiki page for your camera gimbal and check the “Ethernet Connectivity” section. For the Siyi A8 it is normally
rtsp://192.168.144.25:8554/main.264Push “Create”
after a few seconds a thumbnail from the camera may be displayed
From the left menu select “Cockpit”
Expose the configuration menu by pushing the arrow button in the middle left of the screen
Select Settings, Video
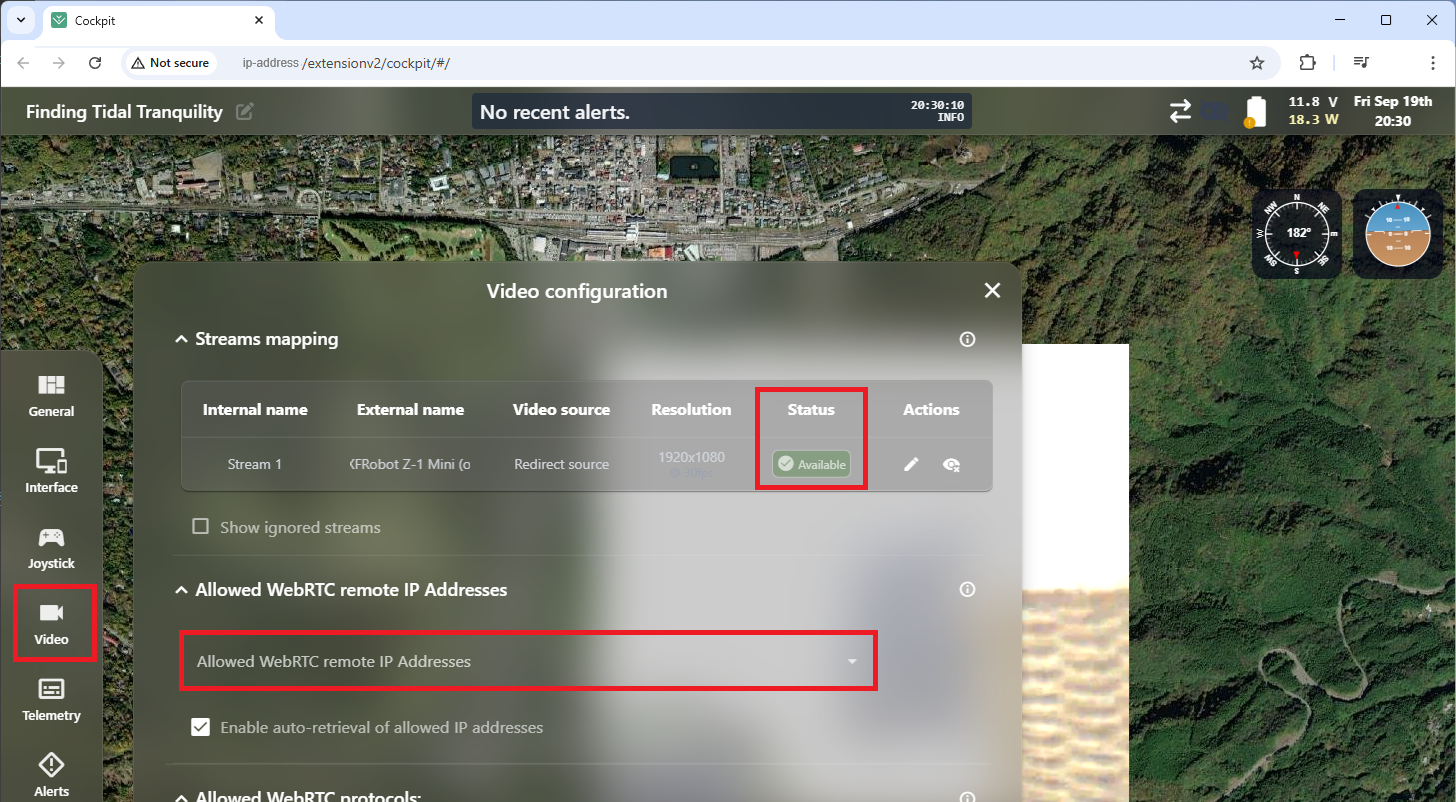
At the top under “Streams mapping” the video stream should be visible with a “Status” of “Available”
Check the “Allowed WebRTC remote IP addresses” field and delete any IP addresses shown
Return to the top of the configuration menu and select “Edit Interface”
Find “Video Player” from the bottom row of icons (this may require scrolling down with the mouse) and drag it to the desired location on the map
More information on the WebRTC Video Player can be found here
RTSP Relay for Mission Planner and QGC
To view the live video in Mission Planner or QGC, the RTSP Relay (aka MediaMTX) extension must be configured
Power on the vehicle and wait about 1 minute to allow BlueOS to start
On the PC, open a chrome browser and connect to BlueOs running on the vehicle by entering the vehicle’s IP address (see 4G/LTE telemetry setup) or try http://blueos-wifi.local/
From the left menu select “Extensions”, find MediaMTX and push the “Get” button
From the left menu select “RTSP Relay”
Copy and paste the code below into the “MediaMTX Configuration” section, making sure to set the “source:” field to the RTSP URL appropriate for your camera. This can be found on the ArduPilot wiki page for your camera gimbal in the “Ethernet Connectivity” section
# MediaMTX configuration file
paths:
  input:
    # Change this to the URL of the RTSP stream you want to proxy
    # Default is the RTSP stream from the Siyi A8 camera
    # Most camera gimbals use "rtspTransport: udp" but XFRobot uses "tcp"
    source: rtsp://192.168.144.25:8554/main.264
    rtspTransport: udp

  compressed:
    runOnInit: >
      ffmpeg -fflags +genpts+igndts -max_delay 500 -rtsp_transport tcp -err_detect ignore_err -i rtsp://localhost:8555/input -vf scale=640:360,fps=10 -c:v libx264 -preset ultrafast -tune zerolatency -g 5 -keyint_min 1 -sc_threshold 0 -max_muxing_queue_size 1024 -f rtsp rtsp://localhost:8555/compressed
    runOnInitRestart: yes

# RTSP settings
# play this with
# ffplay rtsp://10.243.81.105:8554/input\?timeout=0
# or similar
# make sure this port is not being used by another application/stream
rtspAddress: :8555

# WebRTC settings
webrtcAddress: :8889
webrtcICEServers: ["stun:stun.l.google.com:19302"]

# Disable unused features
api: false
metrics: false
pprof: false

logLevel: debug
Optionally adjust the video resolution and frame rate by changing the “scale=640:360,fps=10” portion of the line starting with “ffmpeg”
This creates two streams either of which may be viewed in Mission Planner or QGC. If using ZeroTier, the <vehicle_ip> will have been set during the 4G/LTE setup