Arming / Disarming
Before the rover’s motors will move it must be armed. Arming is required for two reasons:
to prevent the motors from turning when the user is not ready to drive
prevent movement before the autopilot is fully configured and ready to go
How to Arm
Before arming you should normally wait for the LED on the autopilot to become flashing blue (if you only intend to use Manual) or flashing green (for all other modes). If the LEDs never become blue or green please see the “Pre-Arm Checks” section below.
There are three ways to arm the vehicle:
From the transmitter sticks. Ensure the vehicle is in Hold, Manual, Acro or Steering mode, then center the throttle stick and hold the steering stick fully to the right for 2 seconds
From a transmitter switch. If setup, you can use one of the RCx_OPTION switches that includes the arm function. See switch option “153”, “154, or “160.
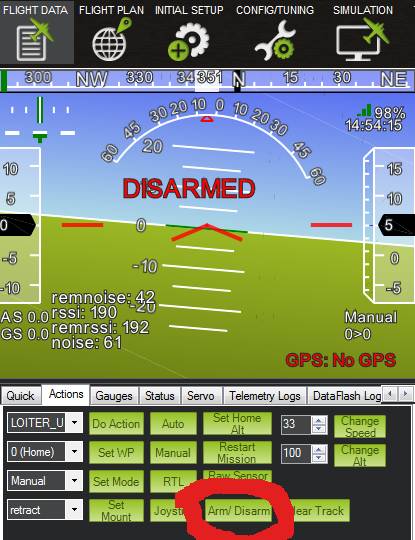
From the Ground Station. Press the arm/disarm button on your ground station. If using the Mission Planner this can be found on the Flight Data screen’s action tab on the bottom left
If the vehicle fails to arm, please see the “Pre-Arm Checks” section below.
Note
Rover cannot be armed in RTL or SMARTRTL modes. In addition AUTO, GUIDED, LOITER, RTL, SMARTRTL, FOLLOW, and DOCK modes cannot be armed via an Auxiliary Functions RC switch.
Warning
Rover will allow arming in some modes without a good GPS location being obtained before arming. If you want any of the modes such as RTL, LOITER, etc. to work properly, you should enable the “Need location” pre-arm check by setting the ARMING_NEED_LOC parameter to “1” to be sure you have position information available.
How to Disarm
From the transmitter sticks. Ensure the vehicle is in Hold, Manual, Acro or Steering mode, then hold the steering stick fully left for 2 seconds
From a transmitter switch. If setup, you can use one of the
RCx_OPTIONswitches that includes the disarm function. See switch option “81”, “153, or “154”.From the Ground Station. Press the arm/disarm button on your ground station. If using the Mission Planner this can be found on the Flight Data screen’s action tab on the bottom left
Note
Skid-steering vehicles can only be disarmed from the transmitter in Hold mode because otherwise they would turn around and around in circles whilst the pilot was trying to disarm
Pre-Arm Checks
Rover includes a suite of safety checks which prevent the vehicle from arming if any of a fairly large number of issues are discovered including missed calibration, configuration or bad sensor data. These checks help prevent sudden motor startups and drive-aways but they can also be disabled by setting the ARMING_SKIPCHK parameter if necessary.
The reason for the failure can be seen by connecting the autopilot to a ground station (using telemetry or a USB cable), after attempting to arm the reason should be displayed on the HUD in red letters.
A more complete list of failures can be found on the Pre-Arm Safety Checks but some common of the Rover specific checks are listed below:
Safety switch. The safety switch must be set to the off state before arming is allowed. This is either done by pressing the safety switch for 2 seconds until it stops flashing, or you can disable the use of the safety switch by setting BRD_SAFETY_DEFLT to 0.
Inertial Sensor Checks. The accelerometers and gyroscopes must all be healthy and all be calibrated. If you have more than one accel or gyro then they need to be consistent with each other.
AHRS checks. The AHRS (attitude heading reference system) needs to be initialized and ready. This normally takes at least 30 seconds after boot.
Compass checks. All compasses must be configured and calibrated, and need to be consistent with each other (if you have more than one compass)
GPS Checks. You need to have a 3D GPS fix for most modes. GPS n has not been fully configured is displayed when the GPS driver is unable to fully configure the GPS. This can be caused by a bad wire between the autopilot and GPS, or by a bad response from the GPS.
Battery checks. The battery voltage must be above the failsafe voltage (if configured)
Logging checks. The logging subsystem needs to be working (ie. a microSD must be fitted and working)
RC Control checks. The RC input must have be calibrated and not in failsafe (i.e. transmitter switched on).
The pre-arm checks can be partially or completely disabled by setting the ARMING_SKIPCHK parameter. The default of 0 means all checks are enabled. In extremely unusual circumstances, setting the parameter to -1 can be used to skip all current and future pre-arm checks (though mandatory checks still remain).
In general the cause of a failure should be addressed and the ARMING_SKIPCHK parameter should be reset back to 0.
Note
If you are arming from the transmitter and no failure message is being displayed on the HUD then it may be that the RC calibration is off so the autopilot is not seeing the throttle at middle or steering at the full right position. Try re-doing the RC calibration.
Disabling Arming/Disarming
Although it is not recommended, it is possible to disable the requirement to arm the vehicle by setting the ARMING_REQUIRE parameter to zero. The vehicle will effectively be armed immediately at startup but please note that modes requiring GPS (all modes except Hold and Manual) will not operate until after a good GPS lock (or more accurately a good EKF position estimate) is achieved.
Note
setting the ARMING_REQUIRE parameter to zero is NOT recommended. If you desire to automatically arm. set it to “3” to arm automatically once pre-arm checks are satisfied the first time after booting.
LED and Buzzer
The LED and buzzer provide visual and audio clues as to the arming state:
LED flashing blue - vehicle is disarmed but is ready-to-arm in Manual
LED flashing green - vehicle is disarmed but ready-to-arm in all modes (vehicle has a good position estimate)
LED flashing yellow - vehicle cannot be armed because one of the pre-arm checks is failing
when the autopilot is ready to arm it will play a “ready to arm” sound on the buzzer
during arming the buzzer will play a 2 second long warning buzzer
during disarming, the buzzer will play a short warning buzz
A full list of buzzer sounds can be found on the sounds page.
Unless the ARMING_OPTIONS bit 2 is set, text messages will be sent to the GCS to indicate when arming or disarming has occurred.
PWM Output Behaviour when Disarmed
The PWM value output to the servos and motors while the vehicle is disarmed can be configured in one of two ways:
if MOT_SAFE_DISARM is 0 (the default) the trim value for each channel will be output (i.e RC1_TRIM will be output on channel 1, RC3_TRIM will be output on channel 3).
if MOT_SAFE_DISARM is 1 no PWM pulses will be sent while disarmed. Note that some ESCs beep to complain that they are powered on without a control signal
Note that if the autopilot has a safety switch which is enabled, no PWM output will be sent until the safety switch is put in the ON position.