FrSky Telemetry
FrSky telemetry allows you to display ArduPilot information such as flight modes, battery level, and error messages, as well as information from additional FrSky sensors on OpenTx compatible RC transmitters and even older X9R transmitters (although with more limited capability).
- It is particularly useful:
for flying without a ground control station (no need for MAVLink telemetry radio),
as a backup in case the ground station fails (e.g., loss of MAVLink radio link),
when a separate person operates the ground control station,
for quick situational awareness by the pilot.
Moreover, some RC transmitters such as the Taranis series, Horus, and T16, can be configured to play sounds, vibrate or perform automatic RC actions based on telemetry information through the highly configurable OpenTX firmware.
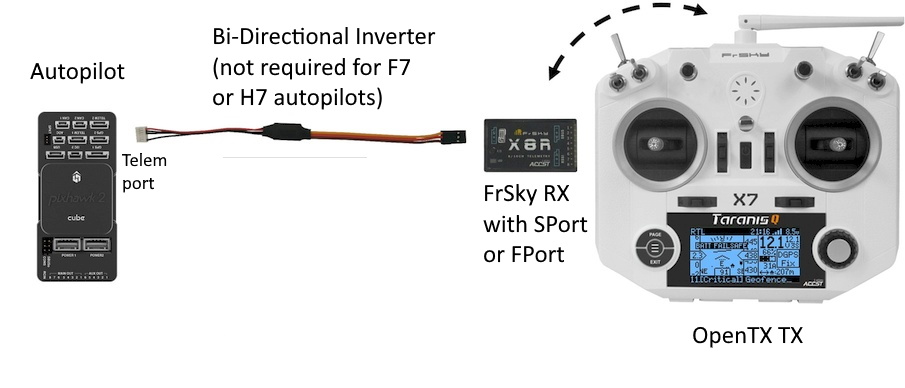
Common FrSky Telemetry Setup with OpenTX transmitter running FlightDeck or Yaapu Telemetry Script.
Note
before the addition of FrSky telemetry protocols to ArduPilot, it was necessary to use an external converter to convert normal MAVLink telemetry from the Autopilot into FrSky Sport compatible telemetry (See MavLink to FrSky Converters), but this is no longer required. However, the MAV2PT converter is especially useful for converting MAVLink telemetry output from many long-range RC systems for display on an OpenTX transmitter or forwarding via Bluetooth or WiFi to a smarphone or PC running a Ground Control Station.
Setup
In order to use FrSky telemetry, the following steps are required:
Connect an autopilot telemetry port to an FrSky receiver which has an SPort or Fport interface. This may require a bi-directional inverter depending on which autopilot it being used. See Connecting to FrSky Sport and FPort.
Configure the autopilot.
Install a LUA script to display the full telemetry. (Although is it possible to display a subset of telemetry values using OpenTX’s built in telemetry screens, it is very limited.)
Connection Diagrams
- See
for connection diagrams.
Configuration
Two protocols are available, Repurposed and PassThrough. Repurposed has been superseded by PassThrough since much more telemetry information can be transferred and displayed.
First set the SERIALxPROTOCOL to “10” for the telemetry port used.
Note
SERIAL port numbers do not necessarily directly correspond to UART or TELEM port labels. See the hardware documentation for your autopilot.
If you have an F7 or H7 autopilot, and therefore do not need to use an external inverter, you must turn on the inverters for the SERIAL port and also set it to half duplex.
Note
Any configuration change to a UART requires a re-boot to take effect.
In general, F4 based autopilots using an external bi-directional inverter can use any UART with the following configuration:
SERIALx_PROTOCOL=10SERIALx_OPTIONS=160 (enable pull-up/pull-downs on TX and RX pins for those external inverter circuits that may require it)
F4 based autopilots using an “inverted SPort” output from the receiver can connect it to any UART’s TX pin with the configuration:
SERIALx_PROTOCOL=10SERIALx_OPTIONS= 4 (Half Duplex)
Note
F4 based autopilots cannot use the RX pin with an “inverted SPort” output since the SWAP capability is only available in F7/H7 based autopilots.
F7/H7 based autopilots can directly connect to the TX pin of any UART and use this configuration:
SERIALx_PROTOCOL=10SERIALx_OPTIONS= 7 (invert TX/RX,Half Duplex)OR to the RX pin:
SERIALx_PROTOCOL=10SERIALx_OPTIONS= 15 (invert TX/RX,Half Duplex, SWAP TX/RX pins)
Note
Some F7/H7 autopilots have level/shifters on their UARTs that cause a delay in Half Duplex operation, like CubeOrange. If the above configuration does not, try setting RC_OPTIONS = 8 which will add padding in the protocol to accommodate this. However, using this option when not required will break operation.
Set FRSKY_OPTIONS bit 0 to “1” to enable sending alternating airspeed and groundspeed data to the display script. The Yaapu FrSky Telemetry Script for OpenTX can use this but it may cause other display apps/scripts to alternate the speed value readout.
Display Scripts
Several options are available:
Turnigy 9XR Pro
This section describes how to enable FrSky telemetry on the Turnigy 9XR Pro transmitter.
Requirements
You will need a transmitter module with support for FrSky telemetry, such as the
FrSky XJT. The DJT also supports telemetry, but you will need to use an external cable to connect the telemetry data from the module to your transmitter.The instructions in this section are specifically for the XJT module.
You will need to be running a recent version (211 or later) of the ErSky9x firmware. You can find more information about upgrading the firmware and about ErSky9x in general from the documentation.
Configuring ArduPilot
Ensure that you have the appropriate SERIAL#_PROTOCOL parameter
set to 10 (“passthrough FrSky telemetry”) to select the ArduPilot
SPORT protocol. For example, if you have plugged your SmartPort cable
into the serial 4/5 port on your Pixhawk, set SERIAL4_PROTOCOL to
10.
Reboot your controller after making this change.
ErSky9x will also work with protocol 4 (“repurposed FrSky
telemetry”), but you will not have access to ArduPilot-specific
information such as the name of the current flight mode or arming
status.
Configuring the 9XR Pro
Verify that you are running version 211 or later. Navigate to the
Radio
Setup
menu and then selectVersion. Look at theSVNfield.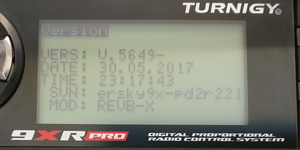
Telemetry support is substantially improved in revision 218 and later.
Navigate to
Model Setupmenu, then selectProtocol. Ensure that you haveProtoset toXJT, andTypeset toD16.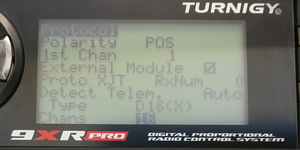
In older versions of the firmware, you may see PXX instead of XJT.
Navigate to the
Model Setupmenu, then selectTelemetry, and then again selectTelemetryfrom the popup menu. Ensure thatUsrProtois set toArduP(for ArduPlane) orArduC(for ArduCopter),Telemetry Com Port(previouslyFrSky Com Port) is1, andCom Port Invert(previouslyInvert Com 1) is off (unchecked).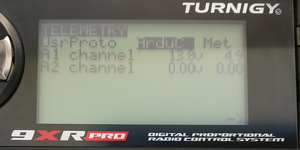
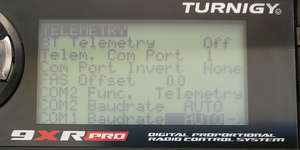
If you are using something other than ArduPlane or ArduCopter, you can set
UsrPrototoFrSky. You will get a more basic telemetry display that will be missing things like the graphic heading indicator, the name of the current flight mode, and so forth.
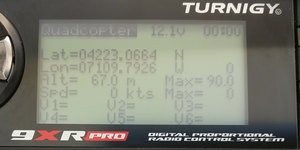
At this point, you should be receiving extended telemetry on your 9XR Pro. If you navigate to the telemetry home screen (use the up/down arrows to switch between screens) you should see standard FrSky telemetry values (such as RSSI, receiver voltage, etc) as well as extended telemetry, such as flight mode, current measurements, GPS information, etc.
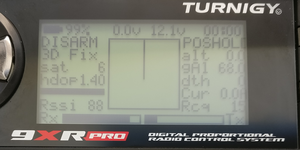
Use the left/right arrows to switch between available telemetry views:
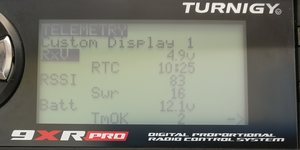
Configuring custom telemetry screens
ErSky9x allows you to customize two telemetry display screens with
your choice of information. To configure the custom screens, navigate
to Model Setup, then select Telemetry, and then select
Custom:
Other Pages Related to FrSky Telemetry