Calibrating an Airspeed Sensor
A properly configured airspeed sensor can greatly improve the ability of Plane to maintain altitude in auto-throttle modes (such as AUTO, CRUISE and FBWB), as well as greatly improve automatic landing. It can also reduce the chance of a stall.
At the same time, an incorrectly configured airspeed sensor can cause your aircraft to crash, so correctly configuring it is critical!
Pre-flight checks
If you have an airspeed sensor installed then it is critical that you do pre-flight checks to ensure that it is working correctly, and ensure that it is correctly zeroed.
During initialization, the firmware checks if you have enabled an airspeed sensor and that it is healthy, otherwise a warning will be given, but arming will still be allowed, so checking the ground station messages is important.
The ARSPD_OFFSET (and ARSPD2_OFFSET if a second sensor is enabled) offset is measured and set at boot-up or if manually commanded from the ground station.
Warning
It is very important to cover the pitot tube during power up, or when you wait and then re-calibrate. An inaccurate static calibration can result in the airspeed being reported too high, causing auto-throttle controlled modes to use very low throttle and potentially cause a crash.
If the offset has changed a lot since the last boot-up, a warning will be issued. This is often an indication that you forget to cover the pitot during boot or manual calibration. The sensitivity of this warning is set by ARSPD_OFF_PCNT which applies to both sensors.
ARSPD_SKIP_CAL and ARSPD2_SKIP_CAL allows you to skip airspeed offset calibration on startup, instead using the offset from the last calibration or requiring a manual calibration. This may be desirable if the offset variance between flights for your sensor is low and you want to avoid having to cover the pitot tube on each boot.
After you start up the autopilot on your aircraft its recommended that you wait at least 1 minute for your electronics to warm up, preferably longer, and then do a pre-flight manual calibration of your airspeed sensor. This is important if your sensor temperature does not match the ambient, but may be skipped if its close to ambient temperature.
Manual Offset Calibration
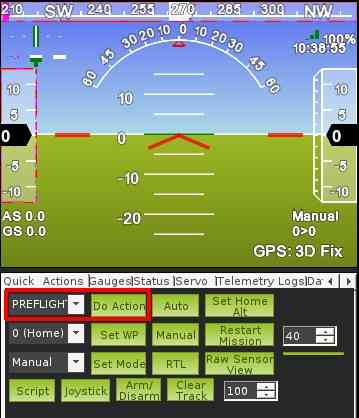
Your ground station software should have a menu for doing this, usually called “Preflight Calibration”. You need to loosely cover your airspeed sensor to stop wind from affecting the result, then press the button. The calibration will take a couple of seconds.
Choosing that action will re-calibrate both your ground barometric pressure and your airspeed sensor.
Note
setting ARSPD_SKIP_CAL or ARSPD2_SKIP_CAL to “2”, will force you to manually recalibrate the offset in order to arm each boot. This is to remind users who need to allow the sensor to settle to ambient temperature before each calibration at boot.
Next you should check that your airspeed sensor is working correctly before takeoff. To do that you should blow into the airspeed sensor and make sure that the “AS” airspeed sensor value in your HUD rises as you blow into it.
Calibrating the airspeed sensor gain
The ARSPD_RATIO parameter determines how ArduPilot maps the differential pressure from your airspeed sensor into an airspeed value. The default value is around 2.0, and should give good results for most people using analog sensors. The correct value does depend on you having your airspeed sensor well placed on your aircraft, and some users may find they need to calibrate their airspeed sensor by changing ARSPD_RATIO. You will find an “Airspeed ratio” setting in the configuration page of the autopilot in your ground station.
Adjusting ARSPD_RATIO can be done automatically using the automatic calibration feature, or manually. The procedures for both methods are presented below.
Automatic calibration
Go to Mission Planner => CONFIG/TUNING => Full Parameter List, change ARSPD_AUTOCAL to 1 and click ‘Write Params’ to send the value to the autopilot.
Take-off and fly a repeated circuit or circular loiter for 5 minutes. This can be done in any mode, but if the autopilot is already tuned sufficiently well, this can be achieved by leaving it in loiter or RTL for 5 minutes. The change in ARSPD_RATIO value can be checked in-flight by going to Mission Planner => CONFIG/TUNING => Full Parameter List, and clicking ‘Refresh Params’. Note that when the calibration is active, an updated ARSPD_RATIO value is only saved in the autopilot’s non-volatile memory every two minutes, and only if the value has changed by more than 5% from the last saved value.
Land, go to Mission Planner => CONFIG/TUNING => Full Parameter List and change ARSPD_AUTOCAL back to 0 to prevent further changes.
In Mission Planner => CONFIG/TUNING => Full Parameter List, click ‘Refresh Params’ and check the value of ARSPD_RATIO. Normally it will be in the range between 1.5 and 3.0. If it is outside this range and you have checked for leaks, then if practical, you should consider relocating the pitot tube to reduce the aerodynamic interference from adjacent fuselage, wings, etc.
Note
The calculation automatically compensates for the effects of altitude on air density.
Note
If you do not anticipate that the wind speed will vary rapidly or dramatically during flights, and you are not flying over terrain that would cause bad wind speed estimates (ie alongside steep hills or canyons), you may leave ARSPD_AUTOCAL enabled. But since the ratio should not vary once calibrated, doing a calibration flight and then disabling is highly recommended.
Warning
Do not leave ARSPD_AUTOCAL enabled for long stretches of level flight. The calibration requires regular turns to get a good estimate. If flown for long distances without a turn then a very poor airspeed ratio can develop, resulting in very incorrect airspeed reporting, even to the point of causing a crash in some extreme cases.
Warning
If you change or replace the pitot tube, reset ARSPD_RATIO (Default = 2.0) and recalibrate the sensor.
Note
For those users chasing increased accuracy, between steps 2) and 3), the value of BARO_GND_TEMP can be set to the current air temperature at the take-off location. By default the calibration algorithm uses the board temperature at power on as an approximation to the ambient air temperature, but due to solar and electrical heating, this nearly always reads high. This step may be worthwhile if operating in extreme temperature conditions.
Manual calibration
To determine the right airspeed ratio manually you should do a test flight in FBWA mode, with the following procedure:
takeoff and get to a safe altitude. Around 100 meters is good for most models
start a steady turn by holding your aileron stick over to one side
let your aircraft do 2 or 3 full turns
land and look at your telemetry logs
Ask your ground station software to graph the airspeed and ground speed values for your flight, zooming in on the part of your flight where you were circling. You will get a graph like this:
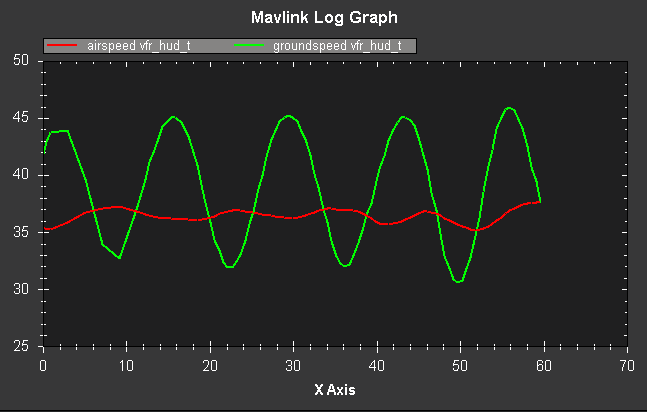
In this case you can see that while circling the ground speed varied quite a lot. That is because in this flight there was quite a strong constant wind (in this case about 7 meters/second).
Now look at where the average of the airspeed value lies in relation to the average of the ground speed. In the above graph you can see that the average airspeed is below the average ground speed by a small amount - in the above graph the difference between the two averages is about 2 meters/second.
Calculating a new airspeed ratio
Given the above graph you can calculate a new airspeed ratio using this formula:
NEW_RATIO = OLD_RATIO*((AVERAGE_AIRSPEED + AIRSPEED_INCREASE)/AVERAGE_AIRSPEED)²
where:
OLD_RATIO = the old value of ARSPD_RATIO
NEW_RATIO = the new value of ARSPD_RATIO
AVERAGE_AIRSPEED = the average airspeed you got during the test
AIRSPEED_INCREASE = the amount you want to increase the average airspeed by
For example, in the above graph we see an average airspeed of 36.5, and we would like to increase that by 2 to 38.5. The old ratio was 2.0. So we can calculate the new ratio as:
NEW_RATIO = 2.0 * ((36.5 + 2) / 36.5)² = 2.23
After adjusting the ARSPD_RATIO do another flight and check that the airspeed is now well calibrated. Don’t forget the pre-flight checks!
Note about higher altitudes
At higher altitudes you expect the true airspeed and apparent airspeed to start to diverge. The above calibration procedure assumes true and apparent airspeed are the same. If you are flying at altitudes of 2000 meters or more above sea level then you should take account of the difference, and aim for your apparent airspeed to be below the average ground speed by the ratio of true airspeed to apparent airspeed.
At an altitude of 2000 meters above sea level the difference between apparent and true airspeed is around 10%, so you would expect your average airspeed to be below the average ground speed by about 10%. At 4000 meters above sea level this rises to around 20%. At 5000 meters it is around 30%. Beyond that please consult an aircraft navigation table.