Automatic Tuning with AUTOTUNE
Getting a good set of roll/pitch tuning parameters for your aircraft is essential for stable, accurate flight. To help with this it is highly recommended that you use the AUTOTUNE system described below.
What AUTOTUNE does
The AUTOTUNE mode is a flight mode that flies in the same way as FBWA, but uses changes in flight attitude input by the pilot to learn the key values for roll and pitch tuning. So the pilot uses their transmitter mode switch to switch to AUTOTUNE mode and then flies the plane for a few minutes. While flying the pilot needs to input as many sharp attitude changes as possible so that the autotune code can learn how the aircraft responds.
Setting up for AUTOTUNE
To setup your aircraft for AUTOTUNE you need to select AUTOTUNE mode as one of the flight modes selectable with the flight mode switch on your transmitter.
You can also autotune the yaw axis during AUTOTUNE for yaw rate control in ACRO mode by setting YAW_RATE_ENABLE = 1 and ACRO_YAW_RATE to a value equal or less than the yaw rate capability of the vehicle(90 deg/s is a typical value). This of course assumes that the vehicle has yaw control surfaces(an elevon only flying wing does not, for example).
Note
you can AutoTune in most stabilized flight modes, such as CRUISE or FBWA/B, LOITER, or even during an AUTO mission segment (if STICK_MIXING is enabled), via an RCx_OPTION switch set to 107.
Warning
Large QuadPlanes can be difficult to fly manually while monitoring the GCS for tune progress messages or if you are not experienced in flying in pilot guided modes. In these cases, it is safer to do the tuning while in a repeating fixed course mission (ie. a rectangular loop for example) in AUTO or while LOITERing, using the the above RC Aux Switch to enable autotuning while not having to constantly guide the vehicle on course.
The AUTOTUNE_AXES bitmask selects which axes will be tuned while in Autotune. Default is roll, pitch and yaw.
Warning
AUTOTUNE is not designed to work well with RUDDER_ONLY vehicles for tuning roll. Manually tune the roll axis instead.
You also should choose a tuning level by setting the AUTOTUNE_LEVEL parameter in the advanced parameter screen of your ground station. The AUTOTUNE_LEVEL parameter controls how aggressive you want the tune to be. The default is level 6, which produces a medium tune, suitable for beginner to intermediate pilots. If you are a more experienced pilot then you could choose level 7, which will result in a bit sharper tune (faster attitude changes). Levels above 7 are not recommended until you have done an initial tune with a lower level. Levels above 8 should only be used by very experienced pilots.
Note
with Yaw rate controller active, turning in AUTOTUNE mode will require the use of rudder, not just aileron input. Do not enable YAW_RATE_ENABLE if you do not have a rudder.
Autotune tunes the FF (feedforward), P, I, and D terms at each AUTOTUNE_LEVEL, which determines the maximum/target slew rates used for the tuning process and the gain from desired attitude angle to demanded angular rate ( PTCH2SRV_TCONST and RLL2SRV_TCONST).
It is important to set a level appropriate for the rates that the aircraft can physically achieve. In particular, the level 6 roll rates can be too large for slow aircraft with large wing spans, like gliders. These often have a maximum roll rate of 30 - 40 degrees per second and should use level 2 or 3. See AUTOTUNE_LEVEL settings for the rates. But level 8 may be appropriate for light foam planes in the under 2kg class.
Note
the PTCH2SRV_RMAX_UP, PTCH2SRV_RMAX_DN, and RLL2SRV_RMAX rates should be set appropriately for normal flight also according to the vehicle’s capabilities.
You also need to make sure that all of the basic settings for your airframe are correct. In particular, ensure that all surface reversals are correct and that you have a reasonable value set for the minimum airspeed. Autotune won’t do anything until you are above the minimum airspeed you have set in the AIRSPEED_MIN parameter. If you don’t have an airspeed sensor then that value is still used, along with an airspeed estimate from other sensors. Also make sure you have done RC calibration, as AUTOTUNE will only work if you have full control movements with your transmitter sticks.
In addition, ArduPilot will automatically scale the tuning gains versus airspeed, either measured or estimated (if no airspeed sensor is used), to compensate for the control surface effectiveness vs speed. The nominal center speed for this is SCALING_SPEED and should be set to the approximate speed that will be used for tuning, ie the typical cruising speed. Once tuning is done with this speed set, do not change it since it directly scales the gains and will corrupt the tune.
Other things to check:
if you have an airspeed sensor fitted then make sure it is working and you have calibrated it. See the section on airspeed calibration.
check your center of gravity, making sure it is correct according to the manual for your aircraft. In general it is safer to be a bit more nose heavy than tail heavy.
check your surface trims. It is recommended to use the SERVO_AUTO_TRIM option after reading the documentation for that option.
make sure your failsafe settings are setup correctly. Try turning off your transmitter with your plane on the ground (and propeller removed or made safe) and check how the plane reacts
setup a rally point for a safe place to RTL if needed other than home
make sure that the PTCH_RATE_SMAX and RLL_RATE_SMAX parameters are appropriately set for your servos speeds. See Limit Cycle Detection. If these are set too low, then the tune will be impacted.
if this is a QuadPlane, and the INS_GYRO_FILTER has been raised significantly from 20Hz to facilitate better VTOL tuning and notch filter use, then AUTOTUNE may set its fixed wing control loop filters too high resulting in a poorer Fixed Wing tune. In this case, AUTOTUNE_OPTIONS can be used to prevent AUTOTUNE from changing them as part of the tune.
Flying in AUTOTUNE
Once you are all setup you can start flying in AUTOTUNE mode. You can either takeoff in AUTOTUNE mode, or takeoff in another mode and switch to AUTOTUNE once you have gained altitude.
When you engage AUTOTUNE mode a few things will happen:
the autotune system will immediately setup some values for your roll and pitch maximum rates and angle error to demanded rate gain. These values depend on the AUTOTUNE_LEVEL
the autotune system will monitor your demanded roll and pitch rates (as determined by your transmitter stick movements). When the demanded roll or pitch rate (or yaw rate if YAW_RATE_ENABLE = 1) exceeds 40% of the maximum tuning target axis rate set by the AUTOTUNE_LEVEL,(not stick deflection) the autotune system will use the response of the aircraft to learn the tuning values. So sharp stick movements are required with a slight pause at moderate to maximum stick deflections in each direction.
the autotune system will save the P and D parameters once the tune has been completed for an axis. When you switch out of AUTOTUNE mode the FF and I values will be saved. Switching out of AUTOTUNE in the midst of tuning an axis will revert the PID values to their original values.
If you are starting with the default parameters for roll and pitch you may find the plane is quite sluggish when you first enter AUTOTUNE. You will find that as the tune progresses this will get better. Make sure your flight area has plenty of room for long slow turns.
The key to a successful Autotune is to input rapid roll or pitch movements with the transmitter sticks. It is best only do one axis at a time, although tuning is occurring simultaneously on all axes being tuned, so tuning messages may be interleaved occasionally.
So rapid stick movements with short pauses at each deflection is used for each axis in turn until the tuning finished message is reported on GCS or OSD.
If your initial tuning values were too low then you should notice the aircraft becomes progressively more responsive as you fly in AUTOTUNE mode.
Stop increasing the AUTOTUNE_LEVEL on successive autotune sessions when the desired feel and responsiveness is obtained, oscillations occur, or it becomes “twitchy” in an axis.
Don’t stop too early
If you cannot monitor the tune progress with a GCS or OSD, it is recommended that you do at least 20 rapid movements in each axis, preferably more. Stopping before all axes are finished tuning will result in a poorly flying aircraft. Keep flying and exercising the sticks in AUTOTUNE mode well past the point where you think the plane is flying well.
Tuning light, agile aircraft
Very light, agile aircraft may fail to complete the tune, or result in a tune that has small oscillations, often in the pitch axis since it has low inertia. In these cases, it may be beneficial to do the following and re-attempt the Autotune:
Increase the main loop rate, SCHED_LOOP_RATE to “200” (Hz) and set the ONESHOT_MASK to those outputs controlling flight surface control servos (if they are capable of doing 200Hz updates…most digital servos are capable of this…check to see that they are not overheating as you move them). This increases the control update rate and decreases delay, increasing phase margin to attempt to eliminate small oscillations and increase accuracy.
Set the INS_GYRO_FILTER to “40” (Hz) cutoff and increase the PTCH_RATE_FLTT and RLL_RATE_FLTT to “20” (Hz) to reduce delay and increase phase margin.
Note
increasing the gyro filter cutof may allow more system noise into the control loops and setting up a dynamic throttle notch filter or in-flight FFT is recommended (if your autopilot firmware includes this feature.. see: Firmware Limitations ).
Testing Tune in Other Modes
The completed suceesfull tune obtained can be tested in any mode, not just the one (QHOVER or QLOITER) used for entry. A switch can be setup,``RCx_OPTION`` = 180 (AUTOTUNE_TEST_GAINS) that will allow switching between original and autotuned gains in any mode, after autotune has completed. If this switch is setup, but not changed after the auotune has completed, it has no effect. Otherwise if switched high the tuned gains are in effect, if low the original gains. Then they apply to any flight mode and will be made permanent upon the next disarm, based on switch position.
ACRO Mode YAW Rate Controller
As of version 4.2, ArduPilot provides the option for utilization of a rate controller for YAW, which behaves in the same manner as the pitch and roll controllers, but for the YAW axis controlled by the Rudder stick, assuming the vehicle has a rudder control surface.
To enable this functionality, set YAW_RATE_ENABLE to 1. When enabled, the ACRO_YAW_RATE parameter can be used to adjust maximum yaw rate demanded at rudder stick full deflections in ACRO mode.
This controller can be AutoTuned in the same manner as the pitch and roll axes, and in the same session using the Rudder control stick to produce the rapid yaw demands used by AUTOTUNE.
Note
while AutoTuning with this controller enabled, roll inputs will result in yaw outputs also, allowing more coordinated turns with the yaw controller active. This will normally result in simultaneously tuning the yaw controller with the roll controller, but not necessarily completing the yaw tune when the roll tune finishes. Also, there may be seemingly excessive rudder applied initially in the roll tune on vehicles with large yaw authority, until the tune progresses.
Autotune Level 0
This is a special level that does not change the rates or time constant (ie like RLL2SRV_RMAX or PTCH2SRV_TCONST) but tunes FF/P/I/D for the current values of those parameters. This may be useful when pitch is unstable at a lower AUTOTUNE_LEVEL level than roll, for example. You can set the ROLL axis values at more aggressive values than the pitch axis and proceed with a tune to re-optimize the FF/P/I/D values for that configuration.
Completing the tune
Once you have learned reasonable tuning parameters with autotune you should complete the tune by manually tuning some other key parameters.
The parameters that are needed for most airframes are:
NAVL1_PERIOD: This default is a very conservative value designed to cope with badly tuned airframes. It controls how sharply the aircraft will turn in automatic modes (such as AUTO, RTL and LOITER). Most aircraft should use a significantly lower value. To tune it, you should fly a rectangular mission in AUTO mode and adjust NAVL1_PERIOD down by 1 at a time until the aircraft turns at a rate you are happy with, and does not “wag its tail” in flight.
PTCH2SRV_RLL: This parameter controls how much elevator to add in turns to keep the nose level. Many aircraft require a small change to this parameter from the default of 1.0. To see if you need to tune this value you should hold a tight circle in FBWA mode by holding the aileron stick hard over while not giving any elevator input. If the plane gains altitude then you should lower PTCH2SRV_RLL by a small amount (try lowering to 0.95 initially). If the plane loses altitude while circling then try raising PTCH2SRV_RLL by a small amount (try 1.05 initially). If you need to go above 1.3 or below 0.8 then there is probably a problem with your setup (such as incorrect center of gravity, poor thrust line, poor airspeed calibration, too soft a tune on the pitch loop, or bad compass errors). You should try and fix the setup.
Note
If you have successfully tuned your plane with Autotune and see slow oscillations on the pitch axis (around ~1-2 Hz), lower PTCH_RATE_I to half of it’s value. And test fly again. Also, if you do not use an airspeed sensor, and get oscillations on full throttle takeoffs, you might try setting the FLIGHT_OPTIONS bit 6 (+64 in value) to avoid increased PIDs due to takeoff climb speed being lower than the speed at which the vehicle was autotuned.
There are many other parameters which can improve the performance of your aircraft, but these are the ones that most people need. Please read the normal manual tuning documentation for more information.
AUTOTUNE Logging
The progress of the autotune is recorded in the dataflash log. If you are trying to debug autotune or are posting about autotune on the forums then please include the dataflash log.
Here is a typical log file from an autotune session:
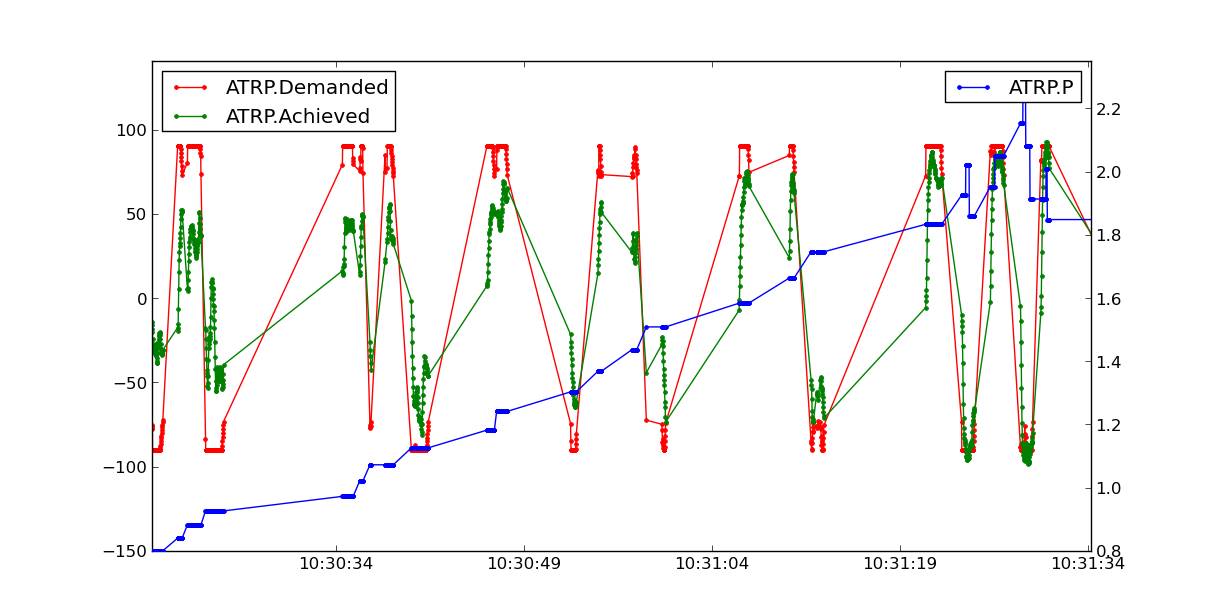
The ATRP message has a “Type” field that shows what type of autotune is being recorded. A Type value of 0 is for roll tuning, and a value of 1 is for pitch tuning. When graphing ATRP results you should choose data with a Type of either 0 or 1 (not both).
The ATRP.Demanded field is the demanded rate of attitude change (roll rate or pitch rate) in degrees per second. The ATRP.Achieved field is what the aircraft actually achieved in attitude change rate. As you can see in the above graph, at the start of the autotune the demanded values were much higher than the achieved, because the tuning gains were too low. As the tune progressed the demanded and achieved started to converge. The blue line in the above graph is the ATRP.P value, which is the P gain for the controller. You can see it rose from 0.8 up to a high of 2.2, then dropped back slightly to around 1.85.
You will also notice that the graph has gaps in it. This is for periods where the pilot was not demanding a high rate of attitude change. The autotune system only works while the pilot is demanding a rapid attitude change (above 80% of the maximum rate).
Manual tuning versus AUTOTUNE
For the very best performance with Plane you can perform a manual tune, perhaps starting with the values from Autotune. The Autotune system is designed as a conservative system to get reasonable values for most aircraft, it is not a “perfect tuner”, and manual tuning can result in better performance if you put the time and effort in. But it requires using and analyzing log file results.
It is still recommended that everyone start out with AUTOTUNE however. Correctly tuning an aircraft is not easy, and AUTOTUNE does better than the vast majority of users can do. So start with an AUTOTUNE and then explore the manual tuning guide starting from what AUTOTUNE produces if you want to push things further.
Manually increasing the D gain can improve the accuracy of the roll and pitch response and make the plane less affected by gusts and turbulence. The optimum value for D gain for a high performance tune can be found by increasing the gain in small increments until the aircraft starts to oscillate. The gain should then be halved from the value that caused it to oscillate. The oscillations that are generated using this method can be large, so do not perform this step unless you are prepared to take manual control. It is recommended that D gain tuning is performed at lower throttle settings and airspeeds.
If you adjust the I gain manually, then this also changes the value for P that is required to maintain the correct response, so adjusting the I gain is only recommended for advanced users.
AUTOTUNE_LEVEL settings
Level |
Rate [deg/s] |
1 |
20 |
2 |
30 |
3 |
40 |
4 |
50 |
5 |
60 |
6 (default) |
75 |
7 |
90 |
8 |
120 |
9 |
160 |
10 |
210 |
11 |
300 |
Note
Yaw rate target, if being tuned, is always 90 deg/sec