3DR Solo (Developer Information)
This page provides instructions for developers working with the 3DR Solo Ready-to-fly copter. The comprehensive 3DR solo dev guide can be found here.
Uploading custom firmware to the Pixhawk 2.1 (CubePilot CubeBlack)
Solo can be flown with ardupilot/master but when shipped by 3DR it runs a modified version of APM:Copter3.3.
The firmware can be found on Github here.
The source code can be found here: ardupilot, PX4Firmware, NuttX.
Compile instructions are the same as for master ardupilot for a Pixhawk with the exception that the modified repos should be used.
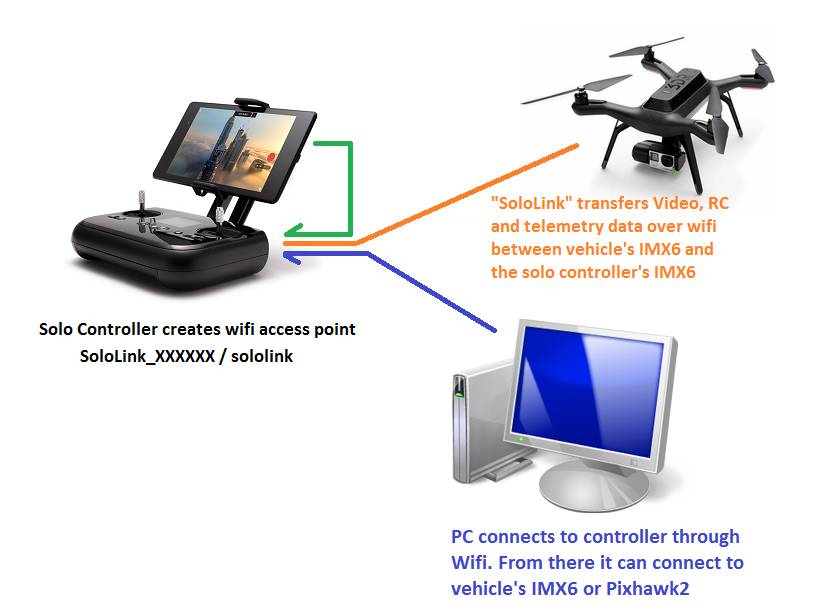
After modifying/building the firmware, turn on the Solo and connect your PC’s network to the Solo controller’s access point using the same login/password used by the Solo app (by default these are something like:
SoloLink_XXXXXX/sololink).Use scp to copy the ArduCopter-v2.px4 file from your PC to root@10.1.1.10:/firmware (i.e. the firmware directory on the IMX6 on the Solo vehicle). Windows users in particular may want to install Putty and use a command like below:
C:\Progra~2\PuTTY\pscp.exe -pw SSH-PASSWORD -scp ArduCopter-v2.px4 root@10.1.1.10:/firmware/
Note
The SSH-PASSWORD should be replaced with the actual ssh password for your vehicle. The default root password is TjSDBkAu.
Reboot the vehicle and the vehicle’s IMX6 should load the firmware onto the Pixhawk 2.1 (CubePilot CubeBlack) (you should see the regular rainbow colours on the arm LEDs as the upload proceeds).
After uploading the firmware is moved to the /firmware/loaded directory.
Changing the controller mode
ssh into the iMX6 board in your artoo (ssh root@10.1.1.1)
vi /firmware/cfg/stick-cfg-evt.cfg:
Mode 1:
throttle stick-id = 1, dir = 0
roll stick-id = 2, dir = 0
pitch stick-id = 3, dir = 1
yaw stick-id = 0, dir = 0
Mode 3:
throttle stick-id = 1, dir = 0
roll stick-id = 0, dir = 0
pitch stick-id = 3, dir = 1
yaw stick-id = 2, dir = 0
Mode 4:
throttle stick-id = 3, dir = 0
roll stick-id = 0, dir = 0
pitch stick-id = 1, dir = 1
yaw stick-id = 2, dir = 0
Copy /usr/bin/runStickCal.sh to a new file (in the same directory) called runStickMapper.sh
Edit runStickMapper.sh and replace:
stick-cal.py /dev/ttymxc1
with
stick-axis-cfg.py /dev/ttymxc1 /firmware/cfg/stick-cfg-evt.cfg