Starting up and calibrating Plane
This article describes the basic setup and calibration that should be performed before launching Plane.
Ground calibration
Set your transmitter mode switch to Manual. This is a safe mode in which to start up the system.
When you power on your board at the field, you should leave the plane motionless on the ground until the LEDs stop flashing blue and red (about 30 seconds). This means that the gyros have been calibrated.
Disengage the safety switch (if present)
If the autopilot has a safety switch connected, it must be disengaged before the vehicle can be armed.
Safety Switch LED Indications:
Fast Blinking indicates: Error Condition, Safety cannot be disengaged. Possibly not calibrated or sensor error.
Slow Blinking indicates: Safe condition. Safety can be disengaged by depressing Safety Button for 5 seconds.
LED Continuously on indicates: Safety has been disengaged. The autopilot may be armed with Throttle down and to the right.
When the LED is continuously on indicating Safety Disengaged it may be toggled back to a Safety engaged condition by depressing the Safety button for 5 seconds.
Note
Both the Safety engaged and Safety disengaged conditions require the button to be held down for 5 seconds to toggle them. This is a safety mechanism to prevent accidental disarming during flight and accidental arming during transportation.
Calibrate and check the Airspeed sensor (if present)
If the vehicle has an airspeed sensor then the pre-flight checks described here should be performed before each flight.
Warning
Be sure that the pitot ports are lightly covered during boot and/or forced pre-flight calibrations to prevent wind from causing a mis-calibration. And be sure to remove that cover before flight!
Wait for GPS lock
You should wait for GPS lock before flying which is normally indicated by the autopilot’s LEDs becoming green. If you do not wait for GPS lock the barometric altimeter calibration will be incorrect and RTL, Loiter, Auto and any other GPS dependent modes will not work properly.
For Plane the home position is initially established at the time the plane acquires its GPS lock. It is then continuously updated as long as the autopilot is disarmed.
This means that if you execute an RTL, your plane will return to the location at which it was armed. If the place you arm is not a good return point then please setup a rally point instead. A rally point will be used in preference to the home location for RTL.
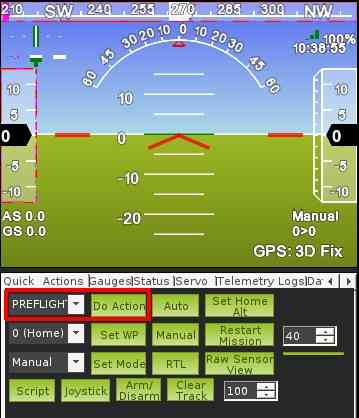
Check servo movements
BEFORE EVERY FLIGHT: before take off, hold the aircraft in your hands and switch to FBWA mode, then pitch and tilt the plane to confirm that the control surfaces move the correct way to return it to level flight. (The ailerons and elevators will move; the rudder only coordinates turns with the ailerons in flight, so it won’t move much on the ground). This will ensure that you haven’t accidentally reversed a channel.
You should do this before every flight, just as you move your control surfaces with your RC transmitter to ensure that nothing’s reversed. Failing to do this is the #1 cause of crashes.
Note
As a safety measure, your throttle will only arm on the ground in Manual mode, Stabilize or for an autotakeoff in Auto mode. It will not come on in any other Auto mode until you are in motion in the air.
First flight
It is highly recommended that you switch into either Stabilize or Fly By Wire mode and observe the behavior of the control surfaces. They should move to return the plane to level when you pitch or roll it. If it isn’t rock solid, you can tune the gains by following the instructions here.
If you have not tuned your PID gains then you may like to consider doing the first takeoff in AUTOTUNE mode. That will start the tuning process as soon as you takeoff.
Second flight
For your second flight, change the third mode (position 3 of your RC mode switch) to RTL in the Mission Planner’s mode setup page.
Once in the air switch the vehicle into RTL. This will test navigation. The aircraft should return to the location at which it armed (or the nearest Rally point) and orbit at a fixed altitude (which can be set with the Mission Planner).
If it does not return crisply and circle overhead in a near-perfect circle, you need to tune the autopilot a bit for your particular airframe. This can usually be done by adjusting the Roll parameters, as described here.
Once all this has checked out, you can program waypoint missions and test them in Auto mode.
Level Adjustment
You may find after flying your plane in FBWA at the desired cruise throttle setting, that it does not hold level attitude with the transmitter sticks centered. If this happens, perform the following:
1) With your autopilot powered on the ground and connected to your mission planner, select FBWA on your transmitter, select the FLIGHT DATA tuning window and plot the nav_roll and nav_pitch data. With your transmitter sticks centered, these should both be zero as shown in this screenshot. If they are not, you need to repeat your RC calibration or adjust your transmitter trims and repeat the FBWA flight test
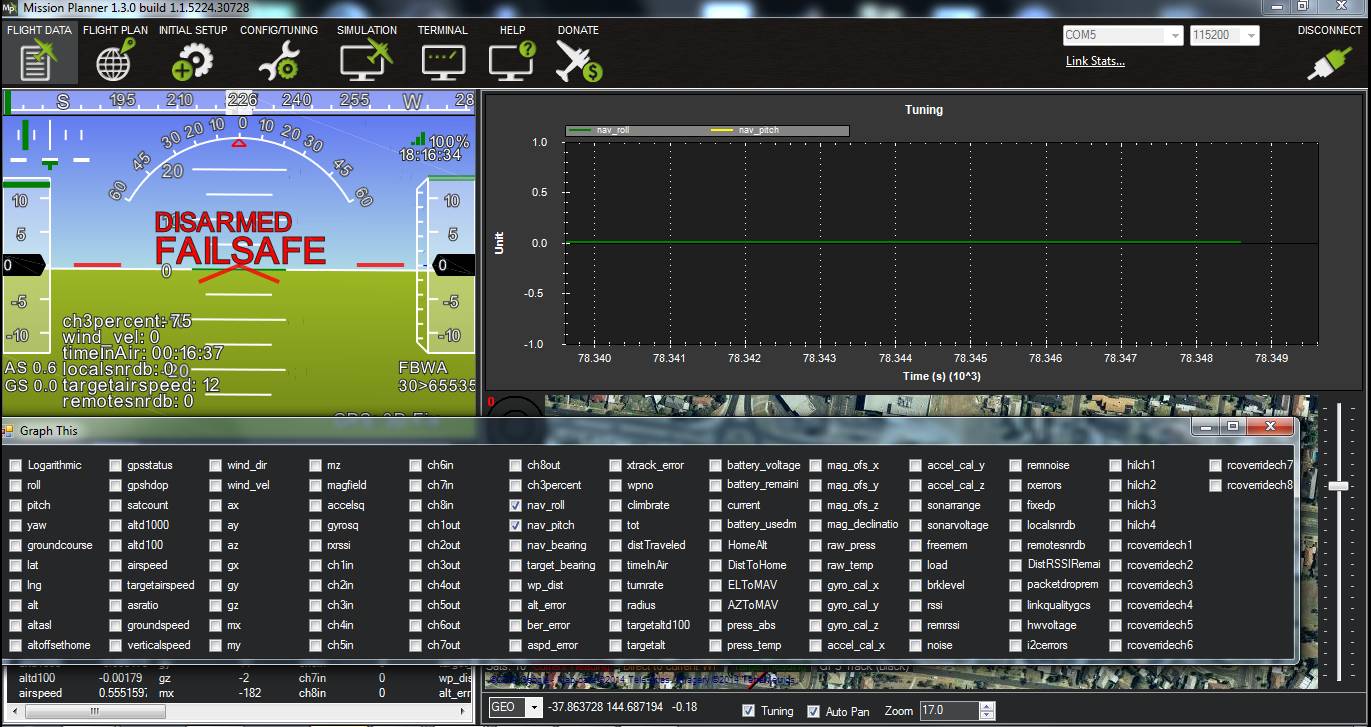
If they are zero, then you need to adjust the level trim for the difference in angle between the autopilot board and your planes attitude when flying straight and level, as explained below.
For roll errors (ie heading keeps changing with sticks neutral), use the “LEVEL” accelerometer calibrate button in Mission Planner with the wings level using a spirit level and the nose to tail fuselage line of the aircraft also level. Unless the plane is warped this will assure that the wings are level in flight. If the aircraft still rotates in heading with sticks neutral, then you will need to trim the rudder, if equipped, also in flight.
If the plane is not generally holding altitude in FBWA at the desired cruise throttle position (ie speed), then you can adjust the cruising pitch attitude using the PTCH_TRIM_DEG parameter. Most planes required this to be a few degrees positive for best cruise trim in FBWA. This parameter is in centi-degrees, so 3 degs is 300 for its value.