Arming Plane
Before you can fly your plane you need to arm it. Arming the aircraft before flight has two purposes:
prevent the motor from turning when the pilot is not ready to fly (a safety feature)
prevent takeoff before the autopilot is fully configured and ready to fly
The key thing that arming does is to enable the motor. You will not be able to start the motor (ie. control the throttle) until the aircraft is armed.
Note: If you have AHRS_EKF_TYPE set to 2 or 3 (you are using one of the EKFs) then it is particularly important that you have arming checks enabled for INS. Flying EKF without arming checks may cause a crash.
Warning
This feature in no way removes the need to respect the prop! When the plane is powered, ALWAYS avoid placing hands in the vicinity of the propeller, even when the throttle is disarmed. If all is not well with the autopilot electronics or software there is always a slight possibility that signal could unintentionally reach the motor. Even though this is unlikely (and made even less likely by safety features such as this) it only takes one time to chew up a finger or hand!
Configuring Arming
There are three parameters which control how arming works:
ARMING_REQUIRE: this controls whether an arming step is required. The default is 1, meaning that arming is required before takeoff. If set to 0 then arming is not required (the plane starts off armed).
ARMING_SKIPCHK: this controls what checks the autopilot does before arming is allowed. The default is 0, meaning all checks are done. Most users should leave it at 0, as the arming checks are important to ensure the autopilot is ready. See below.
ARMING_RUDDER: This parameter allows you to configure rudder based arming/disarming. The default is 1, meaning you are able to arm with right rudder. If you set this to 2 you can also disarm with left rudder. If you set this to 0 then you will only be able to arm/disarm via a ground station or RC channel input using its RCx_OPTION.
Warning
if ARMING_RUDDER is set to 2, then held left rudder can disarm the vehicle in ANY mode, if the autopilot judges that the vehicle is not flying. This flying check CAN be incorrect under certain extreme circumstances, and disarming of the vehicle while still in flight, while rare, could occur.
Arming Checks
Before allowing arming the autopilot checks a set of conditions. All conditions must pass for arming to be allowed. If any condition fails then a message explaining what failed is set to the GCS. Any or all of the Pre-Arming Checks can be disabled, but it is not recommended. See the Pre-Arm Safety Checks topic for more information.
IMPORTANT: RC Transmitter Calibration
It is essential that your RC radio transmitter be calibrated correctly before continuing. Please see the Calibrate your RC input wiki page if you don’t know how to calibrate your radio.
When calibrating your RC input you should also be careful to set the minimum value of the throttle (usually RC3_MIN) to the minimum value when in normal flight control. Don’t set it to the value used by your transmitter when in throttle failsafe or you won’t be able to arm using the rudder as the autopilot will think you are at a non-zero throttle level.
How to Arm
When you are ready to fly you can ask Plane to arm. This can be done in three ways:
Rudder Arming. Hold the rudder stick fully to the right and the throttle stick fully down for 3 seconds.
Note
when rudder arming in QuadPlanes with an autotakeoff, the motors will spin at Q_M_SPIN_ARM and not takeoff until the rudder stick is returned to neutral. Similarly, for normal plane MODE TAKEOFF, or NAV_TAKEOFFs, the arming will not actually occur until the rudder stick is returned to neutral to prevent the takeoff starting with full right rudder.
If setup, you can use one of the RC_xOPTION switches that includes that function. See switch option “153”, “154, or “160”.
GCS Arming. Press the arming button on your ground station
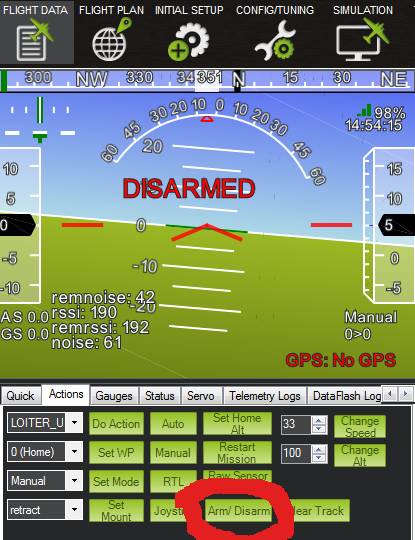
Location of the Arm/Disarm button in Mission Planner (button circled in red near the bottom of the image).
Note
Plane does not allow arming in RTL, QRTL, or QLAND modes. Arming in other throttle controlled modes, like LOITER,CRUISE,etc. is possible, but only if actually flying (ie after an accidental inflight disarm, watchdog reset, etc.)
How to Disarm
If setup, you can use one of the
RC_xOPTIONswitches that includes that function. See switch option “81”, “153, or “154”.
Warning
This is UNCONDITIONAL. If done while in flight, all motors disarm and you must have throttle at idle before re-arming can occur!
It is also possible to disarm using the transmitter. This is done holding throttle at minimum and rudder to the left for 2 seconds. In ArduPlane this condition could be accidentally triggered by pilots while flying so there are additional requirements prior to disarm:
You need to allow rudder disarming by changing ARMING_RUDDER parameter to 2 (ArmOrDisarm) or use the ARM/DISARM switch function provided by setting an RC channel’s RCx_OPTION to 153.
The autopilot needs to make sure that you are not actually flying. There is an algorithm for this that uses the airspeed sensor readings. So you need this source available and giving values lower enough (in a windy day you might not be able to disarm even landed if the plane thinks you are still flying)
You can also disarm without using the transmitter with one of the following methods:
use a ground station to issue a disarm command
use the safety switch on your aircraft (if using a Safety Switch)
after an auto-landing (either via mission or QLAND in QuadPlane) the plane will automatically disarm after 20 seconds if still on the ground (controlled by LAND_DISARMDELAY parameter)
Visual and Audible signals
ArduPlane will provide visual and audio clues to the arming state if your autopilot has notification LEDs and a buzzer. The clues are:
if the autopilot is disarmed, but is ready to arm then the large 3-colour LED will be flashing green
if the autopilot is armed and ready to fly the large 3-colour LED is solid green
when the autopilot is ready to arm it will play a “ready to arm” sound on the buzzer
when the autopilot is armed or disarmed it will play the corresponding sound
See the sounds page to listen to what the buzzer sounds like for each state.
Unless the ARMING_OPTIONS bit 1 is set, text messages will be sent to the GCS to indicate when arming or disarming has occurred.
Throttle output when disarmed
When the plane is disarmed the throttle channel will not respond to pilot input. There are two possible behaviors you can configure:
ARMING_REQUIRE = 1. When disarmed the minimum value for the throttle channel (normally RC3_MIN) will be sent to the throttle channel
ARMING_REQUIRE = 2. When disarmed no pulses are sent to the throttle channel. Note that some ESCs will beep to complain that they are powered on without a control signal or even refuse to initialize and operate.
Diagnosing failure to arm
It can be frustrating if your plane refuses to arm. To diagnose arming issues follow this guide
In Landing Sequence Pre-Arm Failure
If the last mission item was a landing sequence or land command, then arming is prevented and a “Prearm: In Landing Sequence” message is presented. This can occur after an autoland, or if the autopilot is booted before RC is established and the failsafe mode uses a landing sequence (ie Using DO_LAND_START and RTL_AUTOLAND is set, QLAND, etc.).
This may be cleared by restarting the mission using the GCS or Auxiliary Functions switch, or rebooting with RC active.
Check that it is ready to arm
If your board has a “ready to arm” LED (the large LED in the middle of the board on a Pixhawk, for example) then that LED should be flashing green when the board is ready to arm. If it is flashing yellow then that indicates that one of the arming checks is not passing.
Try arming
Try sending an arm command with your GCS. If arming is refused then a message will be sent from the autopilot to the GCS indicating why it is refusing to arm.
Rudder arming
If you are using right-rudder + zero-throttle to arm and you don’t get a message on your GCS giving a arming failure reason then it may be that your RC calibration is a bit off and the autopilot is not quite seeing zero throttle or isn’t quite seeing full right rudder.
Reasons for refusing to arm
When the autopilot refuses to arm it sends a STATUSTEXT MAVLink message to the GCS explaining why it is refusing. Some possible reasons why the autopilot can refuse to arm are (See the Pre-Arm Safety Checks topic for more information):
barometer not healthy. This is very rare. If it happens repeatedly then you may have a barometer hardware fault.
airspeed not healthy. If you have a airspeed sensor fitted and the autopilot is not getting an airspeed reading it will refuse to arm.
logging not available. If your microSD card has failed or is corrupt then logging won’t be available and you cannot arm.
gyros not healthy. If the gyros have failed the autopilot will refuse to arm. This is rare, and if it happens repeatedly then you may have a hardware failure.
gyros not calibrated. This happens when the automatic gyro calibration at startup didn’t converge. Try rebooting the autopilot with the plane held still.
accels not healthy. If the accelerometers have failed the autopilot will refuse to arm. Try recalibrating your accelerometers.
GPS accuracy errors. There are 4 types of GPS arming errors that can be reported. They are “GPS vert vel error”, “GPS speed error”, “GPS horiz error”, “GPS numsats”. Try moving your plane for better GPS reception or switching off any RF sources (such as a FPV transmitter) that may be interfering with your GPS.
Mag yaw error. This happens when your compass is badly out of alignment. Check your compass orientation and re-do your compass calibration or move your plane further away from any magnetic materials.
EKF warmup. This happens when the EKF is still warming up. Wait another 10 seconds and try again.
AHRS not healthy. This means the EKF is not healthy. Often this is due to large variations in GPS position and/or velocity reports, even if a solid 3D lock is reported by the GPS and HDOP is low. Be sure your GPS has a clear “view” of the sky with no obstructions. If the error persists then try rebooting your board.
3D accel cal needed. This happens when you have not done a 3D accelerometer calibration.
Inconsistent accelerometers. This happens when you have multiple IMUs (such as the Pixhawk which has two) and they are not consistent. This can be caused by temperature changes. If the error doesn’t clear itself after a minute you will need to redo your accelerometer calibration.
Inconsistent gyros. This happens when you have multiple gyros and they are not reporting consistent values. If the error does not clear itself after 30 seconds then you will need to reboot.
Limit errors. The arming checks some of your parameter settings to make sure they are in a reasonable range. The checks are “ROLL_LIMIT_DEG too small”, “PTCH_LIM_MAX_DEG too small”, “PTCH_LIM_MIN_DEG too large”, “invalid THR_FS_VALUE”.
GPS n has not been fully configured. This happens with a uBlox GPS where the GPS driver is unable to fully configure the GPS for the settings that are being requested. This can be caused by a bad wire between the autopilot and GPS, or by a bad response from the GPS. If the message is about “GPS 0” then it is the first GPS. If it is “GPS 1” then it is the 2nd GPS. If you get a failure for the 2nd GPS and don’t have two GPS modules installed then set GPS_TYPE2 to zero to disable the 2nd GPS