ARCHIVED
ZED stereo camera for Non-GPS Navigation
This article explains how a ZED stereo camera can be used with OpenKai as a substitute for a GPS allowing position control modes like Loiter, PosHold, RTL, Auto.
Required Hardware
Setup
connect the autopilot and TX1 as shown on the NVidia TX1 as a Companion Computer wiki page
flash the TX1 as described in the Setup the TX1 section of the above wiki page but use the apsync-tx1-openkai image from firmware.ardupilot.org
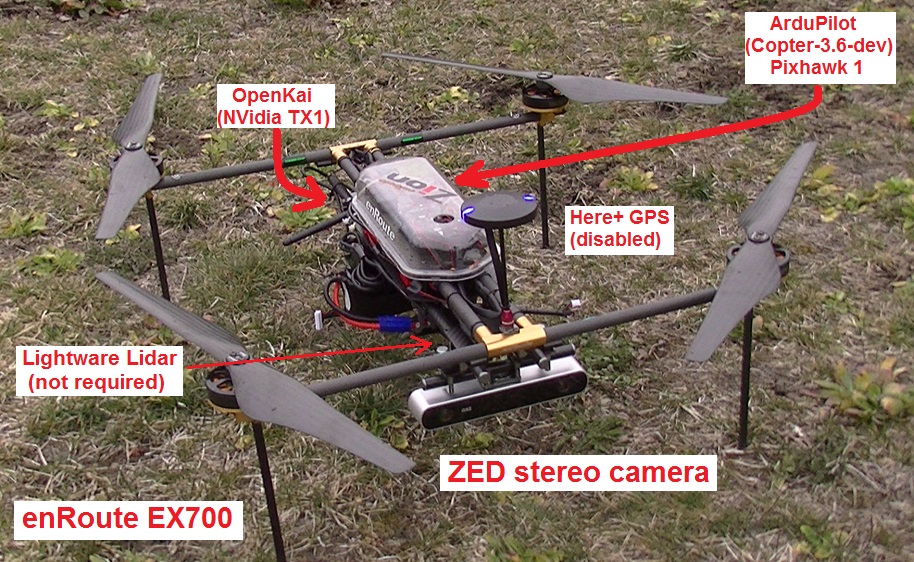
mount the ZED camera upside-down and using vibration dampeners to the front of the vehicle. It can be mounted right-side-up after connecting with ssh and then modify ~/src/OpenKAI/kiss/apmCopter.kiss so “bFlip” is 1.
in order to download the ZED camera’s calibration parameters from stereolabs.com, connect the TX1 to the Internet with an Ethernet cable during powerup (this procedure is only required once)
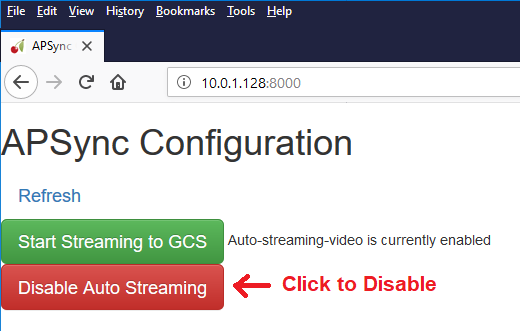
disable APSync’s video streaming (so that OpenKai can use the camera) by connecting your computer to APSync’s access point (
ssid=ardupilot, pw=ardupilot), then open a browser tohttp://10.0.1.128:8000and click the red Disable Auto Streaming button (button should turn green) and reboot the TX1.
Configuration through the Ground Station
Example setup below shown for first proximity sensor:
enable communication between the TX1 and autopilot using the Setup the Pixhawk instructions from the tx1 setup wiki page
set AHRS_EKF_TYPE to 3 (means use EKF3)
set EK2_ENABLE to 0 (disable EKF2)
set EK3_ENABLE to 1 (enable EKF3)
set GPS1_TYPE to 0 (disable the GPS)
set VISO_TYPE to 1 (enable visual odometry)
optionally set PRX1_TYPE to 2 (enable using ZED’s depth map for object avoidance)
Optionally you may also:
set the VISO_POS_X, VISO_POS_Y and VISO_POS_Z to account for the camera’s offset from the IMU or vehicle’s center-of-gravity (more details here)
mount the camera in other orientations and change the VISO_ORIENT parameter. Note: if you are using the ZED’s depth sensing you will also need to modify OpenKai’s configuration (not documented)
Ground Testing
Plug in the vehicle’s LiPo battery so that both the TX1 and autopilot are powered
Connect the autopilot to a ground station using a USB cable
If you are using Mission Planner as your ground station, once messages are successfully passing from the ZED/TX1 to the autopilot: - a proximity viewer should appear showing the distance to objects ahead of the vehicle (if PRX1_TYPE was enabled above) - “Bad Vision Position” message should disappear from the HUD
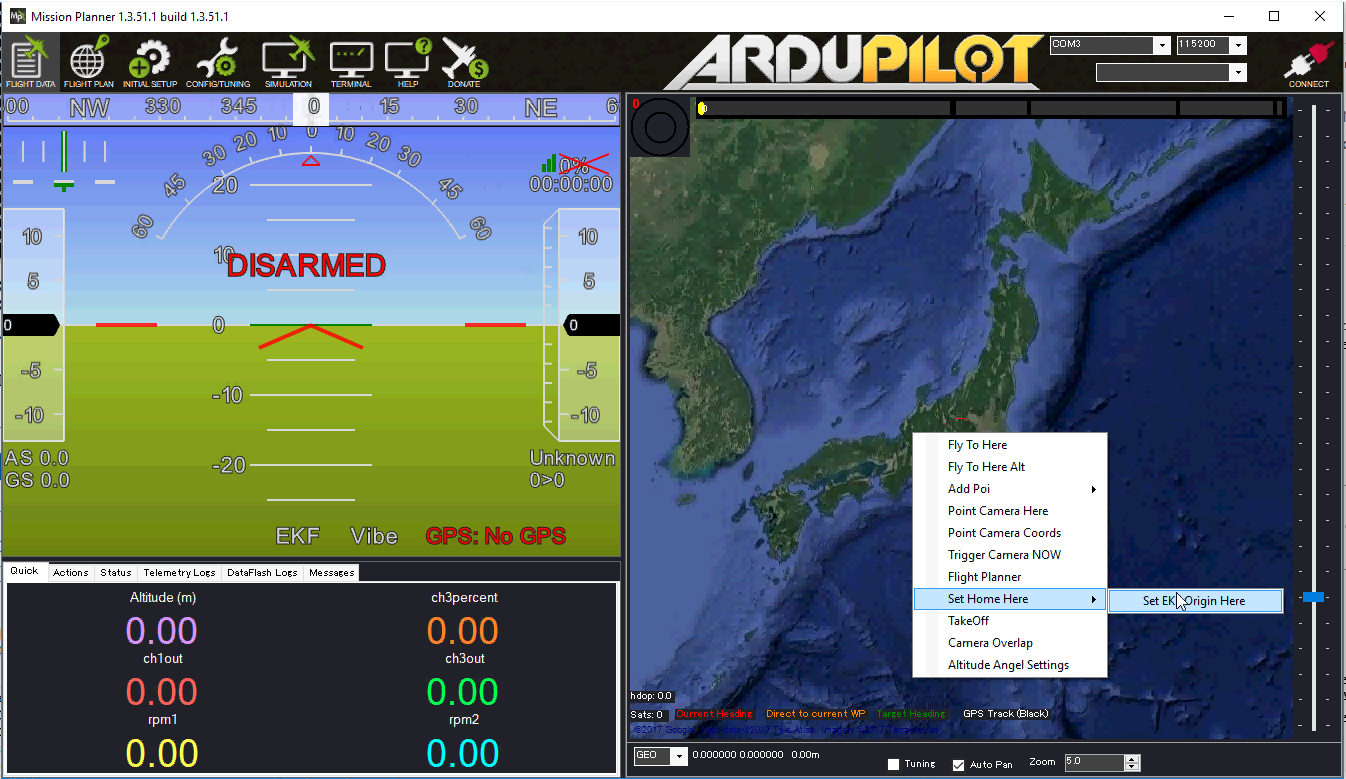
Set the home position from the ground station map (from MP’s Flight Data screen, right-mouse-button-click on the map and select “Set EKF Origin Here”). The vehicle should appear on the map.
Pick-up the vehicle and walk it around checking that the vehicle’s position movements are shown on the map
Flight testing
Setup the vehicle with AltHold and Loiter flight modes
Setup an auxiliary switch to enable/disable object avoidance and move switch to the off position. Alternatively set PRX1_TYPE to 0. This helps ensure the vehicle will not backaway from objects in AltHold mode which could surprise the pilot.
Attempt to arm and take-off in Loiter mode
DataFlash logging
The ZED’s visual odometry information will appear in the VISO dataflash log messages.
Distance to objects ahead of the vehicle will appear in the PRX messages.
EKF’s visual odometry information will appear in XKFD messages