XFRobot Gimbals
XFRobot gimbals can be controlled using a custom serial protocol
Warning
Support for these gimbals is available in ArduPilot 4.7 (and higher)
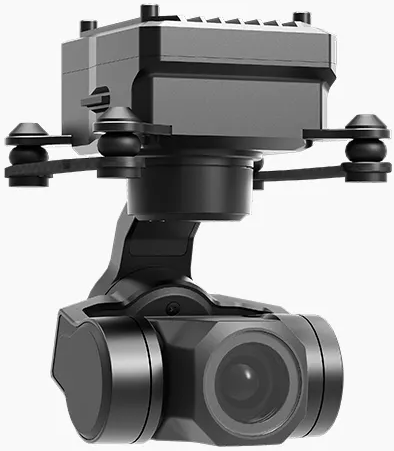
Where and What to Buy
XFRobot gimbals can be purchased from allxianfei.com or AliExpress
Install ArduPilot with XFRobot Support
Support for the XFRobot gimbals is available in ArduPilot 4.7 (and higher) but some boards may require the ‘HAL_MOUNT_XFROBOT_ENABLED’ build option to be enabled which can be done using the Custom Build Server
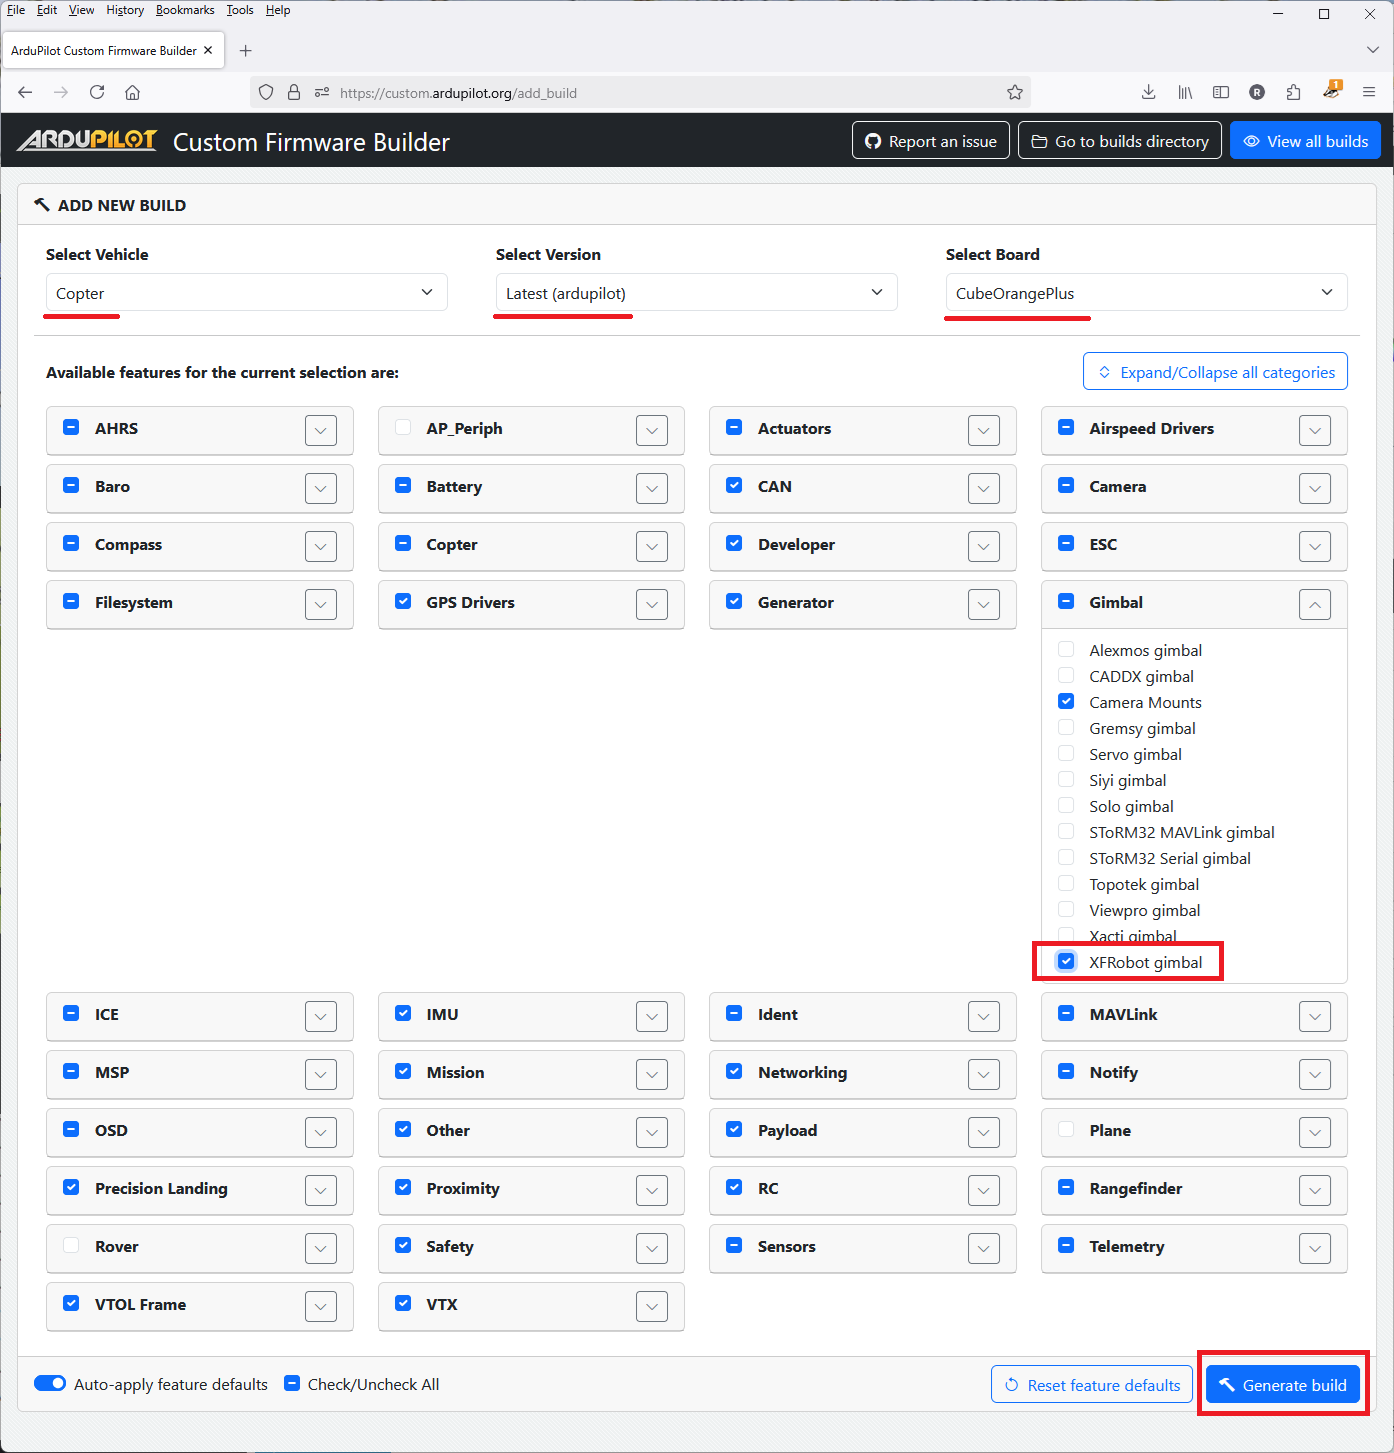
More instructions on using the Custom Build Server can be found here
Connecting to the Autopilot
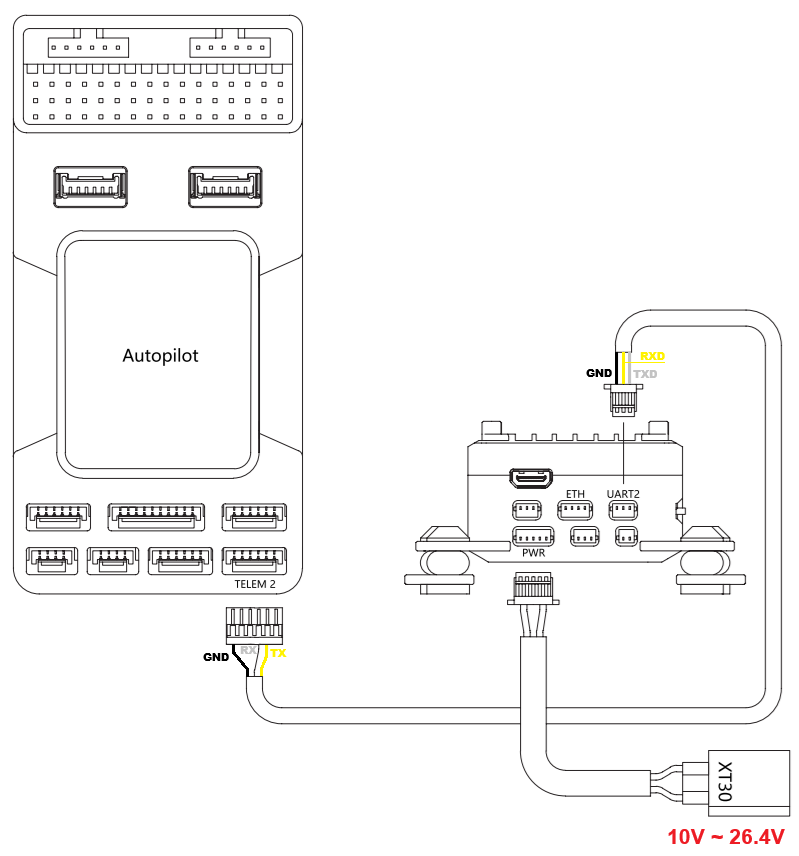
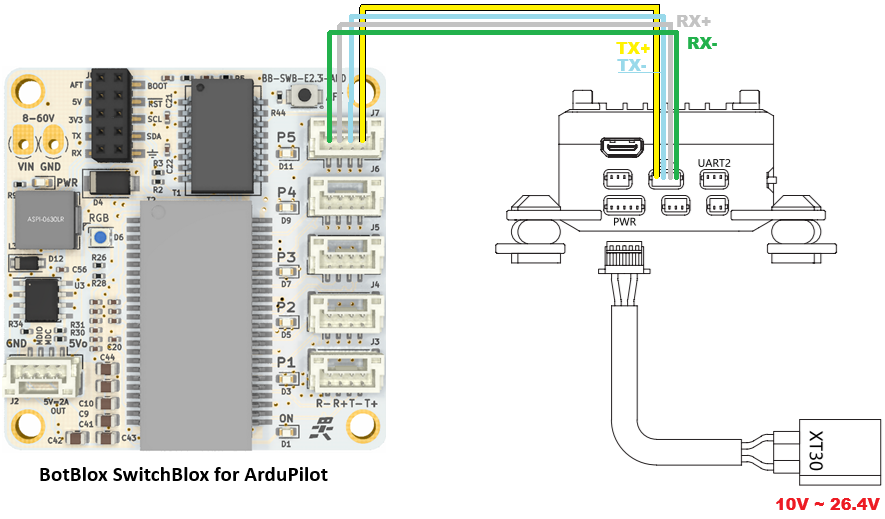
If using the XFRobot Z-1 mini, connect the gimbal’s UART2 port to one of the autopilot’s serial ports as shown below
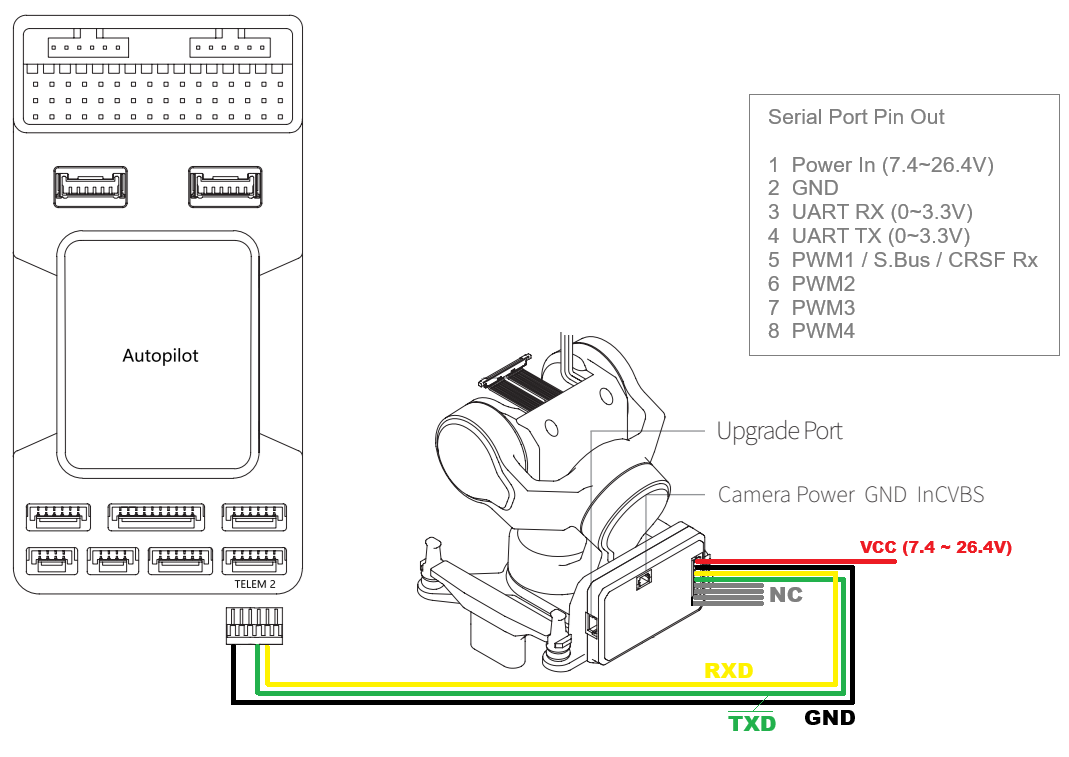
If using the XFRobot C-20T, connect the gimbal’s serial port to one of the autopilot’s serial ports as shown below
Connect with a ground station and set the following parameters. The params below assume the autopilot’s telem2 port is used
SERIAL2_PROTOCOL to 8 (“Gimbal”)
SERIAL2_BAUD to “115”, “250”, “500” or “1000” (the gimbal auto detects the baudrate)
CAM1_TYPE to “4” (“Mount”)
MNT1_TYPE to “14” (“XFRobot”) and reboot the autopilot
MNT1_ROLL_MIN to -50
MNT1_ROLL_MAX to 50
MNT1_PITCH_MIN to -90 (down)
MNT1_PITCH_MAX to 90 (up)
MNT1_YAW_MIN to -160
MNT1_YAW_MAX to 160
MNT1_RC_RATE to 60 (deg/s) to control speed of gimbal when using RC targeting
RC6_OPTION = 213 (“Mount Pitch”) to control the gimbal’s pitch angle with RC channel 6
RC7_OPTION = 214 (“Mount Yaw”) to control the gimbal’s yaw angle with RC channel 7
RC8_OPTION = 163 (“Mount Yaw Lock”) to switch between normal yaw operation and locking mount heading with RC channel 8 (in RC Targeting mode only).
Ethernet Connectivity
Instead of using a UART serial connection to control the gimbal, an Ethernet virtual serial connection may be used
An example of the setup of the gimbal in a networked ArduPilot vehicle system is detailed in Ethernet Connected Vehicle Example but in short, to control the gimbal over Ethernet:
Connect the gimbal and autopilot using an ethernet adapter
Ensure the autopilot and gimbal are on the same subnet (e.g the first 3 octets of the IP address match, 4th octet is different)
The gimbal’s IP address defaults to 192.168.144.108
Set the autopilot’s NET_ENABLE = 1 and reboot to enable networking
Set the autopilot’s IP address using NET_IPADDR0, NET_IPADDR1, NET_IPADDR2, NET_IPADDR3 (e.g. 192.168.144.14)
Create a serial connection over ethernet
Set NET_P1_TYPE = 3 (TCP Client) and reboot the autopilot
Set NET_P1_IP0, NET_P1_IP1, NET_P1_IP2, NET_P1_IP3 to the gimbal’s IP address (e.g. 192.168.144.108)
Set NET_P1_PORT = 2332 (port that gimbals listens for commands on)
Set NET_P1_PROTOCOL = 8 (Gimbal)
The camera’s live video is available at rtsp://192.168.144.108. If connected to a PC, VLC can be used to test the feed
Open VLC
Select “Media”, “Open Network Stream” and enter the RTSP URL, rtsp://192.168.144.108
If using QGC, the live video can be configured from the “Application Settings”, “General” screen. Set “Source” to “RTSP Video Stream” and “RTSP URL” to rtsp://192.168.144.108
If using Mission Planner, the live video can be displayed on the Data screen by following these instructions
Firmware Upgrades
Both the camera and gimbal firmwares can be upgraded as described in the “GCU Upgrading” and “Gimbal Upgrading” sections of the user manual. The user manual for each camera gimbal can be found on its product page’s “Downloads” tab. The process is also outlined below.
Camera firmware upgrade procedure:
Open a browser to https://www.allxianfei.com/en/uav-payloads/, select the camera gimbal being used
Click the Downloads tab and Download “GCU_Upgrade_Tool_Vx.x.xx”, extract the contents of the file to a Windows PC
Connect a PC to the camera gimbal’s ethernet port using the provided RJ45 cable
Power on the camera gimbal
On the windows PC:
Open Settings, Ethernet Settings, IP assignment, Manual, IPv4 On, IP address of 192.168.144.99
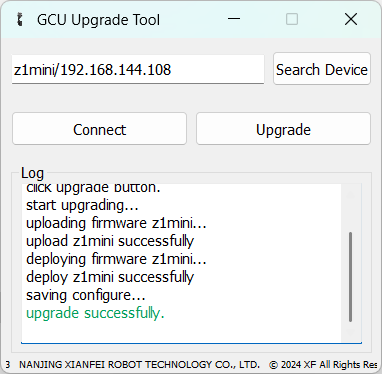
run the “GCU Upgrade Tool.exe” (downloaded above)
Run the GCU Upgrade Tool (downloaded above):
Push the “Search Device” button
Push the “Connect” button
Push the “Upgrade” button
Gimbal firmware update procedure:
Open a browser to https://www.allxianfei.com/en/uav-payloads/, select the camera gimbal being used
Click the Downloads tab and Download “Gimbal_Upgrade_package_V3.6”, extract the contents of the file
Connect a PC to the gimbal’s UART1 port using the provided USB-to-Serial converter
Power on the gimbal
On a Windows PC run GimbalConfig.exe (downloaded above)
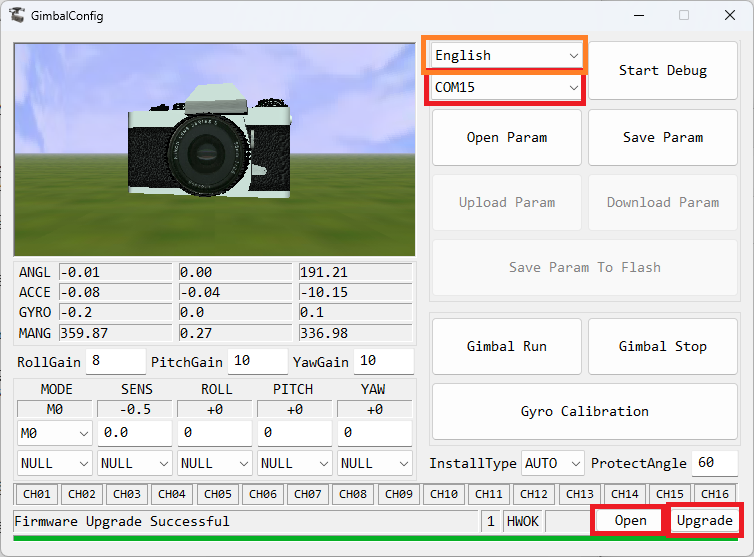
On the GimbalConfig application:
Set the language to “English”
Select the gimbal’s COM port
Push the “Open” button near the bottom left and select the “Gimbal_Firmware_V3.6.cahf” downloaded above
Push the “Upgrade” button
The gimbal can be tested by pushing the “Start Debug” and note that the camera image moves with the gimbal
Control and Testing
The camera and gimbal can be tested using the Dragonfly application which is available from each product page’s Download tab. Alternatively VLC can be used, select Media, Network Stream and enter rtsp://192.168.144.108
See Gimbal / Mount Controls and Camera Controls for details on how to control the camera and gimbal using RC, GCS or Auto mode mission commands
Downloading Images and Video
Images and videos captured by the camera can be remotely downloaded to a companion computer or PC via Ethernet using this xfrobot-download.py Python script