GeoFencing
ArduPilot supports a home based Cylindrical (“TinCan”) and Polygonal and/or Cylindrical, Inclusion and/or Exclusion regions. Inclusion and Exclusion Fences are defined easily in Mission Planner under the PLAN screen and loaded to the autopilot, using the FENCES item in the drop down box, just like Missions or Rally Points are planned.
Some vehicles can also have maximum and/or minimum altitude limits. Some flight modes will try to prevent exceeding these limits automatically, a fence breach will be declared in all modes if exceeded.
Upon Fence breach, selectable actions are taken.
General Setup
Set FENCE_ENABLE = 1 to enable fences. This enables any fences that are setup, except the ALT_MIN fence, which must be enabled by using any fence enable means (GCS message, AUTOENABLE in plane, RC switch)
Set FENCE_ACTION = to whatever you wish for a breach action. These will vary depending on vehicle type. See Fence Breach Actions above.
Set FENCE_OPTIONS Set bit 1 to prevent mode changes after a fence breach until the vehicle returns within the fence boundary (Plane only, Copter/Rover do not allow mode changes while in breach). Set bit 2 to use the Union of inclusion areas instead of just Intersects. Set bit 3 to provide GCS warning when vehicle is less than FENCE_MARGIN from a breach. This parameter is also used in avoidance and path planning.
Set FENCE_ALT_MAX = to the altitude limit you want (in meters). This is unavailable in Rover.
Set FENCE_MARGIN = to the distance from the fence horizontal boundary the vehicle must maintain in order to prevent a breach.
Set the FENCE_ALT_MIN as a minimum altitude breach boundary. This is unavailable in Rover.
Set FENCE_ALT_MAX_TP and FENCE_ALT_MIN_TP to select the altitude reference frame used by the maximum and minimum altitude fences, respectively. See Altitude Fence Reference Frames below. These are unavailable in Rover.
Set FENCE_AUTOENABLE = (Plane Only)to allow automatic enabling of the fence (different than FENCE_ENABLE) under certain vehicle conditions, such as upon arming or takeoff. A value of 0 disables this feature. FENCE_ENABLE is ignored if this feature is enabled. Using FENCE_AUTOENABLE = 3 (enable on ARM) is the only recommended use. “1” or “2” functions are being deprecated shortly since they can produce undesirable results in terms of containment.
FENCE_RET_RALLY allows returning to the nearest RALLY point (See: Rally Points), if loaded, instead of HOME.
Set FENCE_TYPE = is a bitmap set to enable the various fence types: MIN or MAX altitude, simple CIRCLE tin can around HOME, or POLYGON fences. The POLYGON fences must also have been loaded via a fence list from a ground control station in order to be active. See below for detailed setup of Cylindrical Fence and Inclusion and Exclusion Fences.
Note
Polygon fence type includes the circular fences specified in the Inclusion/Exclusion fence list. The simple home centered CIRCLE fence is a separate fence. Rover ignores altitudes, if set.
Defaults for FENCE_TYPE are:
Rover: CIRCLE and POLYGON
Copter: ALT MAX, CIRCLE, and POLYGON
Plane: POLYGON
Detailed Setup
Types of Fences
TYPE OF FENCE |
|
PLANE |
COPTER |
ROVER |
|---|---|---|---|---|
|
0 |
X |
X |
|
|
1 |
X |
X |
X |
|
2 |
X |
X |
X |
|
3 |
X |
Note
if FENCE_TYPE =2 inclusion zones overlap, a fence breach will occur when crossing a boundary, even if within another inclusion zone, UNLESS FENCE_OPTIONS bit 1 is set to make all inclusions zones a union set.
Altitude Fence Reference Frames
The maximum and minimum altitude fences (FENCE_ALT_MAX and FENCE_ALT_MIN) are altitudes above home by default. The altitude reference frame for each can be selected with FENCE_ALT_MAX_TP and FENCE_ALT_MIN_TP, respectively:
0: above mean sea level (AMSL)
1: above home (the default, and the behaviour of previous releases)
2: above the EKF origin
3: above terrain
These parameters are unavailable in Rover. The altitude fences are global limits, independent of any Inclusion/Exclusion fence boundaries, which are horizontal-only.
Note
Using the above terrain frame (3) requires a terrain database (see Terrain Following) and will prevent arming until terrain data is available. If the vehicle cannot determine its altitude in the selected frame while flying, the corresponding fence is treated as breached.
Fence Breach Actions
If enabled, and the fence boundaries or altitudes(FENCE_ALT_MAX and FENCE_ALT_MIN), if non-zero, are exceeded, Plane will execute the FENCE_ACTION below:
FENCE_ACTION |
Plane |
|---|---|
0 |
Report Only |
1 |
RTL |
6 |
Guided to return point |
7 |
Guided to return point with pilot throttle control |
8 |
AUTOLAND mode, or RTL |
The return (and loiter) point, unless FENCE_RET_RALLY is enabled, is the geometric center of the breached fence boundary. If FENCE_ACTION is set to a guided return mode (6 or 7), the altitude at which it returns is determined by FENCE_RET_ALT or if FENCE_RET_ALT is zero, midway between the altitude limits, if non-zero. If both altitude limits are zero, then it will return at current altitude.
The return point can also be replaced by the nearest rally point (See: Rally Points) as a destination, if FENCE_RET_RALLY is enabled.
Note
while executing any action that requires a mode change (ie. all except Report Only), any additional fence breaches are recorded but ignored. For example, RTL that has an AutoLand will breach a MIN_ALT fence, if enabled, but take no action and finish the landing.
Modes changes cannot be executed after the fence breach unless the FENCE_OPTIONS bit 0 is set to “0”. By default it is set to “1” to prevent mode changes. When set, the vehicle must return to within the fence boundary in order to change modes. If mode changes are allowed, you can also return to the mode that was active upon breach by using an RC auxiliary switch set to option “96” (Re-read mode switch).
Enabling the Fence with an RC Channel Auxiliary Switch
It is not necessary to set-up a switch to enable or disable the fence but if you wish to control the fence with a switch follow these steps:
An RCx_OPTION can be set via the Config/Tuning > Full Parameter List screen, for example using RC channel 7:
Set RC7_OPTION = 11 (Fence Enable)
setting the switch high (i.e. PWM > 1800) will enable all configured fences, low (under 1800) will disable all fences.
Note
if the Minimum Altitude fence is enabled by the switch while on the ground and disarmed, a pre-arm failure will occur preventing arming.
Automatic Altitude Breach Avoidance
For landing modes (NAV_LAND,QLAND,LAND,etc.) in Copter and Plane, the FENCE_ALT_MIN limit is automatically disabled.
When in Mode FBWB or CRUISE, Plane will attempt to limit altitude target changes by the pilot (ie using Pitch stick for climb/descent rate demand inputs) to avoid breaching a maximum or minimum altitude fence.
Note
altitude control imperfections can still result in a breach unless the FENCE_MARGIN param is loose enough to accommodate these imperfections.
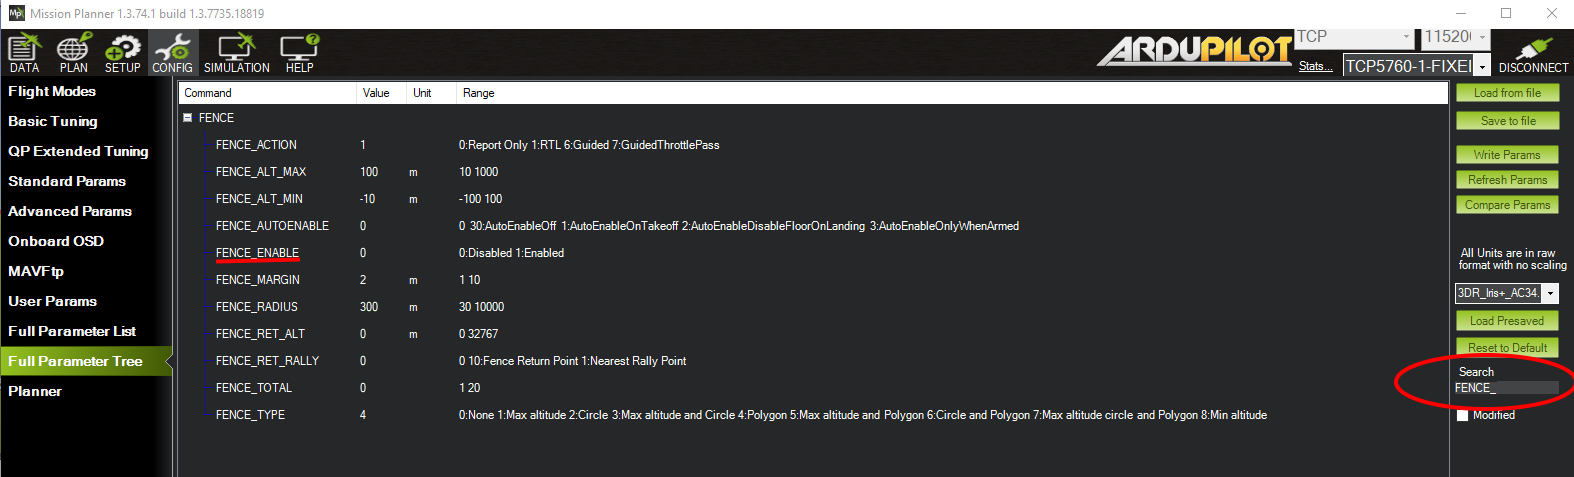
Enabling Fences in Mission Planner
To enable Fences, go to the Mission Planner full parameter list (CONFIG->Full Parameter Tree), search for items with FENCE_:
Use for R/C Training
One of the main uses of geo-fencing is to teach yourself (or someone else) to fly radio controlled vehicles. When you have a properly configured geo-fence it is very hard to crash, and you can try manoeuvres that would normally be too likely to end in a crash, trusting the autopilot to ‘bounce’ the vehicle off the geo-fence before the flight ends in disaster.
Geo-fencing can be combined with any flight mode. So for a raw beginner, you would combine it with one of the stabilised flight modes . Once the pilot has gained some confidence you could combine it with ACRO mode in Copter or MANUAL mode in Plane, which gives direct control of the vehicle and allows for the most interesting aerobatic manoeuvres.
Stick-mixing on fence breach
ArduPilot enables ‘stick mixing’ by default when in auto modes. This means that you can change the path of a loiter, for example, by using your transmitter sticks.
When you are using geo-fencing, stick mixing will be disabled on fence breach until your plane is back inside the fenced region. This is to ensure that the bad control inputs that caused you to breach the fence don’t prevent it from recovering to the return point.
As soon as you are back inside the fence stick mixing will be re-enabled, allowing you to control the GUIDED mode that the plane will be in. If by using stick mixing you manage to take the plane outside the fence again then stick mixing will again be disabled until you are back inside the fence.
MAVLink support
ArduPilot will report the fence status via the MAVLink GCS protocol. The key status packet is called FENCE_STATUS, and is defined in “ardupilotmega.xml”. A typical FENCE_STATUS packet looks like this:
2011-12-20 16:36:35.60: FENCE_STATUS breach_status : 1, breach_count : 15, breach_type : 1, breach_time : 1706506
The breach_status field is 0 if inside the fence, and 1 if outside. The breach_count is how many fence breaches you have had on this flight. The breach_type is the type of the last breach (see the FENCE_BREACH enum in ardupilotmega.xml). The breach_time is the time in milliseconds of the breach since APM was booted.
The MAV_SYS_STATUS_GEOFENCE bit of the MAV_SYS_STATUS_SENSOR portion of the SYS_STATUS message indicates whether or not the geo-fence is breached. As of this writing only the MAVProxy GCS recognizes this status bit and reports the status of the geo-fence. In the future the Mission Planner, APM Planner, and other GCS applications should get support for announcing geo-fence status during the flight.
The MAV_CMD_DO_FENCE_ENABLE MAVLink command message allows a GCS to enable or disable a fence interactively. As of this writing only MAVProxy supports this message using the “fence enable” or “fence disable” commands. In the future Mission Planner, APM Planner, and other GCS applications may get support for interactively enabling and disabling the geo-fence without needing to use a manual transmitter.