Archived:VR Gimbal Controller (3-Axis Open Source)
Warning
ARCHIVED
This article explains how to set up and configure the VR Gimbal 3 Axes Brushless Gimbal Controller for use with ArduPilot.
Overview
The VRGimbal (2-axis and 3-axis available) began as a fork of the open source Martinez 2-axis brushless gimbal controller to support the more powerful STM32 CPUs but since then has been mostly rewritten and includes significant enhancements including 3-axis support and MAVLink for serial communication with the autopilot or ground station.
Hardware schematics coming soon
Note
We do not yet have an recommended affordable 3-axis gimbal for use with the VRGimbal. Testing by the ArduPilot dev team has so far been limited to using a Tarot 2-axis gimbal.
Connecting the VRGimbal to the Pixhawk
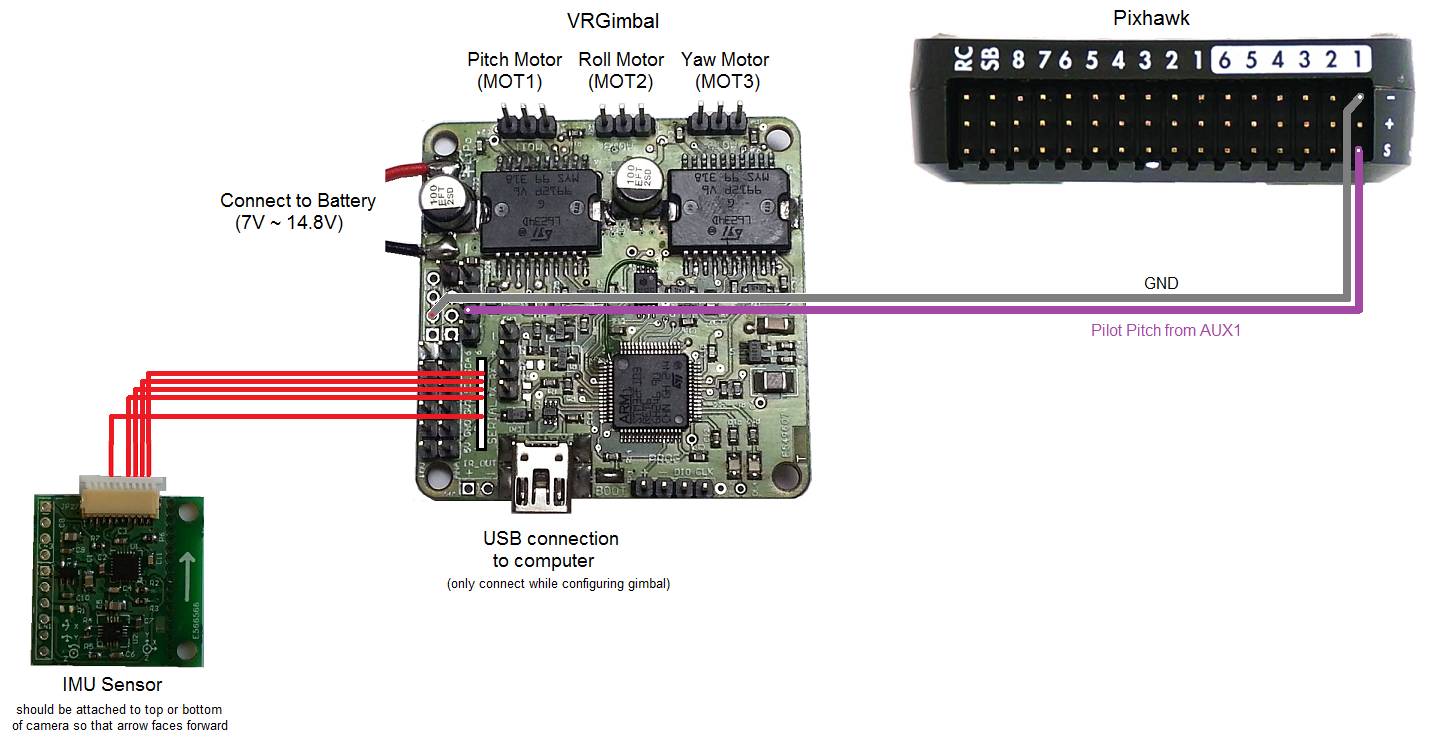
The IMU Sensor should be attached to the top or bottom of the camera so that the white arrow points forward.
The Gimbal controller’s red and black power wires should be connected directly to a 3S or 4S battery.
The Pitch, Roll and Yaw (if present) gimbal motors should be connected to MOT1, MOT2 and MOT3 respectively.
The “RC2” pin (label on the underside of the board) should be connected to the Pixhawk’s AUX OUT 1 signal pin (see image above).
The gound pin which is on the edge of the board near “RC2” should be connected to the Pixhawk’s AUX OUT 1 “-” pin (see image above).
Operation
Upon powering the gimbal, the green power light (bottom right in the image above) should turn on immediately. The gimbal should not be touched within the first 10seconds after start-up as it will be performing an IMU calibration. Once the calibration is done the red LED (immediately left of the green LED) will come on and the controller will attempt to stabilize the cmaera.
LED meanings
Solid Green LED = power on
Solid Red LED = calibration complete, stabilizing camera
Configuring the gimbal
Use a mini USB cable to connect the Gimbal board to your computer (Windows only?). If this is the first time you have plugged in the dongle you will see a USB device installation window but it will likely fail (see “BAD” device driver screen shot below).
To update the Maple driver:
Download the latest driver from here and unzip it to somewhere convenient on your computer
In the device manager, right-mouse-button-click on the Maple driver and select “Update Driver Software”, then “Browse my computer for driver software” and select the folder where you unzipped the driver. Windows 8 machines may complain because the driver is not signed, instructions are here on how to get around this.
After the driver is installed, if the Maple device appears as COM9 or higher you will not be able to connect. The Control Panel’s Device Manager can be used to reassign the comport to the COM1 ~ COM8 range.

Download and run the latest VRGimbal UI installation .msi file by going to the VRGimbal wordpress site and select the top item from the Downloads menu. At the time this wiki page was written it was version 1.13. After installation the “VRGimbal GUI” should appear in your start menu.
Start the VRGimbal GUI from the start menu.
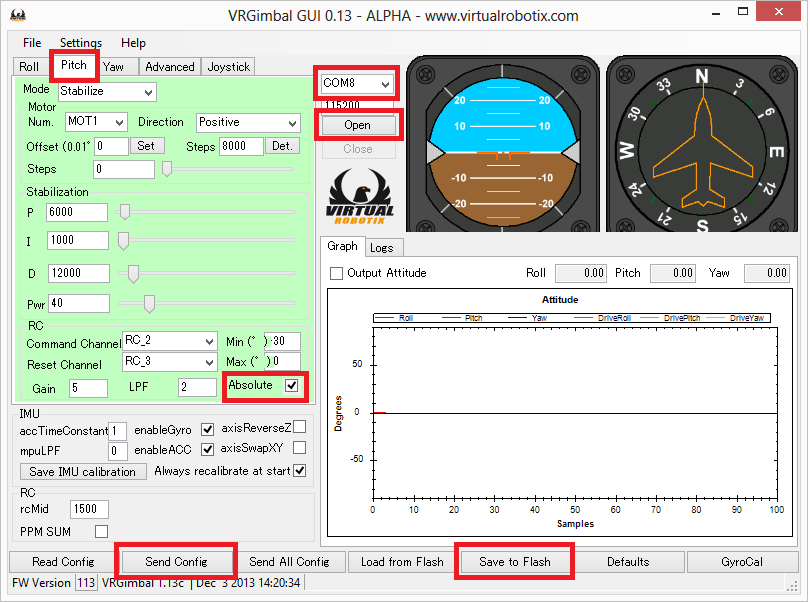
Connect the gimbal to your computer with the mini USB cable
On the VRGimbalGUI select the COM port and press the Open button
Click on the Pitch tab, click the Absolute checkbox, press Send Config and Save to Flash buttons.
Set-up through the mission planner
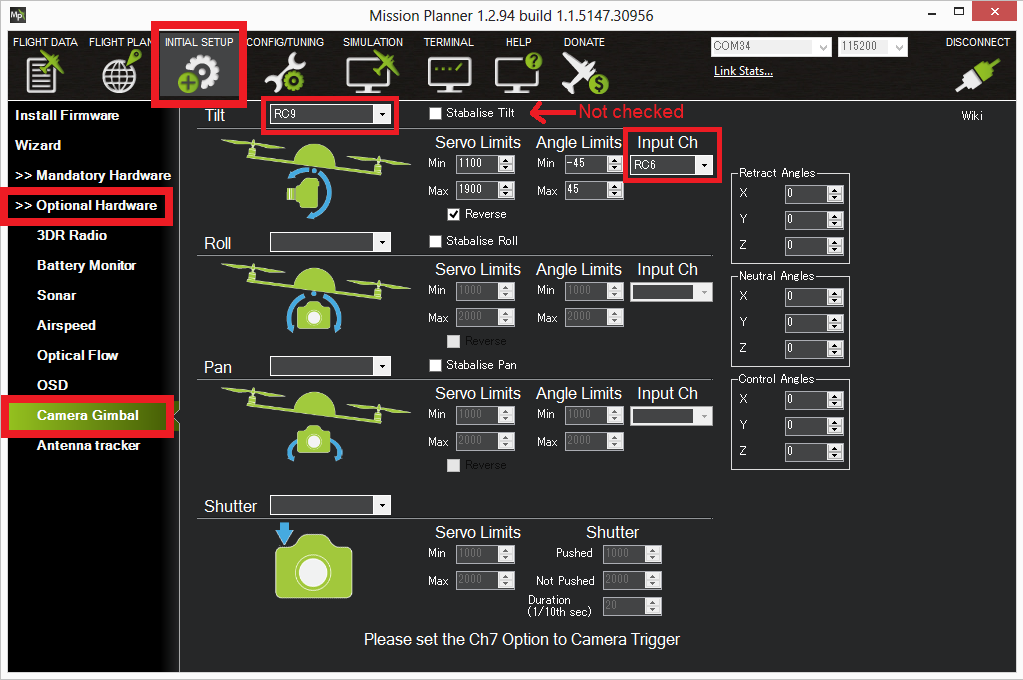
The channel 6 tuning knob’s output can be used to control the pitch angle of the gimbal by:
Connect the Pixhawk to the mission planner
Open the Initial Setup | Optional Hardware | Camera Gimbal screen set:
Tilt drop-down to RC9 (equivalent to AUX OUT1)
Input Ch drop-down to RC6
The “Stabilize Tilt” checkbox should not be checked
Updating the gimbal software
Please see the VRGimbal firmware upgrade wordpress site for details.
Common Problems
Camera is not level. Perform the accelerometer calibration as described at the bottom of this page.
Small gimbal motors emit a high pitches squeal. Connect with the VRGimbalGui, Go to the Advanced tab and set the “PWM frequency” to High. Press Send Config and Save to Flash buttons.
Other Open Source Alternatives
Martinez 2-axis gimbal controllers using the original AVR328 chip can be found at retailers including hobbyking.
OlliW’s STorM3 BGC 3-Axis STM32 based brushless gimbal controller is open source hardware, closed source (but free) gimbal firmware and open source windows configuration UI.
Questions about the VRGimbal? Post to the VRGimbal User group (not directly associated with the DIYDrones or 3dRobotics)