Building ArduPilot for BeagleBone Black on Linux
Warning
This project is old and unmaintained, prefer BBBMini project
Get your BeagleBone running Debian
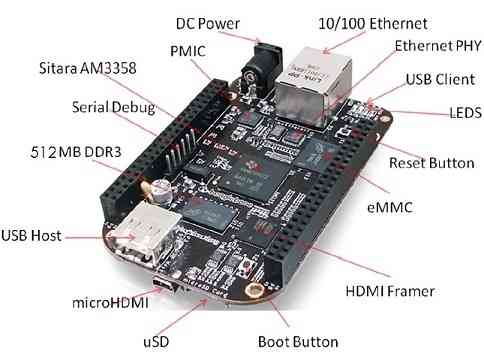
BBB title picture
You will need a microSD card of 4GB or greater and a 5VDC power supply of 1A or higher. You can also use a powered USB hub. It is highly recommended that you not use the USB port on a laptop, which has current limitations.
Go to the BeagleBoard website and get the latest image. You may find multiple images on the page. For ArduPilot on BeagleBone Black you have to download the Debian (BeagleBone Black - 2GB eMMC) image. You can find it under BeagleBone Black (eMMC flasher) header.
For example, the current image is BBB-eMMC-flasher-debian-7.5-2014-05-14-2gb. The date (in this case 2014-05-14) and the version number (in this case 7.5) may change. Make sure you download the latest image.
On Ubuntu/Mac OS X
Verify Image with:
md5sum BBB-eMMC-flasher-debian-7.5-2014-05-14-2gb.img.xz
74615fb680af8f252c034d3807c9b4ae  BBB-eMMC-flasher-debian-7.5-2014-05-14-2gb.img.xz
before plugging your SD card into your computer, type
df -h
this will list the current mounted drives.
Now plug in your SD card and type
df -h
and see what the drive that was added is called.
In my case it was /dev/sdd1
in which case in the command below, the it is writtern dd of=/dev/sdd replace this with the correct address for your SD card.
Warning
IF YOU GET THIS WRONG YOU CAN WIPE YOUR HDD
then xzcat it to your SD card in your Ubuntu/Mac OS X machine
xzcat BBB-eMMC-flasher-debian-7.1-2013-10-08.img.xz | dd of=/dev/sdd bs=1M
when this is finished, remove the SD Card and place it into your BBB.
On Windows
Download Win32 disk imager from here. Insert your SD card, then start the application that you downloaded.
Select the image that you downloaded and then press Write.
when this is finished, remove the SD Card and place it into your BBB.
Flashing the image to the eMMC
Place the SD card in your BBB. Make sure you have removed Ethernet and all other USB devices from your BBB. Connect it to a wall adapter (5VDC 1A) or a powered USB hub.
Press the boot button, and hold it down while booting, until all four blue lights are solid.
Let go, and wait. It will take around 15 mins.
The lights will flicker a lot at this stage, you will know it is complete when the four lights return to solid Blue (no flickering). Power down the BBB and remove the SD card.
Connect the BeagleBone Black to your machine using the USB cord that’s provided with it. Depending on your OS, install the required drivers.
Now ssh into the BeagleBone Black by typing
ssh root@192.168.7.2
There is no password for the root user on the Debian image
You could also connect the BBB to your local network over Ethernet and ssh to it.
The PixHawk Fire Cape
In order to run APM in the BeagleBone black you’ll need to use the right set of sensors. Most of these sensors are included in the PixHawk Fire cape (PXF), an open hardware board available from Erle Robotics store.
Making the rt kernel
(taken from https://wiki.beyondlogic.org/index.php/BeagleBoneBlack_Building_Kernel )
modified for the RT version, and to simplify.
Compiling the BeagleBone Black Kernel
The following contains instructions for building the BeagleBone Black kernel on your PC with Ubuntu 13.04 O.S.
to make it simple, run
sudo su
you may need to put in your password here…
if you do not have this already, make the following directory
mkdir /home/YOUR_USERNAME/export
mkdir /home/YOUR_USERNAME/export/rootfs
Prerequisites
ARM Cross Compiler
To compile the linux kernel for the BeagleBone Black, you must first have an ARM cross compiler installed on your linux box. I use gcc-4.7-arm-linux-gnueabi-base that comes with Ubuntu 13.04. To install the compiler run:
apt-get install gcc-arm-linux-gnueabi
GIT
The Beaglebone patches and build scripts are stored in a git repository. Install git:
apt-get install git
And configure with your identity.
git config --global user.email "your.email@here.com"
lzop Compression
The kernel is compressed using lzo. Install the lzop parallel file compressor:
apt-get install lzop
uBoot mkimage
The bootloader used on the BeagleBone black is u-boot. u-boot has a special image format called uImage. It includes parameters such as descriptions, the machine/architecture type, compression type, load address, checksums etc. To make these images, you need to have a mkimage tool that comes part of the u-Boot distribution. Download u-boot, make and install the u-boot tools:
wget ftp://ftp.denx.de/pub/u-boot/u-boot-latest.tar.bz2
tar -xjf u-boot-latest.tar.bz2
cd u-boot-2013.10 (look to see what this is called, it may have changed)
make tools  (don't work with last revision of u-boot need a revision)
install tools/mkimage /usr/local/bin
Compiling the BeagleBone Black Kernel
Here we compile the BeagleBone Black Kernel, and generate an uImage file with the DTB blob appended to the kernel for ease of use.
git clone git://github.com/beagleboard/kernel.git
cd kernel
git checkout 3.8-rt
./patch.sh
cp configs/beaglebone kernel/arch/arm/configs/beaglebone_defconfig
wget http://arago-project.org/git/projects/?p=am33x-cm3.git\;a=blob_plain\;f=bin/am335x-pm-firmware.bin\;hb=HEAD -O kernel/firmware/am335x-pm-firmware.bin
cd kernel
make ARCH=arm CROSS_COMPILE=arm-linux-gnueabi- beaglebone_defconfig -j4
make ARCH=arm CROSS_COMPILE=arm-linux-gnueabi- uImage dtbs -j4
make ARCH=arm CROSS_COMPILE=arm-linux-gnueabi- uImage-dtb.am335x-boneblack -j4
Now we build any kernel modules:
make ARCH=arm CROSS_COMPILE=arm-linux-gnueabi- modules -j4
And if you have your rootfs ready, you can install them:
make ARCH=arm CROSS_COMPILE=arm-linux-gnueabi- INSTALL_MOD_PATH=/home/YOUR_USERNAME/export/rootfs modules_install
Installing the RT kernel
After you have made the Linux kernel…
ensure you have Debian installed on the beaglebone and ssh into the Beaglebone from Linux….
ssh root@192.168.1.3
(my ip address, adjust for your beaglebone)
Go to folder /boot/uboot/
cd /boot/uboot/
make sure there is a backup folder there. If not:
mkdir backup
then backup your zImage
cp zImage uInitrd backup/
then
ls /lib/modules
it should show 3.8.13-bone28 or similar.
Now we need to go to our Ubuntu computers terminal. Ggo to your export folder that you made:
cd /home/YOUR_USER_NAME/export/rootfs/lib/modules
and run
rsync -avz 3* root@192.168.1.3:/lib/modules/
then run
rsync /home/proficnc/u-boot-2013.10/kernel/kernel/arch/arm/boot/zImage 192.168.1.3 :/boot/uboot/
back on your Beaglebone run the following
ls /lib/modules
you should now have both the old file and the new rt folder.
Now type:
sync
reboot
Some useful tips
Hooking up the sensors
When hooking up your Sensor board it connects as follows (using SHORT wires)
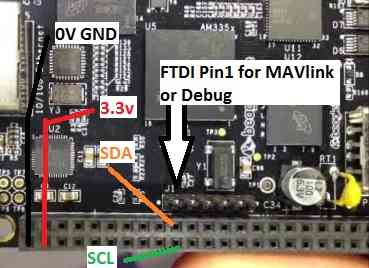
i2c connection
I2c Debug
To detect if the i2c is working, you can use the following command
i2cdetect -r 1
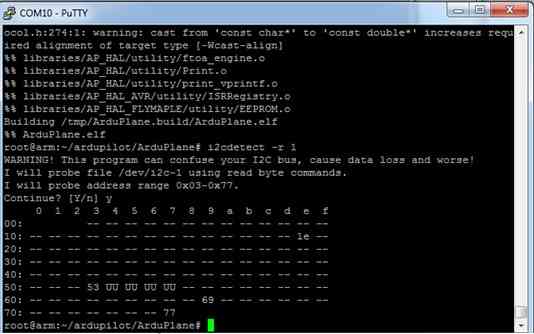
i2c check
The numbers: 1e, 53, 69, 77 are the MAG, Gyro, Accel, and Baro.(not in that order)
Hooking up your GPS
To be added
Hooking up your Receiver
To be added
Hooking up your servos
To be added
Hooking up your Airspeed sensor
To be added
Devices tested so far
Responded with the Who Am I request on SPI
MPU6000
MPU9250 (may have compass issues due to soldering of jumper wire)
MS5611 (SPI)
Not responding on SPI
1 LSM9DS0 ( soldering issue, no connection to I/O
Responded to I2C detect
CapeID EEPROM 0x54h AT24CS32
CapeID COA_OTP 0x5Ch AT24CS32
Crypto 0x64h ATSHA204
Airspeed 0x28h MS4525DO-DS3AIXXXDS
Compass Ext 0x1eh HMC5883L
Power management 0x24 TPS65217C
on-board EEProm 0x50h unknown
HDMI core…. unused, do not enable 0x34
Not responded to I2C test
MS5611 (I2C) 0x76h
2. RGB LED Driver 0x55h TCA62724 (is conflicting with non existent Cape eeprom)
Adjusting the BBB clock
cpufreq-info shows your current frequency
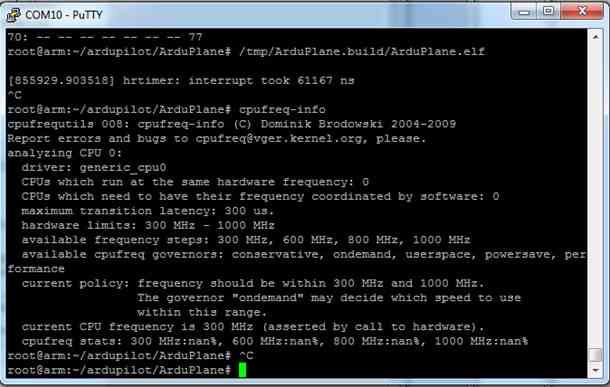
clock check
Edit /etc/default/cpufrequtils (you might need to create it if it doesn’t exist). Specify the governor with the GOVERNOR variable:
nano /etc/default/cpufrequtils
add the following……
# valid values: userspace conservative powersave ondemand performance
# get them from cat /sys/devices/system/cpu/cpu0/cpufreq/scaling_available_governors
GOVERNOR="performance"
CTRL-X to exit
Y to save
Reboot, and check to see that it has worked
Installing and Making ArduPilot on BBB
install git, make, gawk, g++, arduino-core on your BBB
apt-get install git make gawk g++ arduino-core
git clone --recurse-submodules git://github.com/ArduPilot/ardupilot.git
cd ardupilot
then open
cd ArduPlane
or
cd ardupilot/ArduCopter
or
cd ardupilot/APMRover2
or
cd ardupilot/AntennaTracker
then
make linux
from this directory, run the tmp/Plane.elf (or Copter, or Rover)
tmp/Plane.elf
Connecting to GCS
To be added……………
Status
The following table summarizes the driver development status:
Milestone |
Status |
|---|---|
ArduPilot running in the BBB (I2C connected sensors) |
Ok |
Device Tree for the PXF |
WIP |
MPU6000 SPI userspace driver |
Ok |
MPU9150 I2C userspace driver |
Ok |
LSM9DS0 SPI userspace driver |
Coded |
MPU9250 SPI userspace driver |
Coded |
MS5611 I2C/SPI userspace driver |
Coded |
GPIO userspace driver |
WIP |
I2CDriver multi-bus aware |
WIP |
AP_InertialSensor_Linux |
ToDo |
PRU PWM driver |
Ok (issue with the PREEMPT_RT kernel) |
MPU6000 SPI kernel driver |
WIP |
MPU9150 I2C kernel driver |
ToDo |
LSM9DS0 SPI kernel driver |
ToDo |
MPU9250 SPI kernel driver |
ToDo |
MS5611 I2C/SPI kernel driver |
ToDo |
Status: ``Ok``, ``Coded`` (needs test), ``WIP`` (work in progress), ``Issue``, ``ToDo``