Auto Mode
In Auto mode the copter will follow a pre-programmed mission script stored in the autopilot which is made up of navigation commands (i.e. waypoints) and “do” commands (i.e. commands that do not affect the location of the copter including triggering a camera shutter). This page provides an overview of Auto mode.
Information on creating a mission script, can be found on the Planning a mission with waypoints and events page. A full list of supported commands can be found on the Mission Command List page.
AUTO mode incorporates the altitude control from AltHold mode and position control from Loiter mode and should not be attempted before these modes are flying well. All the same requirements apply including ensuring that vibration levels and compass interference levels are acceptable and that the GPS is functioning well including returning an HDOP of under 1.4.
Overview
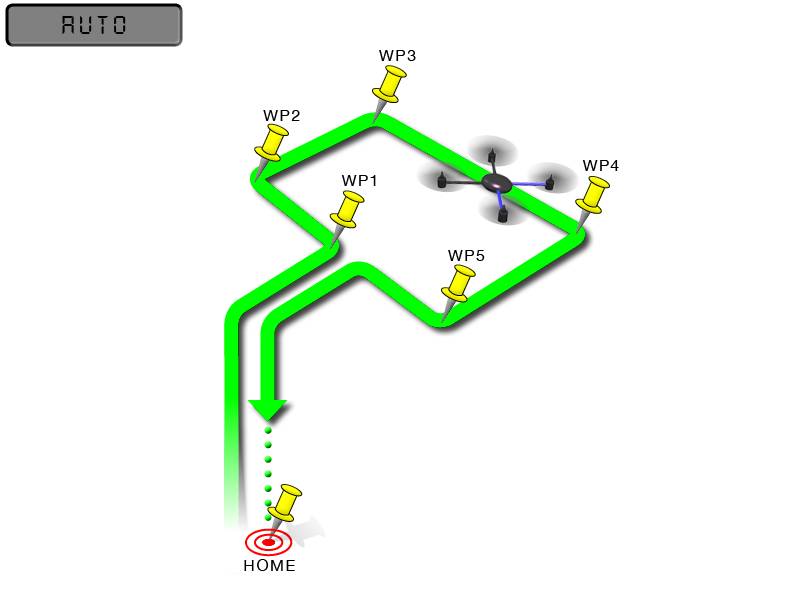
AUTO mode navigates between each waypoint in a straight line and as it approaches each waypoint follows a smooth curving path towards the next waypoint (S-Curve). It controls the path as it approaches a waypoint to be within the WP_RADIUS_M of each waypoint. The speed is lowered below WP_SPD, as necessary, to keep the vehicle within the configured acceleration limits (WP_ACC and WP_ACC_CNR).
This smooth curving path as it changes direction to the next waypoint will not occur if the next mission command after the waypoint is anything other than a normal waypoint (e.g LAND, LOITER_TURNS, RTL, etc). In these cases the copter will approach the waypoint, stop, and then proceed to the next navigation waypoint instead of smoothly curving in front of it and proceeding to that next navigation waypoint.
Also, small WP_RADIUS_M values will require that the curve be very small, effectively appearing like the non-S-Curve behavior explained above.
Starting a Mission
Missions can be entered and amended through the Mission Planner’s Plan screen. In general most missions begin with a Takeoff command, include a series of waypoints followed by a Return-To-Launch command. Please refer to the Mission Command List wiki page for a list of supported commands along with a short description of each.
AUTO should be set-up as one of the Flight Modes on the flight mode switch.
By default the vehicle cannot be armed in Auto mode meaning the pilot must first arm the motors in another mode before switching to Auto mode. The AUTO_OPTIONS parameter can be used to alter this behaviour, allowing arming while in AUTO mode, and/or, allowing a mission takeoff command to start as soon as the vehicle enters AUTO mode, even if the throttle has not been raised.
If starting the mission while the copter is on the ground the pilot should ensure the throttle is down, then switch to the Auto flight mode, then raise the throttle. The moment that the throttle is raised above zero, the copter will begin the mission.
If starting the mission while the vehicle is already flying, the mission will begin from the first command as soon as the vehicle is switched into Auto mode. If the first command in the mission is a take-off command but the vehicle is already above the take-off command’s altitude the take-off command will be considered completed and the vehicle will move onto the next waypoint.
At any time the pilot can retake control from the autopilot by returning the flight mode switch to another flight mode such as Stabilize or Loiter. If the pilot then switches to AUTO again, by default the mission will resume from the last command unless MIS_RESTART has been set to “1” in which case the mission will restart from the first command.
During the mission the pilot’s roll, pitch and throttle inputs are ignored but the yaw can be overridden with the yaw stick. This allows the pilot to, for example, aim the nose of the copter (which might have a hard mounted camera on it) as the copter flies the mission. The autopilot will attempt to retake yaw control as the vehicle passes the next waypoint. The AUTO_OPTIONS param can be set to always ignore pilot yaw input.
Ending a Mission
Missions should normally have an RTL as their final command to ensure the copter will return after the mission completes. Alternatively the final command could be a LAND with a different location. Without a final RTL or LAND command the copter will simply stop at the final waypoint and the pilot will need to retake control with the transmitter.
Remember that when using RTL, the copter will return to the “home” position which is the location where the copter was armed.
As the copter touches down at the end of the mission the vehicle should automatically disarm but occasionally the vehicle may not sense the landing and the pilot may need to hold the throttle down and takeoff in another mode like Stabilize or Loiter and then manually disarm the vehicle.
Note
for a NAV_LAND, the LAND_SPD_MS and the LAND_SPD_HIGH_MS parameters affect descent speed just like in the Land Mode. The PILOT_THR_BHV option bit 1, when set, allows high throttle stick position to cancel the landing, switching the vehicle to Loiter or AltHold if Loiter is unavailable. During landing the pilot can re-position the vehicle using the pitch and roll sticks to avoid obstacles unless the LAND_REPOSITION parameter is changed to “0”.
Tuning

AUTO mode incorporates the altitude control from AltHold mode and position control from Loiter mode.
Commonly adjusted settings are listed below. Most of these can be adjusted from the Mission Planner’s Config, Extended Tuning screen (see above).
WP_SPD is the maximum horizontal speed (in m/s) during missions. The default is 10 which is 10m/s. A typical copter can reach top speeds of 10m/s ~ 20m/s before it becomes unable to maintain both altitude and horizontal speed
WP_ACC determines how quickly the horizontal speed can change (in m/s/s). Lower values result in smoother acceleration and deceleration and may also cause the vehicle to cut the corners more. Higher values will lead to more aggressive movements and tighter cornering
WP_SPD_UP determines the max speed up in m/s. Low values may lead to the vehicle’s horizontal speed slowing during diagonal climbing waypoint segments
WP_SPD_DN determines the max speed down in m/s. Low values may lead to the vehicle’s horizontal speed slowing during diagonal descending waypoint segments. High values (above 150) may lead to unstable vertical descents as the vehicle passes through its own prop wash
WP_RADIUS_M allows you to control how close the copter must come to the waypoint before it is considered “complete” and the copter moves onto the next waypoint. Setting this to a larger value may cause the vehicle to cut the corners more leading to a smoother path
Less commonly adjusted parameters include:
WP_ACC_CNR determines the maximum cornering acceleration in m/s/s. Higher values will cause the vehicle to make sharper corners meaning it will cut the corners less
WP_ACC_Z determines how quickly the vertical speed can change
WP_JERK determines how quickly the horizontal acceleration can change (in m/s/s/s). Lower values will lead to a smoother acceleration and deceleration but will also lead to the mission taking slightly longer to complete
Common Problems
Below are a list of commonly reported problems and recommendations
The vehicle does not cut the corners as much as I would like and/or stops at each waypoint
Increase WP_RADIUS_M to allow the vehicle to pass further from each waypoint
Increase WP_SPD to cause the vehicle to start turning earlier in order that it not surpass the max acceleration
Decrease WP_ACC to cause the vehicle to start turning earlier and more gradually
Decrease WP_ACC_CNR or reset to the default of zero
Ensure the waypoint command’s Delay field is 0. A delay of even 1 second will cause the vehicle to stop at the waypoint
If Dijkstras object avoidance is enabled, by default the vehicle will stop at each waypoint. This can be avoided by setting the OA_OPTIONS parameter
The vehicle does not reach the configured maximum horizontal speed (e.g. WP_SPD)
Increase WP_ACCEL to allow the vehicle to accelerate to its maximum speed more quickly
Increase WP_JERK to allow the vehicle to get to its maximum acceleration more quickly
If the waypoint includes a climb or descent the vehicle’s horizontal speed may be limited by WP_SPD_UP or WP_SPD_DN
Ensure the vehicle’s maximum lean angle (e.g. ATC_ANGLE_MAX) is sufficient to reach the desired speed
Ensure the vehicle has enough power to maintain both altitude and the desired speed
If the mission command uses terrain following the vehicle may need to slow horizontally to maintain the desired altitude above terrain
Move the waypoints to be further apart. S-Cruve navigation only looks forward two waypoints and plans a path that allows it to stop by the time it reaches the 2nd waypoints (see this issue for more details)