Planning a Mission with Waypoints and Events
This page describes generic waypoint setup for all types of vehicles.
Setting the Home Position
For Copter, Plane and Rover the home position is set as the location where the vehicle was armed. This means if you execute an RTL, it will return to the location where it was armed, so arm your vehicle in the location you want it to return to, or use a rally point to setup an alternative return point.
Video: Produce and save a Multi-waypoint Mission
Video: Load an already saved Multi-waypoint Mission
Instructions
In the screenshot below, a Copter mission starts with an auto takeoff to 20 meters altitude; then goes to WP 2 rising to 100 meters altitude on the way, then waits 10 seconds; then the craft will proceed to WP 3 (descending to 50 meters altitude on the way), then returns to launch. After reaching the launch position, the craft will land. The mission assumes that the launch position is set at the home position.
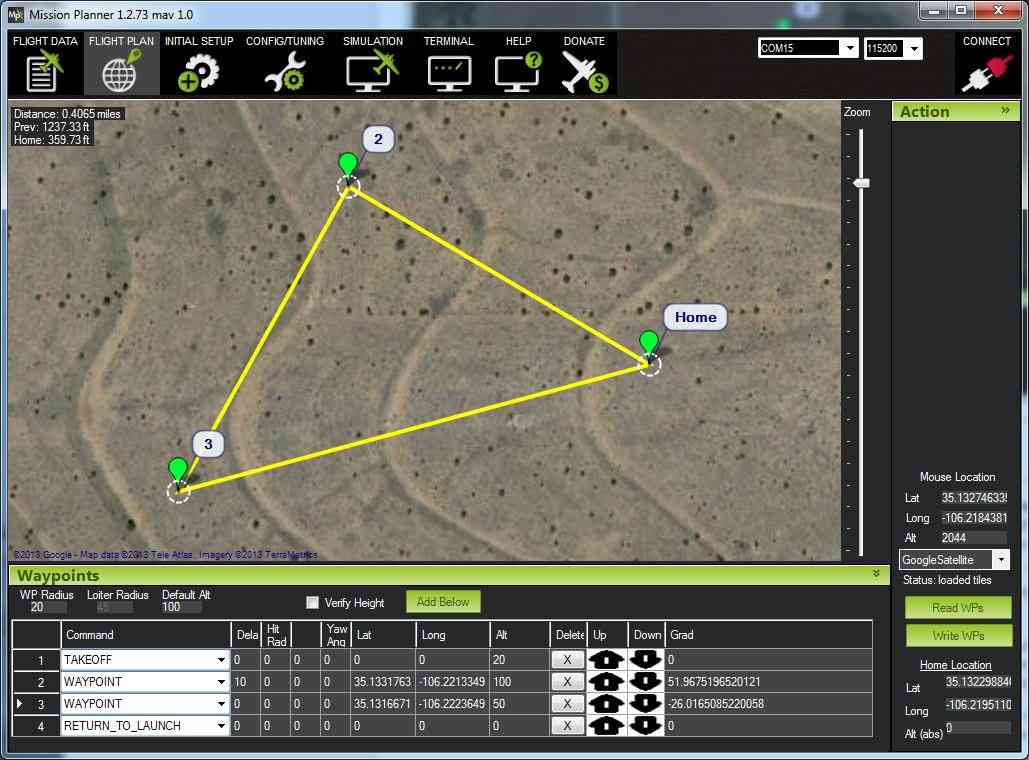
Copter: Mission Planning Example
You can enter waypoints and other commands (see the Mission commands section below for more information). In the dropdown menus on each row, select the command you want. The column heading will change to show you what data that command requires. Lat and Lon can be entered by clicking on the map. Altitude is relative to your launch altitude/home position, so if you set 100m, for example, it will fly 100m above you.
Default Alt is the default altitude when entering new waypoints. See Understanding Altitude in ArduPilot for altitude definitions.
Verify height means that the Mission Planner will use Google Earth topology data to adjust your desired altitude at each waypoint to reflect the height of the ground beneath. So if your waypoint is on a hill, if this option is selected the Mission Planner will increase your ALT setting by the height of the hill. This is a good way to make sure you don’t crash into mountains!
Once you are done with your mission, select Write and it will be sent to APM and saved in EEPROM. You can confirm that it’s as you wanted by selecting Read.
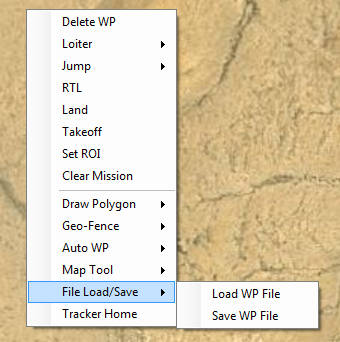
You can save multiple mission files to your local hard drive by selecting Save WP File or read in files with Load WP File in the right-click menu:
Tips
Prefetch: You can cache map data so you don’t need Internet access at the field. Click the Prefetch button, and hold down Alt to draw a box to download the selected imagery of a location.
Grid: This allows you to draw a polygon (right click) and automatically create waypoints over the selected area. Note that it does not do “island detection”, which means if you have a big polygon and a little one inside of that, the little one will not be excluded from the big one (see this for more). Also, in the case of any polygon that partialy doubles backs on itself (like the letter U), the open area in the center will be included as part of the flyover.
Setting your home location to the current location is easy, just click Home Location above where you enter your home location, and it will set your home location to the current coordinates.
You can measure the distance between waypoints by right-clicking at one end and selecting Measure Distance. Then right-click on the other end and select Measure Distance again. A dialog box will open with the distance between the two points.
Auto grid
You can also have the Mission Planner create a mission for you, which is useful for function like mapping missions, where the aircraft should just go back and forth in a “lawnmower” pattern over an area to collect photographs.
To do this, in the right-click menu select Polygon and draw a box around the area you want to map. Then select Auto WP, Grid. Follow the dialog box process to select altitude and spacing. The Mission Planner will then generate a mission that looks something like this:
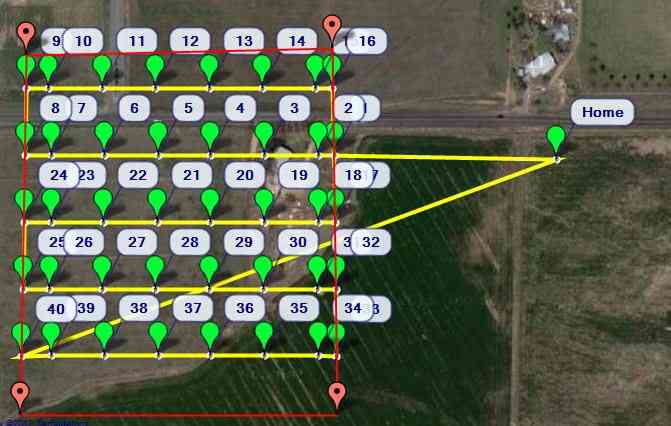
Mission Planner auto-generated grid
Mission commands
Mission Planner provides a filtered list of the commands appropriate for the current vehicle type, and adds column headings for the parameters that need user-supplied values. These include navigation commands to travel to waypoints and loiter in the vicinity, DO commands to execute specific actions (for example taking pictures), and condition commands that can control when DO commands are able to run.

Example: LOITER_TURNS command withheadings for number of turns, direction, and location to loiteraround.
The full set of mission commands supported by all ArduPilot platforms are listed in MAVLink Mission Command Messages (MAV_CMD). This includes the full name of each command (as defined in the protocol definition), information about which parameters are supported, and also the corresponding Mission Planner column headings.
Note
Mission Planner uses a cut-down version of the full command name. For example, commands like MAV_CMD_NAV_WAYPOINT, MAV_CMD_CONDITION_DISTANCE, MAV_CMD_DO_SET_SERVO are listed in MP as WAYPOINT, CONDITION_DISTANCE and DO_SET_SERVO respectively.
There is also a Copter-specific Copter Mission Command List.
End of Mission
When the mission list is completed, Copter will loiter at the last waypoint indefinitely until a mode change or disarm (as when landing), Rover will hold, but Plane will RTL unless the last mission item is unlimited loiter or turns, or a landing.
Mission Reset
On Copter and Rover, the mission is reset to the beginning of the mission list every disarm. On Plane, it is reset similarly, except in AUTO mode which does not reset on disarm and leaves the “mission pointer” on the last mission item to be performed. For all vehicles, any landing mission item, when the landing is completed, will not advance to the next mission item. The MIS_OPTIONS parameter, bit 2, can be set to continue onward in the mission list after landing.
One can set an RCx_OPTION switch function (“24”) to reset the mission item pointer to the beginning of the mission list at any time.
Also, the mission can be set to reset upon any entry into AUTO mode with the MIS_RESTART parameter. Default (0) is to resume the mission when re-entering AUTO mode.
MIS_OPTIONS
The MIS_OPTIONS parameter bits can be set to modify how missions function:
ref:MIS_OPTIONS<MIS_OPTIONS> bit |
Option |
|---|---|
0 |
Clears the loaded mission on boot. Must be loaded after each boot. |
1 (Plane only) |
Use distance to land calculation on battery failsafe. See Using DO_LAND_START |
2 |
Continue after landing. Advances mission item pointer to next mission item after landing complete. If no item exists, RTL. |
Mission Re-Wind
The behavior of returning to a mission sequence when interrupted by a mode change is described in the Mission Rewind on Resume section.
Mission Size
The number of mission items which can be stored in the autopilot is limited to approximately 650 waypoints. If you need to have longer missions, then you can set the BRD_SD_MISSION parameter to create a file on the SD Card to store more. This can be set up to a maximum of 64 (kB) which would allow a total of over 4,000 waypoints in a mission.