Compass Calibration
Note
Operation of fixed wing Planes and some Rovers is possible without the use of a compass (See Compass-less Operation), but utilizing a compass is recommended for all other vehicles unless yaw is provided by some other means (GPS for Yaw (aka Moving Baseline) or Non-GPS Navigation or External AHRS Systems)
This article explains how to perform basic compass calibration. It assumes that you have at least one compass, either internally or externally in the system, and it has been enabled. See Advanced Compass Setup for more information and to setup other compass related features.
Warning
It is important that when compass calibration is done, the vehicle have a good 3D gps lock, in order to assure the best setup. If necessary, move outdoors in order to get a good 3D gps lock before doing the compass calibration.
Note
Compass calibration cannot be performed while vehicle is armed.
Tip
It is not necessary to recalibrate the compass when the vehicle is flown at a new location because ArduPilot includes a “world magnetic model” which allows converting the location’s magnetic North to true North without recalibrating . In addition the location’s “inclination” is calibrated at startup and then again soon after takeoff.
Calibration first steps
Warning
Do not calibrate the compasses near any metallic or magnetic field producing object (computers, cell phones, metal desks, power supplies, etc.) or incorrect calibration will occur.
Under SETUP| Mandatory Hardware select Compass.
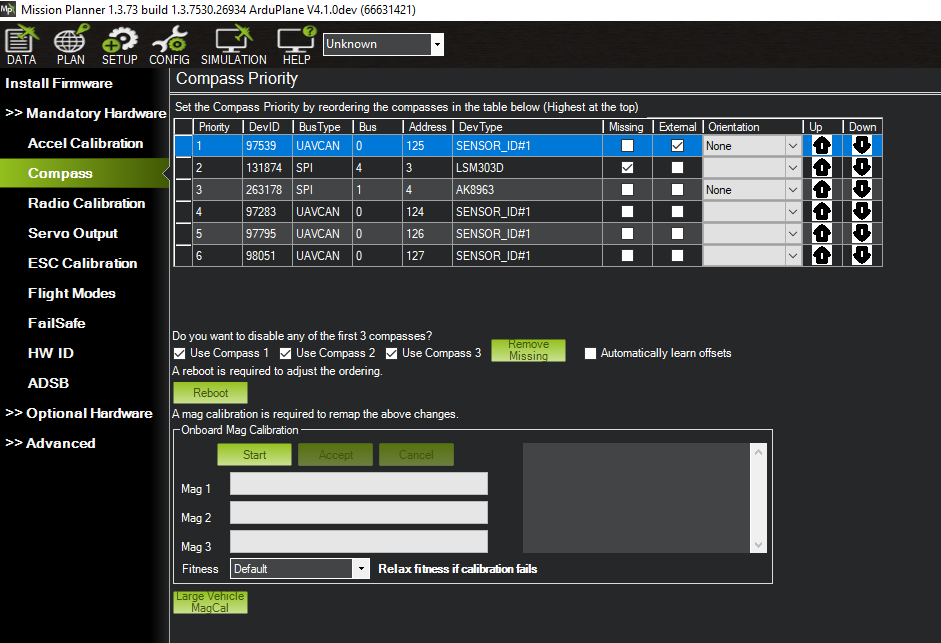
Mission Planner: Compass Calibration
You may wish to disable any internal compasses if you are consistently seeing the “inconsistent compasses” pre-arm message often and you are sure that the external compass is calibrated.
Onboard Calibration
“Onboard Calibration” is a calibration routine that runs on the autopilot. This method is more accurate than the older “Offboard Calibration” (aka “Live Calibration”) which runs on the ground station because in addition to offsets, scaling and orientation are also automatically determined.
Note
Calibration could fail for the compasses integrated into the autopilot, if any, if the autopilot board orientation parameter is not correct.
To perform the onboard calibration of all compasses:
click the “Onboard Mag Calibration” section’s “Start” button
if your autopilot has a buzzer attached you should hear a single tone followed by short beep once per second
hold the vehicle in the air and rotate it so that each side (front, back, left, right, top and bottom) points down towards the earth for a few seconds in turn. Consider a full 360-degree turn with each turn pointing a different direction of the vehicle to the ground. It will result in 6 full turns plus possibly some additional time and turns to confirm the calibration or retry if it initially does not pass.

as the vehicle is rotated the green bars should extend further and further to the right until the calibration completes
upon successful completion three rising tones will be emitted and a “Please reboot the autopilot” window will appear and you will need to reboot the autopilot before it is possible to arm the vehicle.
If calibration fails:
you will hear an “unhappy” failure tone, the green bars may reset to the left, and the calibration routine may restart (depending upon the ground station). Mission Planner will automatically retry, so continue to rotate the vehicle as instructed above.
if a compass is not calibrating, consider moving to a different area away from magnetic disturbances, and remove electronics from your pockets.
if, after multiple attempts, the compass has not passed the calibration, Press the “Cancel” button and change the “Fitness” drop-down to a more relaxed setting and try again.
if compass calibration still fails it may help to raise COMPASS_OFFS_MAX from 850 to 2000 or even 3000
finally, if a single compass is not calibrating and you trust the others, disable it.
Onboard Calibration using RC Switch
Onboard Calibration can be started using an RC switch instead using the Mission Planner technique above. This allows calibrating without the tangle of the USB cable.
Setup an RC channel to start the calibration by setting its RCx_OPTION to be “171”. A high value on the channel will start calibrating all compasses and you would move the vehicle as above. A low value will cancel the calibration. The tones for success or failure above will be emitted.
Large Vehicle MagCal
Large or heavy vehicles are impractical to rotate on all axis. This feature allows a fairly accurate calibration if GPS lock is active on the autopilot and the vehicles actual heading is known, either using a landmark reference on the Mission Planner map, or using another compass (eg cell phone) and entering the vehicles heading.
Warning
The proper orientation of the compass must also be set in order for this method to give a good result. If orientation is incorrect this procedure will appear to succeed while leaving the compass calibration in a very bad state.
Note
the heading entered should be TRUE, not MAGNETIC. Using a phone’s compass app will usually required adding the local declination value to the reading in order to obtain the TRUE geographic heading which should be entered.
Compass Ordering
At the top of the page, you can change the priority of the attached compasses, if desired.
Additional information
More information about compass configuration can be found in Advanced Compass Setup. This includes instructions for how to set up additional compasses, automatic setting of offsets, non-standard compass alignments, compassmot, etc.
General discussion on magnetic interference and ways to reduce it can be found in Magnetic Interference.
Video demonstration
Video demonstrations of compass calibration.