Accelerometer Calibration
This article shows how to perform basic accelerometer calibration (using Mission Planner). The accelerometers in the autopilot must be calibrated to correct for their bias offsets in all three axes, as well as any off-axis variations.
Attention
Accelerometer calibration is mandatory in ArduPilot.
Important
Accelerometer calibration cannot be performed while the vehicle is armed.
Calibration steps
Warning
If the board is mounted in a non-standard orientation (i.e. arrow is not pointing forward) then please ensure the AHRS_ORIENTATION is properly set before doing the accelerometer calibration.
Tip
For very large vehicles, this may be done on the bench, after the orientation is set for how it will be mounted in the vehicle and the calibration orientations are done as fit in the vehicle. Then be sure to use the Calibrate Level step in the following instructions once mounted.
Under Setup | Mandatory Hardware, select Accel Calibration from the left-side menu.

Mission Planner: Calibrate Acceleration
Click Calibrate Accel to start the full 3-axis calibration.
Mission Planner will prompt you to place the vehicle on each axis during the calibration. Press any key to indicate that the autopilot is in position and then proceed to the next orientation.
The calibration positions are: level, right side, left side, nose down, nose up, and on its back.

Accelerometer Calibration Positions (Copter)
The vehicle must be kept still immediately after pressing the key for each step. This is more important than getting the angle exactly right, ie. left being 90deg to horizontal, etc. Except for the first “LEVEL”, the positions can be within 20 degrees of being exact. Being still in each position as you press the key is much more important.
You should calibrate the board mounted in the vehicle if possible.
However, you may need to calibrate the board before it is mounted if the size/shape of the vehicle makes this difficult.
The level position is the most important to get right as this will be the attitude that your controller considers level while flying.
You can recalibrate this Level position using Mission Planner after you have installed the autopilot and are ready to fly. Place the vehicle in its level flying attitude and use the Calibrate Level button.
Note
this Calibrate Level operation can only correct up to a 10 degree difference between the initial calibration and the final position in the vehicle, and only corrects pitch and roll differences, not yaw.
Proceed through the required positions, using the Click when Done button once each position is reached and held still.
When you have completed the calibration process, Mission Planner will display “Calibration Successful!” as shown below.
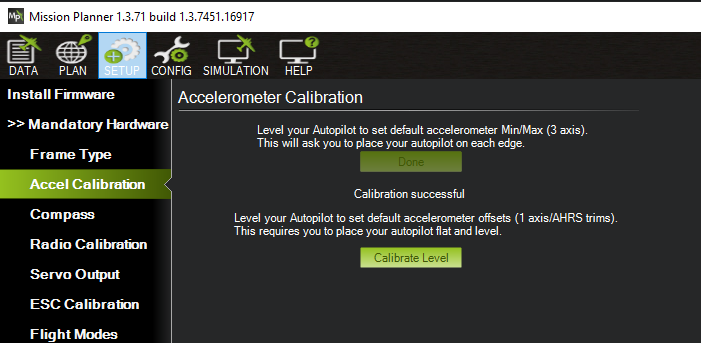
Mission Planner: Calibration Successful
Note
If your autopilot has a built-in IMU heater, then it is recommended that the IMU Temperature Calibration also be done. Some autopilots have this calibration done at the factory in which case, this calibration need not be done.
Simple Calibration
Sometimes, for very large vehicles, it’s not easy to do the full 3-axis calibration. In this case, the Simple Accel Cal can be done with the vehicle held still and in a level attitude. This only calibrates the main offsets of the accelerometers, not the minor off-axis variations, so it’s not ideal in terms of optimal performance, but is sometimes an acceptable compromise.
Note
This is NOT the same as the Calibrate Level function. To use that function, either a full 3-axis or simple calibration must be done first!
Video demonstration (Copter)
Video demonstration of accelerometer calibration. This is for an older version of Copter/Mission Planner, but is useful as an example of how you might hold a Copter.