Geotagging Images with Mission Planner
This article shows how to Geo-tag images, using Mission Planner to inject data from telemetry logs into their EXIF tags.
Overview
Geo-tagging images makes it easier to photo-merge the many pictures taken during a camera mission, and is important for applications including photogrammetry, orthophoto generation, 3D terrain modeling etc.
Mission Planner provides two methods for geotagging your photos from a mission log:
CAM messages from dataflash log
ArduPilot can trigger a camera during pre-programmed missions or by RC activation using the
DO_DIGICAM_CONTROLorDO_SET_CAM_TRIGG_DISTcommands. Corresponding CAM messages are stored in the dataflash log, and can be used by Mission Planner to add accurate geotag information to images.Time offset (image timestamp to log timestamp)
This method uses the time difference between the camera internal clock and system clock to determine where in the log each image was taken and get the GPS information. Typically users must tune the offset value in order to find a sensible result.
Tip
- This method is less accurate. It is used when there is no
connection between camera and autopilot.
Note
Even if your camera has a built-in GPS you may find this approach provide more accurate information than the built-in GPS.
Geotagging images
Common pre-steps
Open Mission Planner and press Ctrl+F. This will open a hidden screen like the one shown below.
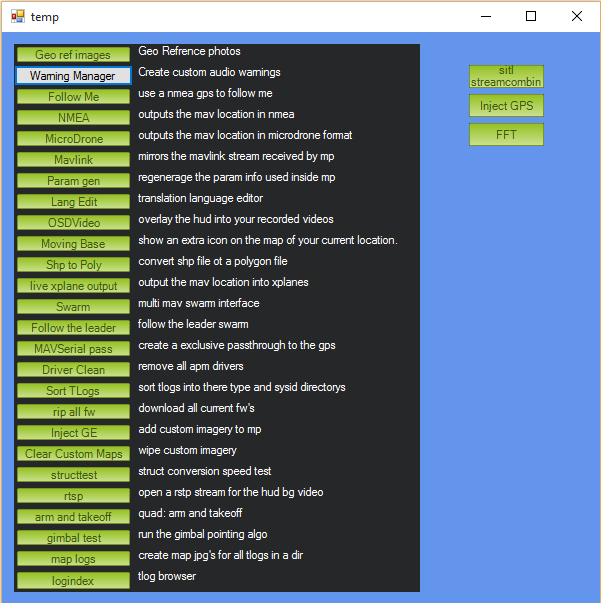
Mission Planner: Temp Screen (Ctrl +F)
Click the button Geo ref images. It will give you access to the Geo Tagging tool
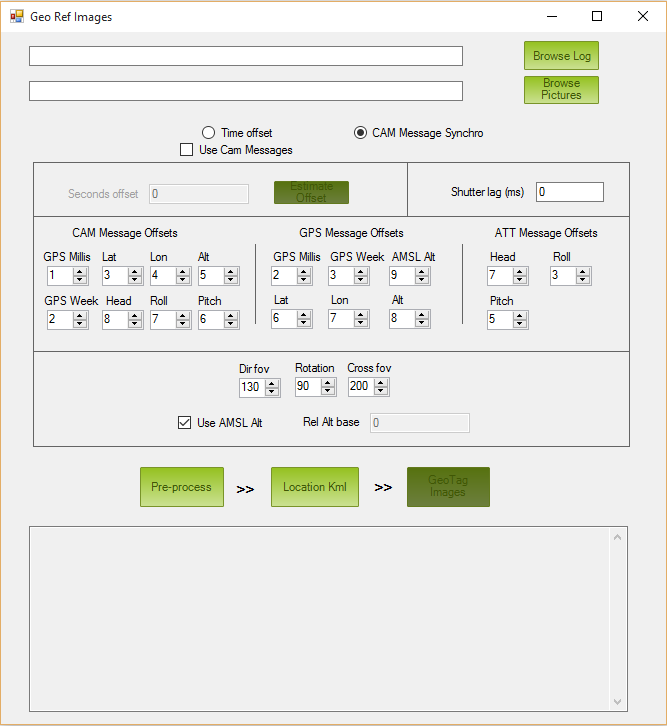
Mission Planner: Geo Ref Images Screen
Click the button Browse Log and select the log (.tlog or .log) of the flight related to the shooting session.
Click the button Browse Directory and select the folder where your aerial pictures were downloaded from your camera.
Notice that the camera picture folder can contain other files apart from the pictures. However in terms of pictures, it must contain just the ones belonging to the flight.
The next steps depend on whether you’re using CAM Messages or a time offset.
CAM messages
In order to process CAM messages, the mission file had to be defined to use remote camera trigger by means of any of the available mission commands (CAM_TRIGG_DISTANCE, DO_DIGICAM_CONTROL, etc).
Select the CAM Message method if it is not selected in the Geotag Mode section.
Enter Shutter Lag value (in milliseconds) if you know it. If not leave it with 0
Check that Log offsets are correct according to your log version (usually these are OK)
Enter FOV information if needed
Select Use AMSL Alt checkbox if you want absolute altitude. Otherwise, uncheck
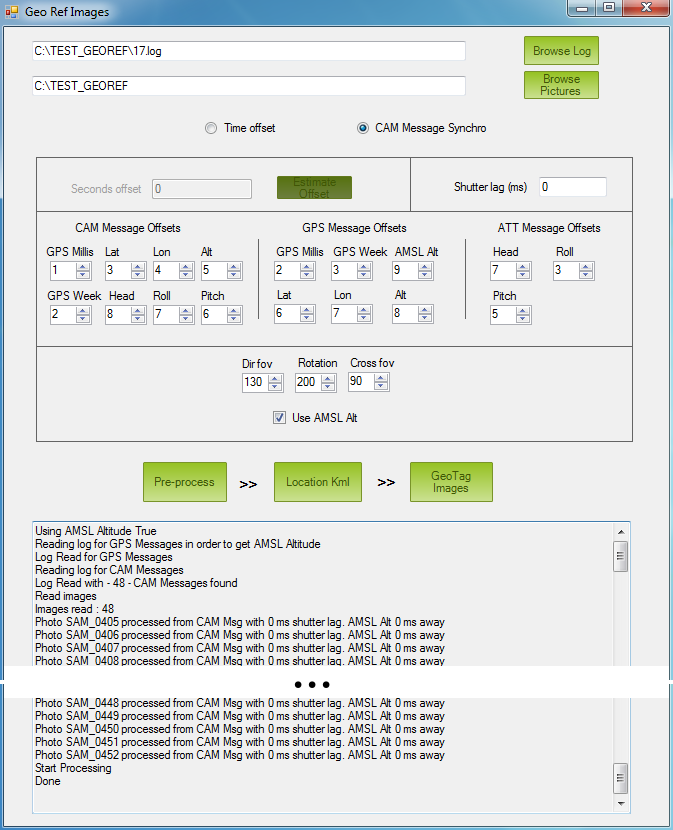
Click Pre-process
If pre-processing works correctly, you will see Done displayed at
the end of the Process Messages Area.
Note
The most common problem in this processing mode is having a discrepancy between the number of CAM messages in log and the number of pictures in the folder. If the tool finds that they are different, it will output an error message and abort.
The final step is to “sanity check” the proposed picture location using the Location Kml button (See Common Post-steps below).
Time offset
Tip
If you haven’t flown yet, one useful trick is to synchronize camera and system time.
Select the Time Offset method if it is not selected in the Geotag Mode section.
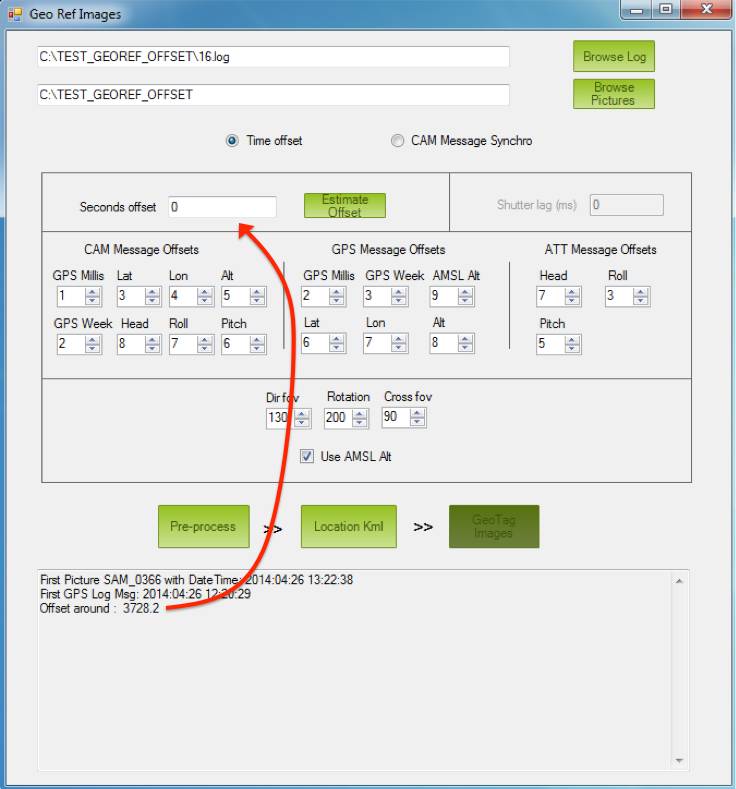
Click on Estimate Offset button
The tool will calculate (as explained in previous section) the time difference between the first picture and the first GPS time in the log.
Copy the calculated offset printed in the Process Messages Area and paste it into the field Seconds offset
Take a look at the following picture:
Click Pre-process
If pre-processing works correctly, you will see Done displayed at
the end of the Process Messages Area.
Note
The most common problem when using this method is the use of an inaccurate time offset. Remember that the estimated time offset is just a starting point!
The Geotag tool will output a warning if pictures are discovered that are not found in the autopilot log - see picture below:
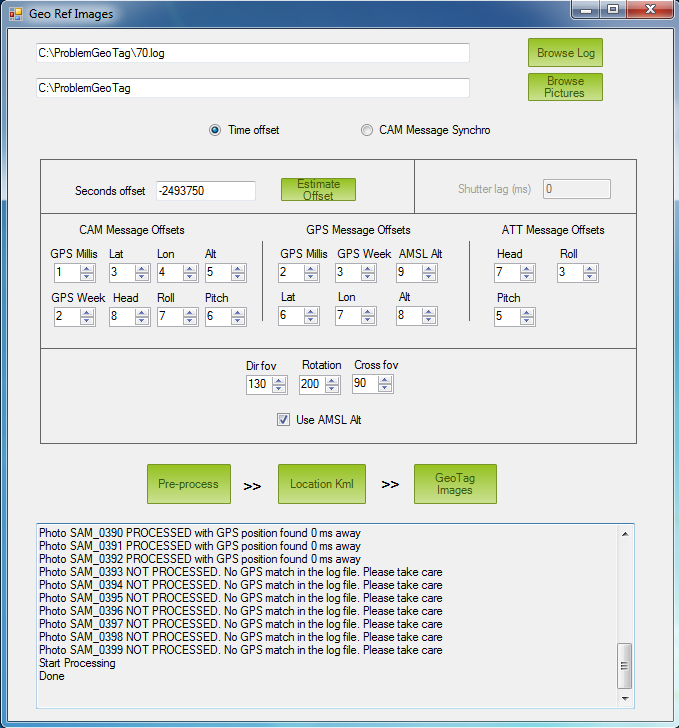
Mission Planner: Images not found in log at specified offset
The final step is to “sanity check” the proposed picture location using the Location Kml button (See Common Post-steps below). If the proposed locations are not correct, add or subtract some seconds to the Offset Time and repeat.
Common post-steps
The remaining steps are to check that proposed picture locations are acceptable and write location information to the picture’s EXIF data:
Click on the Location Kml button. Google Earth will open and show the proposed picture locations (as shown below):
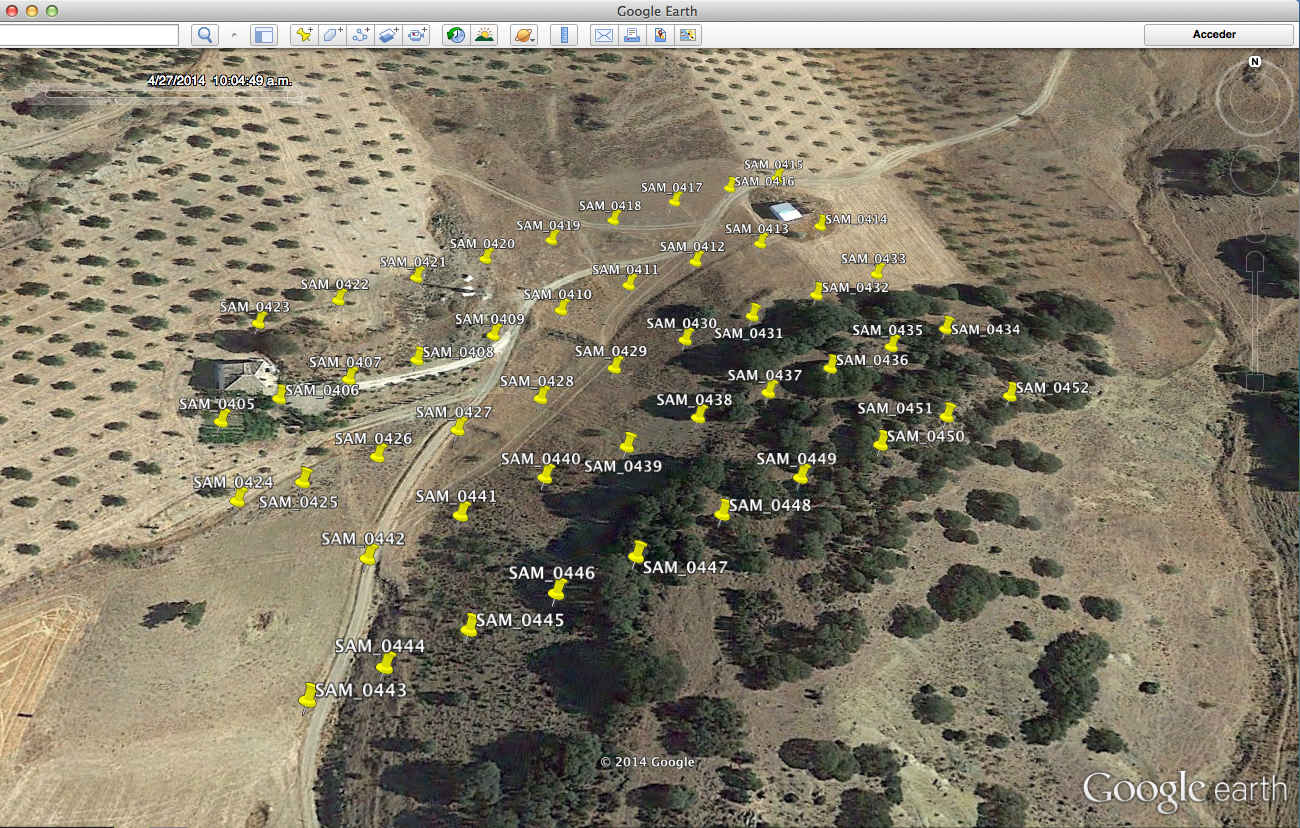
Check that they are OK. If you used CAM Message mode, there shouldn’t be any problem (iIf there is, just order pictures alphabetically and check that the first picture in the list is also the oldest one). If you used Time Offset, just try adding or subtracting seconds to time offset.
If everything is OK, click on GeoTag Images button and wait to see the processing message
Geo tagging FINISHED.
Geotagged files can be found in geotagged folder inside the original pictures folder
Interface overview
The Mission Planner Geo Ref Images screen is shown below:
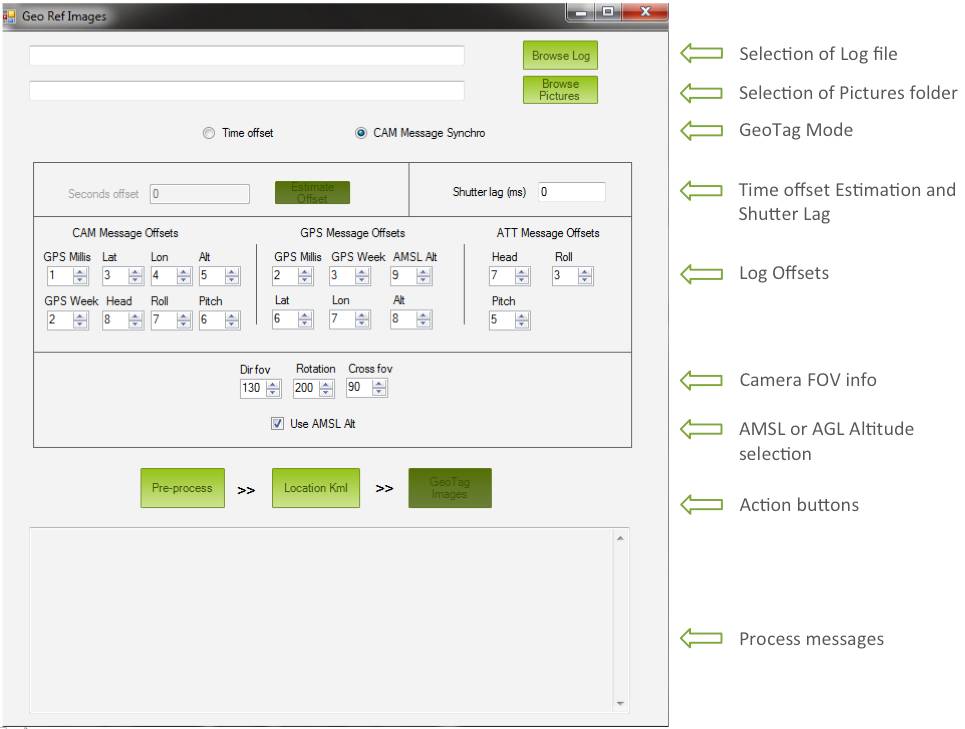
Files selection
This is where the user has to select the log location and camera pictures folder
Geotag mode
As explained above, there are two options. CAM Messages and Time offset.
Time offset estimation and shutter lag
This section is only relevant if Time Offset mode has been selected.
The time offset needs to be estimated by comparing the first picture time and the first GPS time in the log. Once the user clicks the Estimate Offset button, the tool will calculate time offset and print the result in the Process Messages section at the bottom of the window:
Offset Estimation = 1st_Picture_Time - 1st_GPS_Time_Logged
Notes:
If CAM Message is selected, the Shutter Lag option is available. Note that GPS positions are stored at 5Hz by default (if using 3DR GPS) so they are recorded every 200ms.
If Shutter Lag is less than 100ms, then GPS position is taken from current CAM Message.
If Shutter Lag is bigger than 100ms, the GPS position is taken from 200ms ahead in log.
Item offsets in log
This section allows the user to tell the tool where specific information can be found in the log. There are three messages whose offsets need to be defined
CAM
GPS
ATT
Tip
Item offsets are preset to the values for the last stable APM release.
Example of how to find out item offset in a message line within a log
Lets take a look at the GPS Line Format definition at the beginning of a log:
FMT, 130, 45, GPS, BIHBcLLeeEefI, Status,TimeMS,Week,NSats,HDop,La6t,Lng,RelAlt,Alt,Spd,GCrs,VZ,T
The field with the number 1 is the one after the
Units-definition-word.
In our case, the Units-definition-word is BIHBcLLeeEefI. So the
field with number 1 is Status
From this we should have:
TimeMS = 2
Week = 3
Lat = 6
...
FOV and altitude reference
This is where the user can define the Field of View (FOV) and orientation information. This information is incorporated into the result files but it is not used or stored in the picture EXIF data.
The AMSL Alt checkbox allows to select either AGL Altitude (Above Ground Level) or AMSL Altitude (Above Mean Sea Level).
Process messages
This is the place where the tool will output information
Additional information
This section contains links to additional information/information for working with specific cameras:
Geotag GoPro Images with a Pixhawk Log File (tuffwing.com)
Acknowledgements
This tutorial was created to show you how does it work. Original work from Sandro Benigno and Guto Santaella updated by Jesus Alvarez.