Servo Gripper
This article explains how to connect a servo to an autopilot and configure it for use as a gripper which is useful for delivery or bottle drop applications. The servo can be controlled directly by the pilot via a switch on the transmitter or as part of a mission. You may wish to refer to the general servo wiki page for other ways servos can be controlled.
Connecting the servo to an autopilot
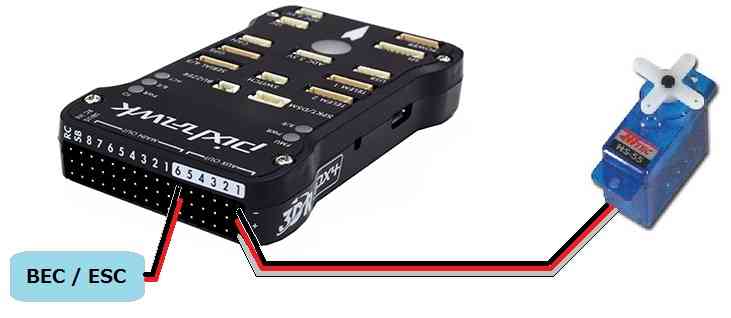
If using Copter, connect the servo to AUX OUT 1, 2, 3 or 4 if the autopilot includes an IOMCU for the first 8 MAIN outputs, or any output operating at 50Hz if the autopilot does not use an IOMCU. MAIN OUT 1 ~ 8 should be avoided because these normally update at 400hz. If using Plane or Rover where all PWM output pins usually update at 50hz, any unused output may be used.
In some autopilots with IOMCUs, AUX OUT 5 and 6 cannot be used by default because they are setup by default as Relays. These pins can changed to Servo outputs by setting the
BRD_PWM_COUNTparameter to 6 and setting RELAY2_PIN and RELAY1_PIN to -1.If the autopilot cannot provide power to the servos, an external BEC or ESC that can provide 5V should be used.
Configuration
set which RC output is used by setting SERVOx_FUNCTION (or RCX_FUNCTION) to 28 (i.e. if using AUX OUT 1 on a Pixhawk, set SERVO9_FUNCTION to 28).
GRIP_ENABLE to 1 to enable the gripper feature and then refetch parameters from the ground station in order to make other gripper parameters visible.
GRIP_TYPE to 1 to enable the servo gripper and reboot the autopilot
GRIP_GRAB to the pwm value (i.e. 1000 ~ 2000) for the gripper’s closed position
GRIP_RELEASE to the pwm value for the gripper’s open position
GRIP_NEUTRAL to the pwm value for the gripper’s neutral position (often the same as its closed position)
Controlling Gripper from the transmitter
One of the transmitter’s auxiliary switches can control the gripper by setting an RCx_OPTION parameter to “19” (Gripper).
Controlling Gripper during a mission
The gripper position can be controlled during a mission in AUTO mode using the DO_GRIPPER command. Set the “drop/grab” column to 0 to drop (open the gripper), 1 to grab (close the gripper).

Controlling Gripper from the ground station
The gripper can be opened or closed in real-time from the ground station if the ground station sends a COMMAND_LONG with the command field set to DO_GRIPPER (i.e. 211) but there are no ground stations (as far as we know) that support doing this.