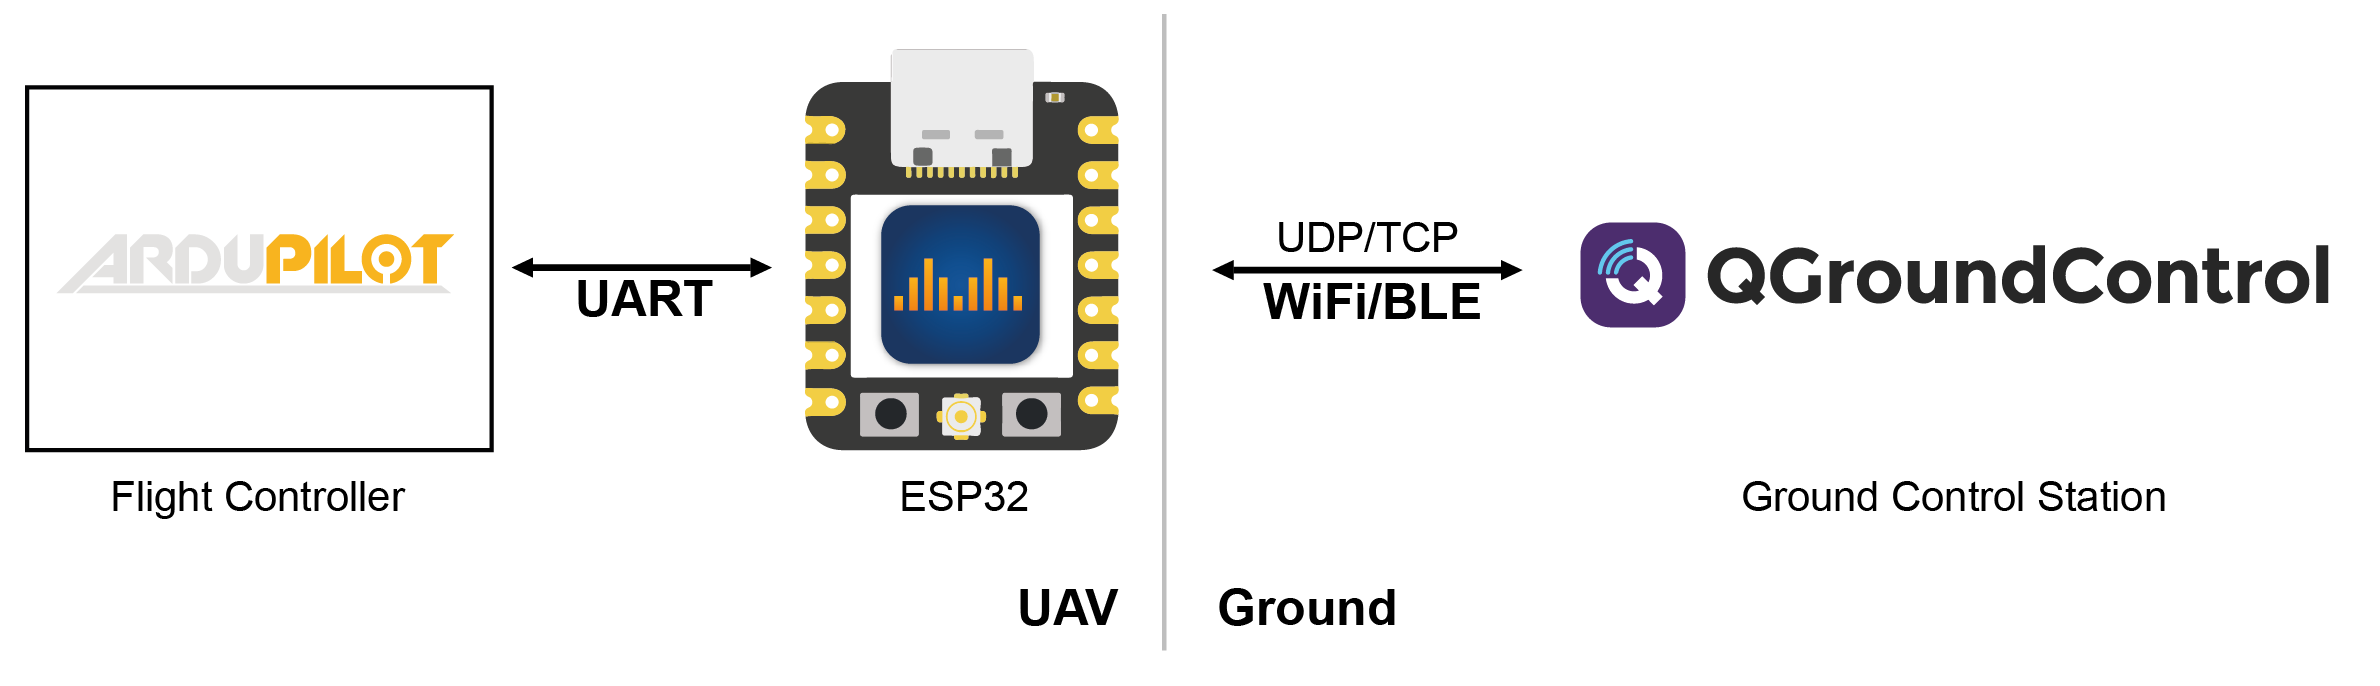
DroneBridge for ESP32
DroneBridge for ESP32 allows an ESP32 to be used as a bi-directional telemetry radio using Wifi or Bluetooth LE at ranges up to 1km.
DroneBridge for ESP32 supports standard WiFi connections to an access point but can also operate as a standalone access point.
Three operating modes are available:
Standard Wifi has a range of 150m+
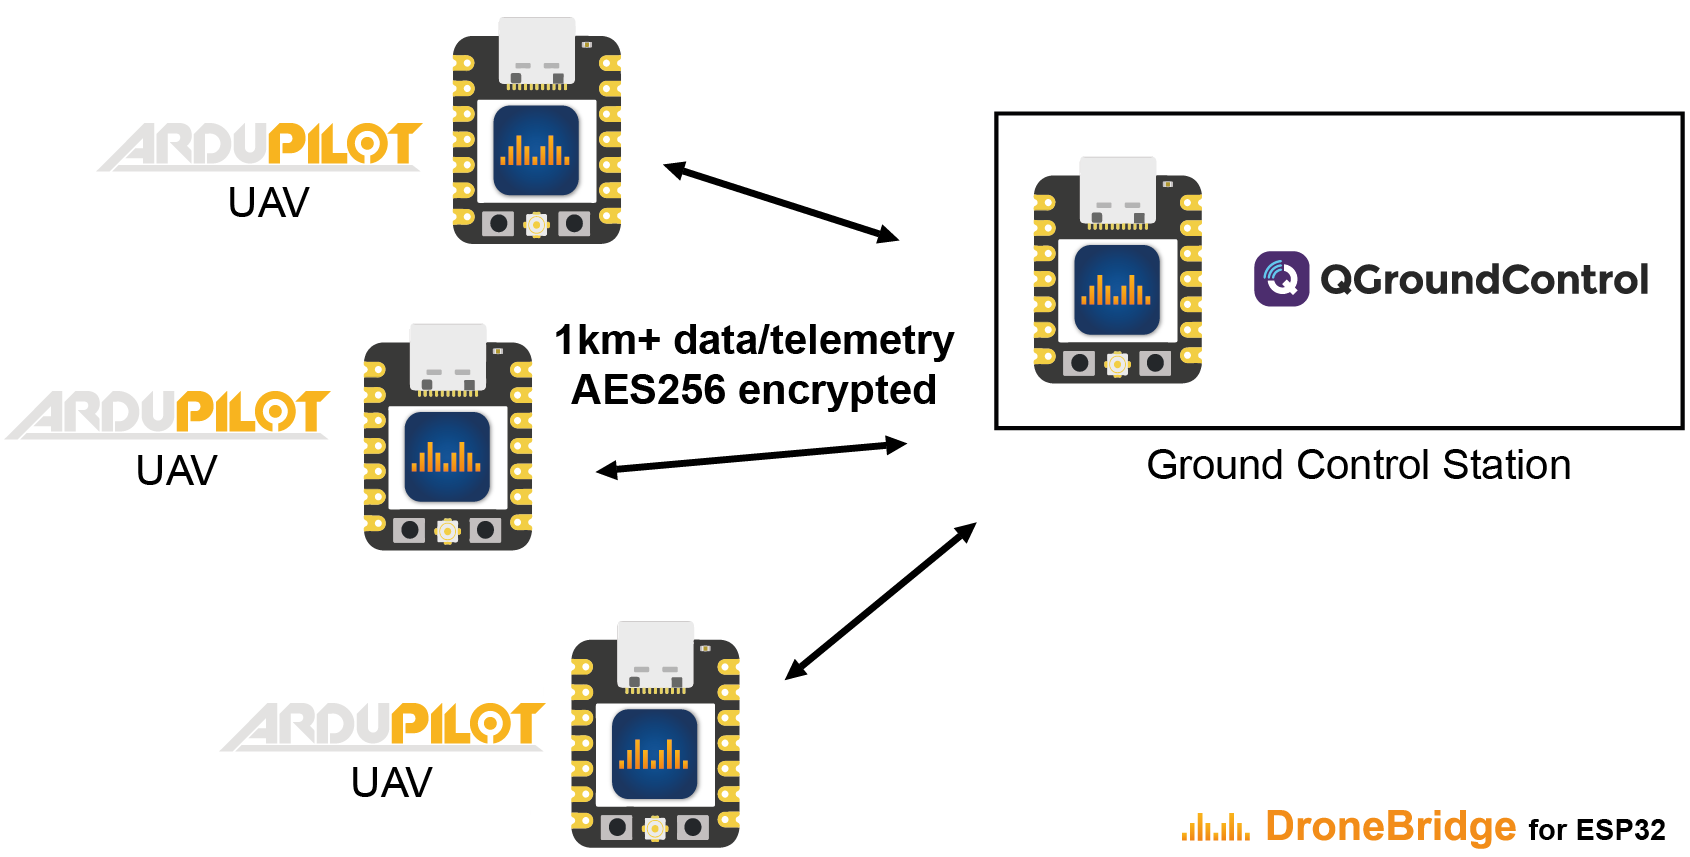
ESP-NOW mode offers a connectionless and encrypted alternative to traditional WiFi. While the data rate is reduced to ~250 kbit/s the range is increased up to 1 km. This mode has no limit on how many clients are connected on the autopilot side. Only channel capacity and processing capacity limit the number of clients. This mode requires ESP32 devices on the GCS side as well as on the autopilot side.
Drone Light Show Edition is a specialised build optimised for Skybrush drone shows
More information available on the official DroneBridge website.
Features
Bidirectional: serial-to-WiFi, serial-to-WiFi Long-Range (LR), serial-to-ESP-NOW link
150m+ range using standard WiFi depending on the access point
Up to 1km of range using ESP-NOW or Wi-Fi LR Mode
Fully encrypted in WiFi & ESP-NOW (AES-GCM 256 bit)
High data rates (250kbit ESP-NOW & 11Mbit WiFi mode)
Bluetooth LE connections for short range configuration of your UAV
Support for MAVLink, MSP & LTM telemetry
Support for any payload using transparent option
Supported by QGroundControl, Mission Planner, mwptools, impload etc.
Easy to set up: Power connection + UART connection to flight controller
Fully configurable through an easy-to-use web interface
Parsing modes for reduced packet loss
Ideal for central drone swarm control
Reliable, Low latency, Affordable
Weight: <8g
Where to Buy
Official DroneBridge ESP32 hardware is available directly from DroneBridge
(Optionally) 2.4GHz Rod Antenna (ESP32-C3 or ESP32-C6)
(Optionally) 2.4GHz FPC Antenna A-01 (ESP32-C3 only)
While not recommended, unofficial hardware can also be used.
Flash the DroneBridge Firmware
To flash the latest firmware to the ESP32:
Connect your PC to the ESP32’s USB port
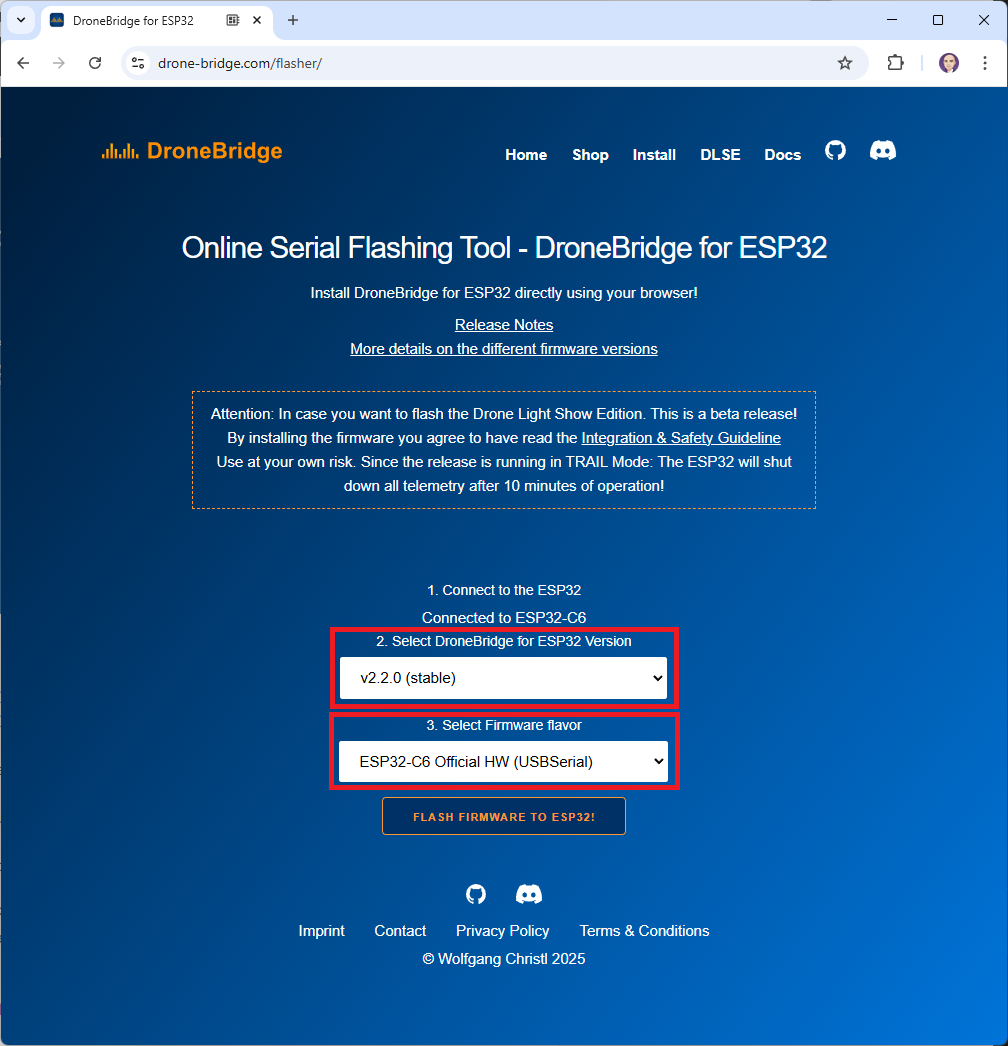
Open a web browser and connect to the online flashing tool at drone-bridge.com/flasher
Press the “Connect to ESP32” button
From the “Select DroneBridge for ESP32 Version” drop-down:
For Wifi, Bluetooth LE or ESP-NOW, select the latest “Stable” version
For Drone Light Show Edition, select the latest “Drone Light Show Edition” version
From the “Select Firmware flavor” drop-down:
If using official hardware:
For the vehicle telemetry unit, select, “ESP32-xx Official HW”
For the ground station telemetry unit, select, “ESP32-xx Official HW (USBSerial)”
If using unofficial hardware:
For the vehicle telemetry unit, select, “ESP32-xx”
For the ground station telemetry unit, select, “ESP32-xx (USBSerial)”
Push the “Flash Firmware to ESP32!” button
For more details see the DroneBridge Docs Installation Guide.
Configuring DroneBridge for ESP32
After powering on the ESP32, connect your PC’s wifi to the WifiAP, “DroneBridge for ESP32” with password “dronebridge”. If “ESP-NOW” is installed, it may be necessary to short-press the “Settings” button to make the WifiAP appear.
Open a web browser and connect to one of the following URLs:
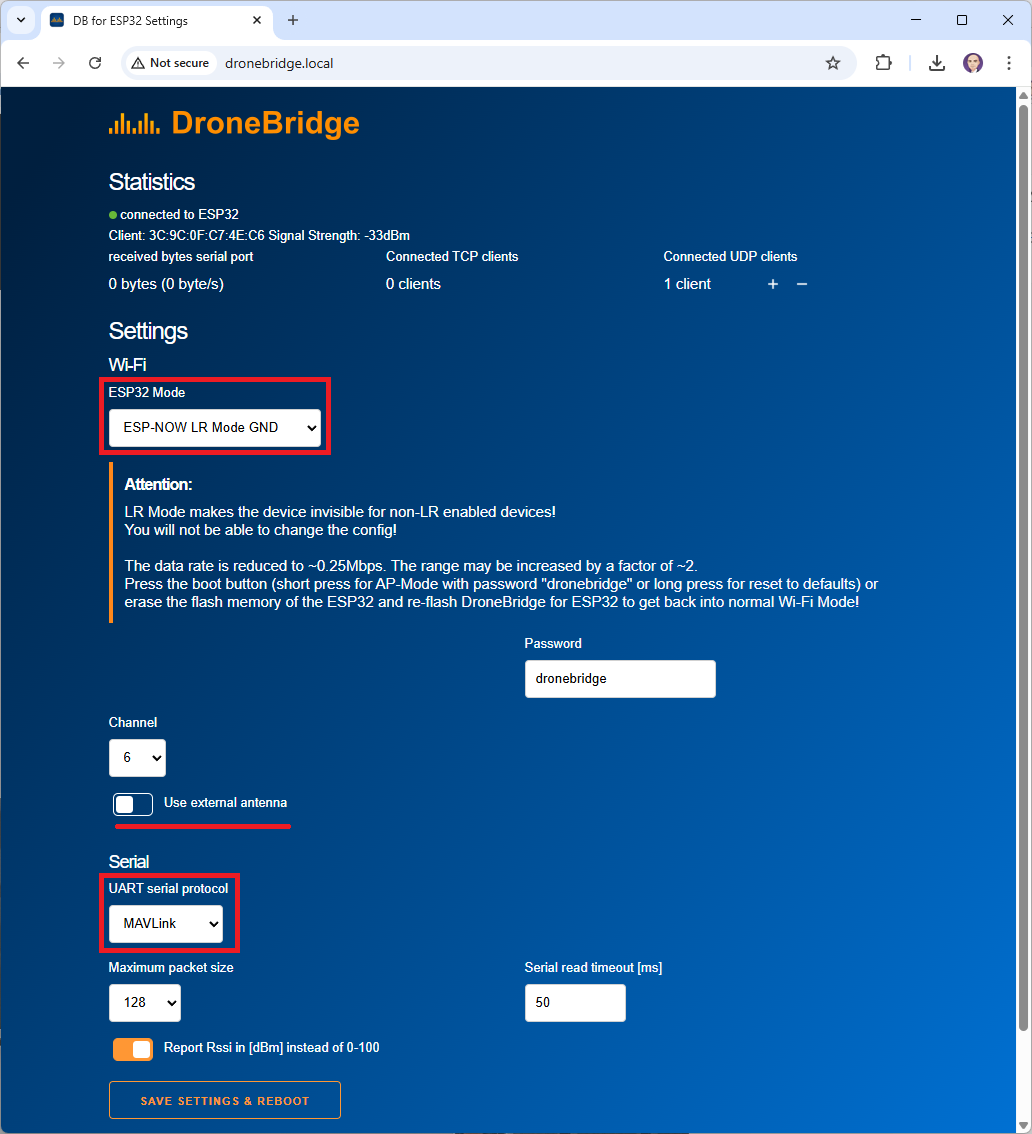
For outdoor use ESP-NOW is recommended:
Set “ESP32 Mode” to “ESP-NOW LR Mode GND” for the ground station unit
Set “ESP32 Mode” to “ESP-NOW LR Mode AIR” for the vehicle unit
If an external antenna is used move the “Use external Antenna” slider to the right
“UART serial protocol” should be left at “MAVLink” and “UART baud” should be left at “115200”
Press “Save Settings & Reboot”
Once configured to use ESP-NOW, the WifiAP will not appear after startup unless the “boot” button is short pressed. Alternatively long-press the “boot” button to reset all settings back to the defaults.
For more details see DroneBridge Docs Configuration Guide.
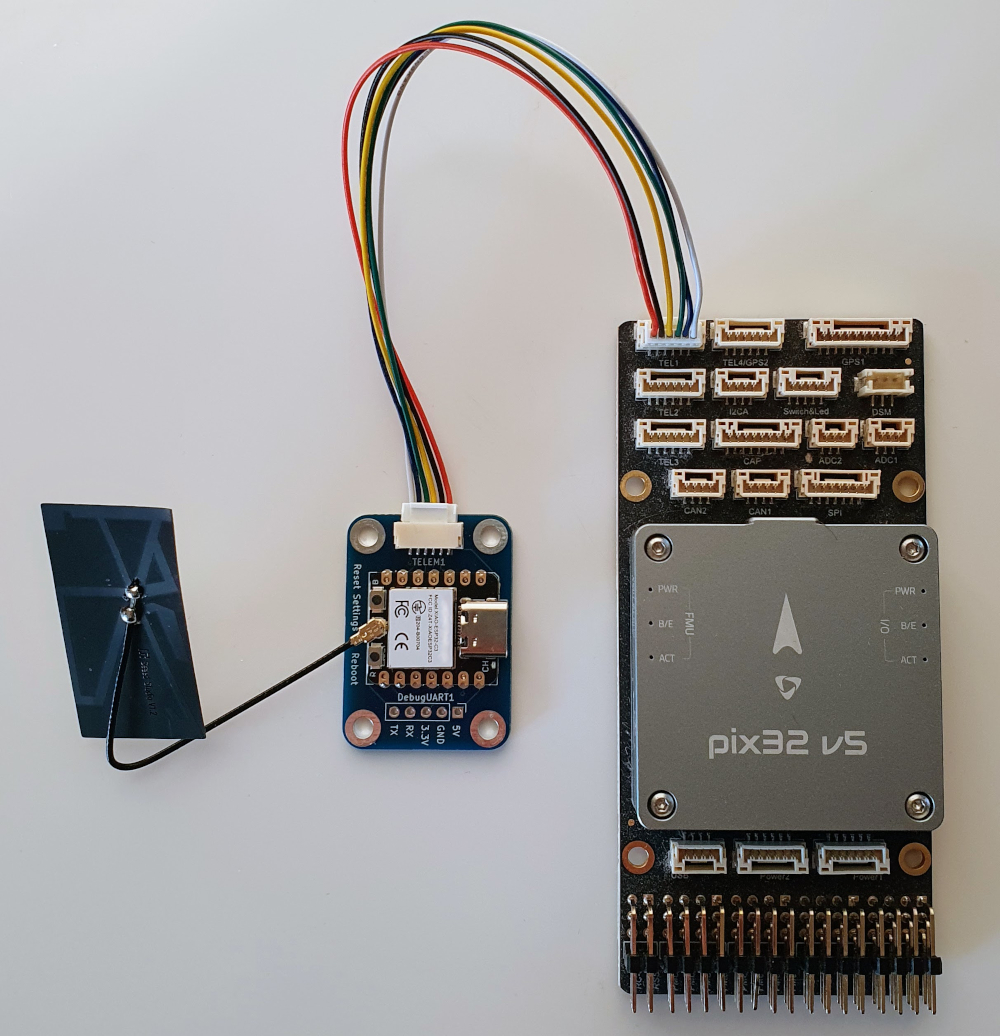
Connecting to the Autopilot
If using the official hardware, use a JST-GH 6-pin cable to connect the ESP32 to one of the autopilot’s serial ports (e.g.. TELEM1 or TELEM2)
For unofficial hardware see the DroneBridge Docs Hardware & Wiring Guide
Set the autopilot’s serial protocol and baud rate to match the DroneBridge settings. If connected to Serial2 (aka Telem2) these parameters should be:
SERIAL2_PROTOCOL = 2 (MAVLink2)
SERIAL2_BAUD = 115 (115200 baud)
(Optionally) BRD_SER2_RTSCTS = 0 to disable flow control
Connection to the GCS
To connect using a USB cable:
Connect the ESP32 to the PC using a USB cable
Start the GCS (e.g. Mission Planner, QGC) and connect to the COM port
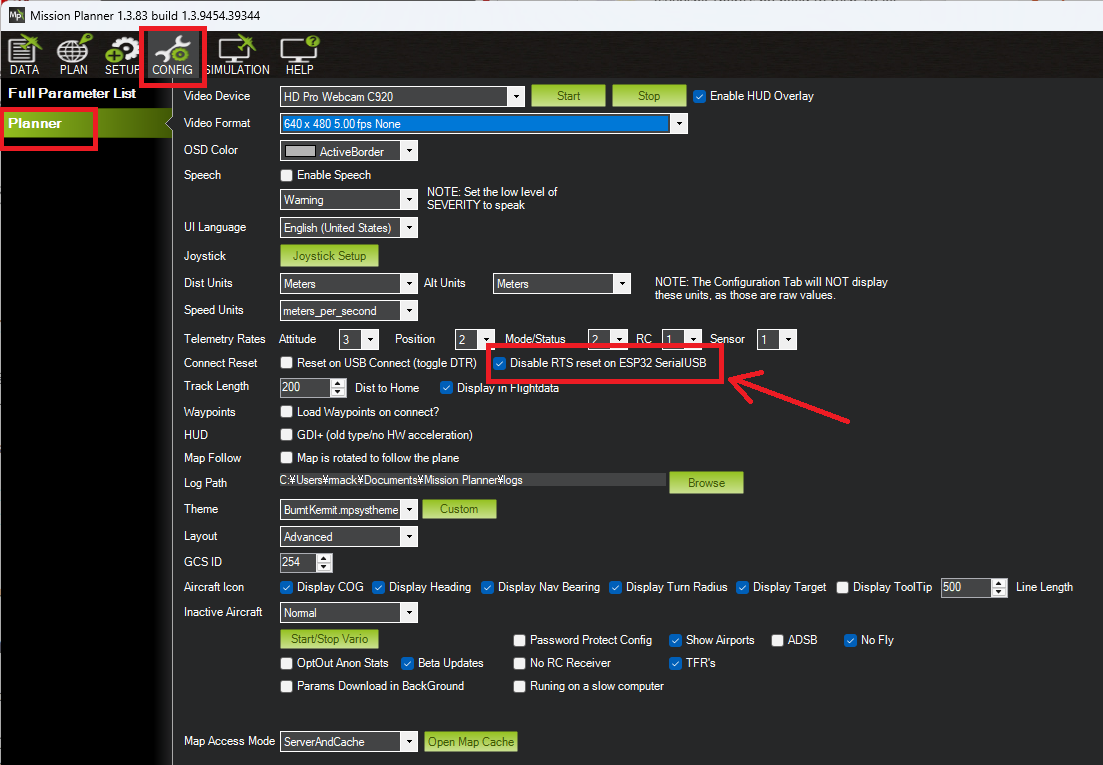
For use with Mission Planner it may be neessary to check the Config, Planner, “Disable RTS reset on ESP32 SerialUSB” checkbox as shown below
Alternatively if the vehicle unit is configured to use Wifi, connect the PC to the WifiAP and enter the password (e.g. “dronebridge”)
QGroundControl or Mission Planner should auto-detect the connection and no further action should be required but if necessary connect manually using UDP or TCP:
UDP unicast on port
14550to all connected devices.TCP on port
5760
APIs,Troubleshooting & Support
For more detailed information please visit the official Wiki!