BeagleBone Blue
BeagleBone Blue (BBBlue) is a complete, Linux-enabled robotics computer. Community-supported and fully open-source, the real-time performance, flexible networking and rich set of robotics-oriented peripherals make building mobile robots quick and affordable.
Note
Copter support was added in Copter-3.5.
Confer the schematic(s) from BBBlue repo for more details.
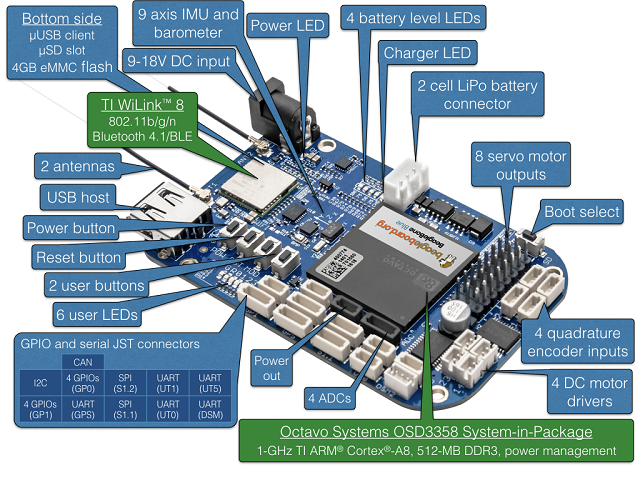
Specifications
Processor
1GHz ARM Cortex-A8
2x32-bit 200-MHz programmable real-time units (PRUs)
512MB DDR3 RAM integrated
4GB 8-bit eMMC flash
Sensors
MPU9250 for accelerometers, gyroscope and internal compass (I2C)
BMP280 barometer
Interfaces
Wifi (802.11bgn)
Bluetooth 4.1 and BLE
8x ESC/Servo out (6v), 4x DC motor out
USB 2.0 client and host
11x programmable LEDs
2x buttons
1.8V analog
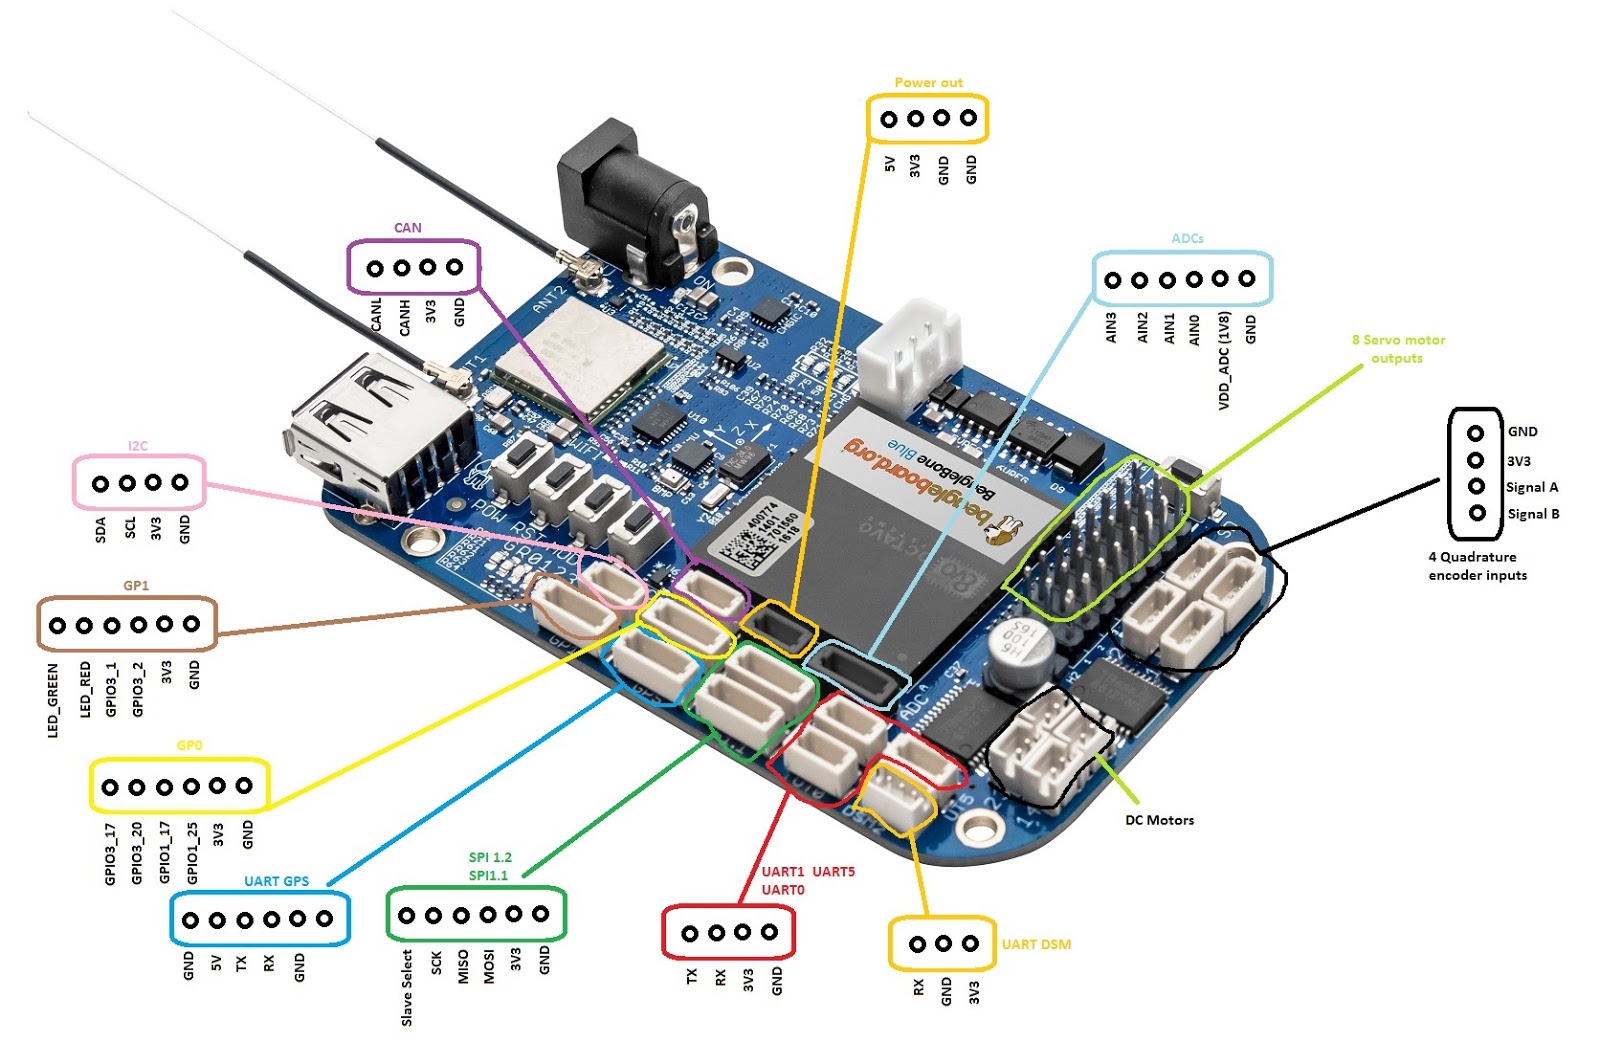
SPI, I2C, UART
2-cell LiPo support with balancing, 9-18V charger input
OS
Linux (Debian)
Quick Start
Preparing BBBlue with linux
Download the latest buster-console image from https://rcn-ee.net/rootfs/bb.org/testing/ (bone-debian-10.11-console-armhf-2021-12-01-1gb.img.xz used in this example).
Note
In case this image does not exist anymore or is outdated, go to https://rcn-ee.net/rootfs/bb.org/testing/ and look for the most recent folder that contains a ...-console folder with image - it contains all we need and is usually around 150 MB. The ...-iot could also be used but is bigger. Basically just look for the smallest and most recent bone-... image, as you can always install more software if needed.
Flash image onto SD card.
Insert SD card in BBBlue and power up using a suitable USB cable at the micro USB bus.
Connect via SSH (ssh debian@192.168.7.2 on Windows and ssh debian@192.168.6.2 on Mac/Linux).
The password should be temppwd. It is given at the command prompt.
Connect BBBlue to the internet using a shared internet connection over USB (see chapter Connect BBBlue to the internet).
On the BBBlue configure gateway and nameserver.
sudo nano /etc/network/interfaces
Then paste the following lines under iface lo inet loopback
iface usb0 inet static
address 192.168.7.2
netmask 255.255.255.252
network 192.168.7.0
gateway 192.168.7.1
post-up route add default gw 192.168.7.1
dns-nameservers 192.168.7.1
Next, configure the Host (Linux or Windows):
Windows:
Press CTRL + R > Type ncpa.cpl and hit Enter.
Find your real Ethernet or Wifi Adapter and right click > Properties
Select the Tab "Sharing" > Tick the first checkbox and select the BBBlue ethernet connection
Press OK
Select the BBBlue ethernet connection and right click > Properties
Double click "Internet Protocol, Version 4 (TCP/IPv4)
Set the IP Address to 192.168.7.1
Set DNS server to 8.8.8.8
Press OK
Linux:
Host computer’s command prompt:
ifconfig
use this output to figure out which is your internet connected network adapter and replace in the following ‘wlan0’ by the name of it:
sudo sysctl net.ipv4.ip_forward=1
sudo iptables -t nat -A POSTROUTING -o wlan0 -j MASQUERADE
sudo iptables -A FORWARD -m conntrack --ctstate RELATED,ESTABLISHED -j ACCEPT
sudo iptables -A FORWARD -i usb0 -o wlan0 -j ACCEPT
Reboot the BBBlue and then reconnect again using SSH
sudo reboot
Eliminate the necessity for the user to enter the sudoer password:
echo "debian ALL=(ALL) NOPASSWD: ALL" | sudo tee -a /etc/sudoers.d/debian >/dev/null
Install locales (a lot of programs complain otherwise) and set them:
sudo apt -y update
sudo apt install -y locales
sudo dpkg-reconfigure locales
Choose a locale (e.g. en_US.UTF-8 = English, United States, UTF8). This may take a while.
sudo apt -y dist-upgrade
sudo apt install -y git
sudo apt-get install -y cpufrequtils
Set CPU profile to “Performance”:
sudo sed -i 's/GOVERNOR="ondemand"/GOVERNOR="performance"/g' /etc/init.d/cpufrequtils
Setting up ArduPilot
The following instructions show how to setup ArduPlane. It is the same for other vehicle types just replace plane by e.g. copter etc. (see Building ArduPilot). It is also possible to setup multiple vehicle types on the same system.
Create an empty service file so that ardupilot automatically starts on boot and runs in the background:
sudo nano /lib/systemd/system/arduplane.service
Paste following text. And replace <target IP address> with the IP address of the telemetry receiving computer:
[Unit]
Description=ArduPlane Service
After=networking.service
StartLimitIntervalSec=0
Conflicts=arducopter.service ardurover.service antennatracker.service

[Service]
ExecStart=/usr/bin/ardupilot/arduplane -C /dev/ttyO1 -A udp:<target IP address>:14550 -B /dev/ttyS2
Restart=on-failure
RestartSec=1

[Install]
WantedBy=multi-user.target
sudo mkdir -p /usr/bin/ardupilot
Download the latest ArduPilot binary for the blue target/FC from https://firmware.ardupilot.org/ (Plane/stable-4.1.6/blue/arduplane used in this example). Copy this file to /usr/bin/ardupilot/.
sudo wget -O /usr/bin/ardupilot/arduplane https://firmware.ardupilot.org/Plane/stable-4.1.6/blue/arduplane
Alternatively there are other possible sources like the https://custom.ardupilot.org/ build server or you can compile it yourself (see Cross compiling ArduPilot from source).
Note
In case this image does not exist anymore or is outdated, go to https://firmware.ardupilot.org/ and look for the vehicle type you want. Then look for the firmware you want - usually the most recent stable - and within that folder look for blue. In this folder you will find some text files and the firmware binary/executable.
sudo chmod 0755 /usr/bin/ardupilot/a*
sudo systemctl enable arduplane.service
sudo reboot
Your BBBlue is now ready to connect to a Ground Control Station (e.g. MissionPlanner or QGroundControl )
When establishing a connection select UDP on port 14550.
More information can be found in section Connect BBBlue to a Ground Station Software
Appendix
Connect BBBlue to the internet
Via Wifi
Connect the BBBlue to an available access point - this does NOT setup the BBBlue to act as access point itself.
connmanctl services | grep 'YOUR_SSID' | grep -Po 'wifi_[^ ]+'
cat >/var/lib/connman/wifi.config
One line at a time, we’re writing a file line by line:
[service_<OUTPUT-FROM-CONNMANCTL-COMMAND>]
Type = wifi
Security = wpa2
Name = YOUR_SSID
Passphrase = YOUR_WIFI_PASSWORD
CTRL + C, should save File contents. Make sure to add a new line (press Enter) after Passphrase = *
sudo reboot
Again, ssh into the BBBlue at the former IP.
Obtain the IP of the BBBlue wifi interface:
ip addr
ssh by wifi into the BBBlue.
Cross compiling ArduPilot from source
Generally you can compile ArduPilot on the BBBlue itself. But this takes a lot of time (several hours) and a lot of space (you need to maximize/grow the partition on the SD card to fit) and is therefore not recommended.
Install Ubuntu 20.04 64-Bit as build machine (e.g. can be VM or github action).
sudo apt update
sudo apt install git
git clone --recurse-submodules https://github.com/ardupilot/ardupilot.git
cd ardupilot
use either the stable tag ArduPlane-stable or the current Plane branch Plane-4.1 (in the moment both refer to Plane-4.1.6) - make sure to use a stable version
./Tools/environment_install/install-prereqs-ubuntu.sh
git checkout Plane-4.1
./waf configure --board=blue
./waf plane
binary is located in build/blue/bin/.
Kernel configuration
In this section we update the kernel. There are two types of kernels: Real-time and regular (default). In this guide we will configure the real-time kernel v5.10 RT. Refer to elinux.org/Beagleboard if you wish to use different version or type.
Update local scripts:
cd /opt/scripts && git pull
Update kernel:
sudo /opt/scripts/tools/update_kernel.sh --bone-rt-kernel --lts-5_10
Specify device tree binary to be used at startup:
sudo sed -i 's/#dtb=/dtb=am335x-boneblue.dtb/g' /boot/uEnv.txt
PRU Drivers
There are two types of drivers available for the PRU’s (Programmable Realtime Units): RProc and UIO. RProc is enabled by default. In this example we’re using UIO instead of RProc. If you don’t want to change to UIO, ignore setting the uboot_overlay_pru= section.
Open uEnv.txt for editing:
sudo nano /boot/uEnv.txt
Set uboot_overlay_pru=AM335X-PRU-UIO-00A0.dtbo.
Finally reboot the board to finalize configuration.
sudo reboot
Test to see if the device tree blob (DTB) is loaded
lsmod |grep uio
It should show something like this:
uio_pruss       4928 0
uio_pdrv_genirq 3539 0
uio             8822 2 uio_pruss,uio_pdrv_genirq
Flash SD card to eMMC
You can use the following steps to copy everything over to the eMMC. This way the SD card can be removed or used for other purposes.
sudo nano /boot/uEnv.txt
Uncomment the line #cmdline=init=/opt/scripts/tools/eMMC/init-eMMC-flasher-v3.sh
It should now be:
cmdline=init=/opt/scripts/tools/eMMC/init-eMMC-flasher-v3.sh
Save the file and sudo reboot
The flashing process will immediately start on reboot. This process can take up 15 minutes (Usually 5 minutes). Wait until all flashing LEDs are OFF (Only power LED is on).
Once done, remove power and then remove the SD card.
Power it up again and it should boot as usual.
Check if booted from eMMC or SD card
sudo apt-get install tiomapconf
Boot from eMMC:
sudo omapconf read 0x44E10040
0040033C
Boot from microSD (boot button pressed):
sudo omapconf read 0x44E10040
00400338
Connect BBBlue to a Ground Station Software
Via built-in Bluetooth
In order to use the built-in Bluetooth connection as MAVLink some steps are required. First, we need a Python script that provides a rfcomm bluetooth service. The script also creates a virtual serial port (/dev/pts/0) which we will specify as ardupilot telemetry channel later. Everything that is sent or received to or from the virtual serial port will be redirected over bluetooth to our client application or ardupilot.
sudo python3 -m pip install pybluez
sudo python3 -m pip install pyserial

sudo mkdir /usr/bin/bluetooth-serial
sudo nano /usr/bin/bluetooth-serial/bluetooth-serial.py
Paste the following script
import os, pty, serial, time
from bluetooth import *
import threading

def receive(client, master):
    try:
        while True:
            received_data = os.read(master, 1024)
            client.send(received_data)
    except:
        print("cannot receive, connection closed")

def send(client, master):
    try:
        while True:
            data = client.recv(1024) #128
            written = os.write(master, data)
    except:
        print("cannot send, connection closed")

def start_server_and_listen(master):
    service_uuid = "00001101-0000-1000-8000-00805F9B34FB"
    server = BluetoothSocket(RFCOMM)
    server.bind(("", PORT_ANY))
    server.listen(1)
    port = server.getsockname()[1]
    advertise_service(server, "BBBlue-MAVLink", service_id = service_uuid, service_classes = [SERIAL_PORT_CLASS], profiles = [SERIAL_PORT_PROFILE])
    client, client_info = server.accept()
    receive_thread = threading.Thread(target=receive, args=(client, master))
    send_thread = threading.Thread(target=send, args=(client, master))
    receive_thread.start()
    send_thread.start()
    receive_thread.join()
    send_thread.join()
    server.close()
    client.close()

master, slave = pty.openpty()
s_name = os.ttyname(slave)
print(s_name)
ser = serial.Serial(port=s_name, baudrate=57600, stopbits=serial.STOPBITS_TWO)

while 1:
    try:
        start_server_and_listen(master)
    except:
        print("Exception occurred, restarting server...")

client.close()
server.close()
Next we create a systemd service for this script.
sudo nano /lib/systemd/system/bluetooth-serial.service
And paste the following text.
[Unit]
Description=Bluetooth Serial Service
After=networking.service

[Service]
Type=simple
Restart=always
ExecStart=/usr/bin/python3 /usr/bin/bluetooth-serial/bluetooth-serial.py

[Install]
WantedBy=multi-user.target
We now have to adjust the previously created ardupilot service. Open the service file:
sudo nano /lib/systemd/system/arduplane.service
It’s mandatory that the bluetooth-serial.service starts before ardupilot. We can replace the After=[…] to
After=bluetooth-serial.service
to achieve this behaviour.
Next let’s adjust the communication channel to our newly created virtual serial port:
ExecStart=/usr/bin/ardupilot/arduplane -A /dev/pts/0
Enable service:
sudo systemctl enable bluetooth-serial.service
Save the file and reboot.
sudo reboot
Now it’s time to connect our bluetooth capable device to the BBBlue. On Windows add a regular Bluetooth device and select “beaglebone”.
After pairing a new virtual COM-Port should appear.
You can now use this COM-Port as connection for your ground control software e.g. QGroundControl or Mission Planner.
If there are, for some reason, two COM-Ports just test both of them until you find the correct one.
Troubleshooting
RCOutputAioPRU.cpp:SIGBUS error generated
https://github.com/imfatant/test/issues/16#issuecomment-477725439
For me the sudo dd if=/dev/zero of=/dev/mmcblk1 bs=1M count=10 did the trick.
Careful: The uboot_overlay_pru version in this Github comment is outdated. Use the instructions above for reference.
Check system config
sudo /opt/scripts/tools/version.sh
The current config should look like this (Use diffchecker or similar tool):
git:/opt/scripts/:[1583f354594aabfaff08dee2a4aabdfe61433024]
eeprom:[A335BNLTBLA21736EL001182]
model:[TI_AM335x_BeagleBone_Blue]
dogtag:[BeagleBoard.org Debian Buster Console Image 2021-12-01]
bootloader:[microSD-(push-button)]:[/dev/mmcblk0]:[U-Boot SPL 2019.04-g923f8b8 (Oct 26 2021 - 14:46:57 +0000)]:[location: dd MBR]
bootloader:[microSD-(push-button)]:[/dev/mmcblk0]:[U-Boot 2019.04-g923f8b8]:[location: dd MBR]
bootloader:[eMMC-(default)]:[/dev/mmcblk1]:[U-Boot SPL 2019.04-g923f8b8 (Oct 26 2021 - 14:46:57 +0000)]:[location: dd MBR]
bootloader:[eMMC-(default)]:[/dev/mmcblk1]:[U-Boot 2019.04-g923f8b8]:[location: dd MBR]
UBOOT: Booted Device-Tree:[am335x-boneblue.dts]
UBOOT: Loaded Overlay:[AM335X-PRU-RPROC-4-19-TI-00A0.kernel]
UBOOT: Loaded Overlay:[BB-ADC-00A0.kernel]
kernel:[4.19.94-ti-r68]
device-tree-override:[dtb=am335x-boneblue.dtb]
/boot/uEnv.txt Settings:
uboot_overlay_options:[enable_uboot_overlays=1]
uboot_overlay_options:[uboot_overlay_pru=AM335X-PRU-UIO-00A0.dtbo]
uboot_overlay_options:[enable_uboot_cape_universal=1]
pkg check: to individually upgrade run: [sudo apt install --only-upgrade <pkg>]
pkg:[bb-cape-overlays]:[4.14.20210821.0-0~buster+20210821]
pkg:[bb-customizations]:[1.20211201.1-0~buster+20211201]
pkg:[bb-usb-gadgets]:[1.20211012.0-0~buster+20211012]
pkg:[bb-wl18xx-firmware]:[1.20210922.2-0~buster+20211007]
pkg:[kmod]:[26-1]
WARNING:pkg:[librobotcontrol]:[NOT_INSTALLED]
pkg:[firmware-ti-connectivity]:[20190717-2rcnee1~buster+20200305]
groups:[debian : debian adm kmem dialout cdrom floppy audio dip video plugdev users systemd-journal input bluetooth netdev gpio admin tisdk weston-launch cloud9ide]
cmdline:[console=ttyS0,115200n8 bone_capemgr.uboot_capemgr_enabled=1 root=/dev/mmcblk0p1 ro rootfstype=ext4 rootwait coherent_pool=1M net.ifnames=0 lpj=1990656 rng_core.default_quality=100 quiet]
dmesg | grep remote
[   26.835790] remoteproc remoteproc0: wkup_m3 is available
[   26.901553] remoteproc remoteproc0: powering up wkup_m3
[   26.901586] remoteproc remoteproc0: Booting fw image am335x-pm-firmware.elf, size 217148
[   26.901840] remoteproc remoteproc0: remote processor wkup_m3 is now up
[   28.464026] remoteproc remoteproc1: 4a334000.pru is available
[   28.480195] remoteproc remoteproc2: 4a338000.pru is available
dmesg | grep pru
[   28.464026] remoteproc remoteproc1: 4a334000.pru is available
[   28.464212] pru-rproc 4a334000.pru: PRU rproc node pru@4a334000 probed successfully
[   28.480195] remoteproc remoteproc2: 4a338000.pru is available
[   28.480412] pru-rproc 4a338000.pru: PRU rproc node pru@4a338000 probed successfully
dmesg | grep pinctrl-single
[    0.975434] pinctrl-single 44e10800.pinmux: 142 pins, size 568
dmesg | grep gpio-of-helper
END