Using SITL with X-Plane 10/11
This article describes how to use X-Plane 10 as a simulation backend for ArduPilot SITL.
Overview
X-Plane 10/11 is a commercial flight simulator with a rich networking interface that allows it to be interfaced to other software. In this case we will be interfacing it to the ArduPilot SITL system, allowing ArduPilot to fly a wide variety of aircraft.
Using X-Plane with SITL is a good way to get some experience flying ArduPilot and learning how to use the ground control station. It can also be used to see how ArduPilot handles unusual aircraft and to develop support for aircraft features that may not be available in other simulator backends.
Before starting SITL the only thing you need to setup on X-Plane is the network data to send the sensor data to the IP address of the computer that will run ArduPilot. This can be the same computer that is running X-Plane (in which case you should use an IP address of 127.0.0.1) or it can be another computer on your network.
Setup of X-Plane 11
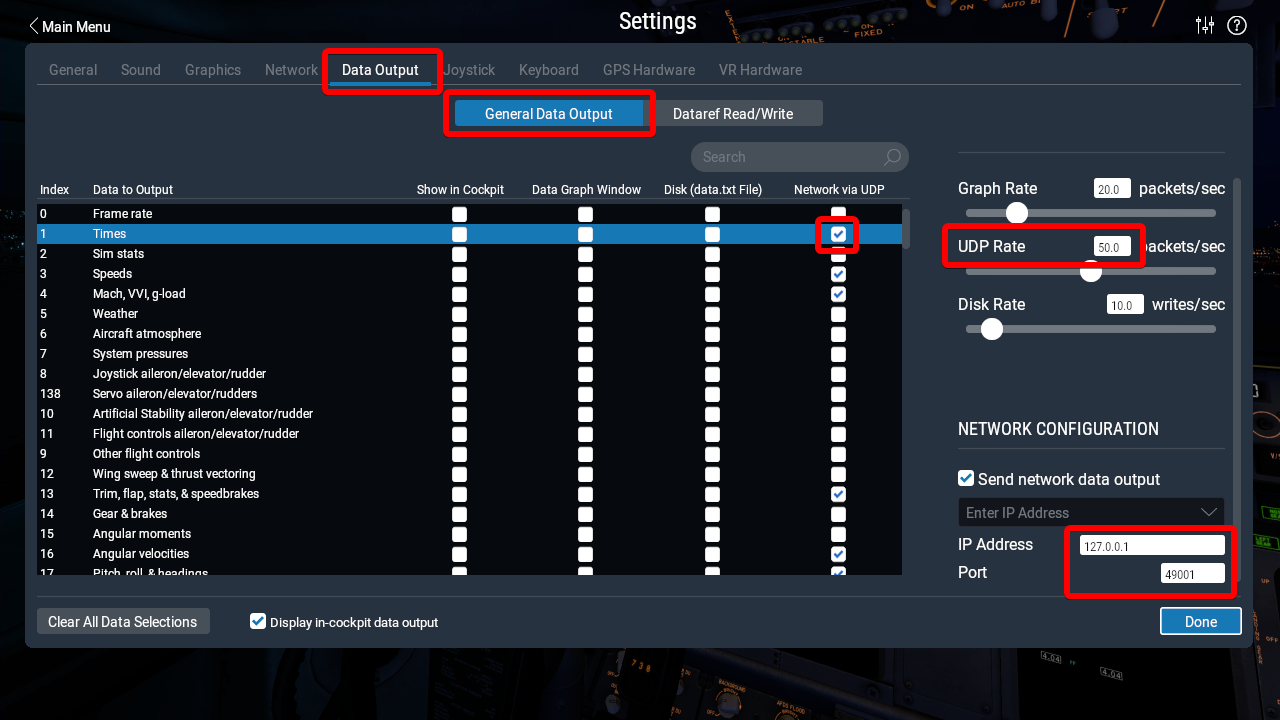
Go to Settings -> Data Output menu in X-Plane 11 and activate the General Data Output tab. Check the Network via UDP column for at least one of the settings that ArduPilot will use (e.g. Times in the second row). The other will be set with commands over network by ArduPilot itself, note that you can use that to verify a two-way connection.
In the right part of the interface, set UDP Rate to 50.0 and make sure that the checkbox below labeled Send network data output is set. Set the IP Address field to the address of the computer running SITL. Set Port field to 49001.
Setup of X-Plane 10
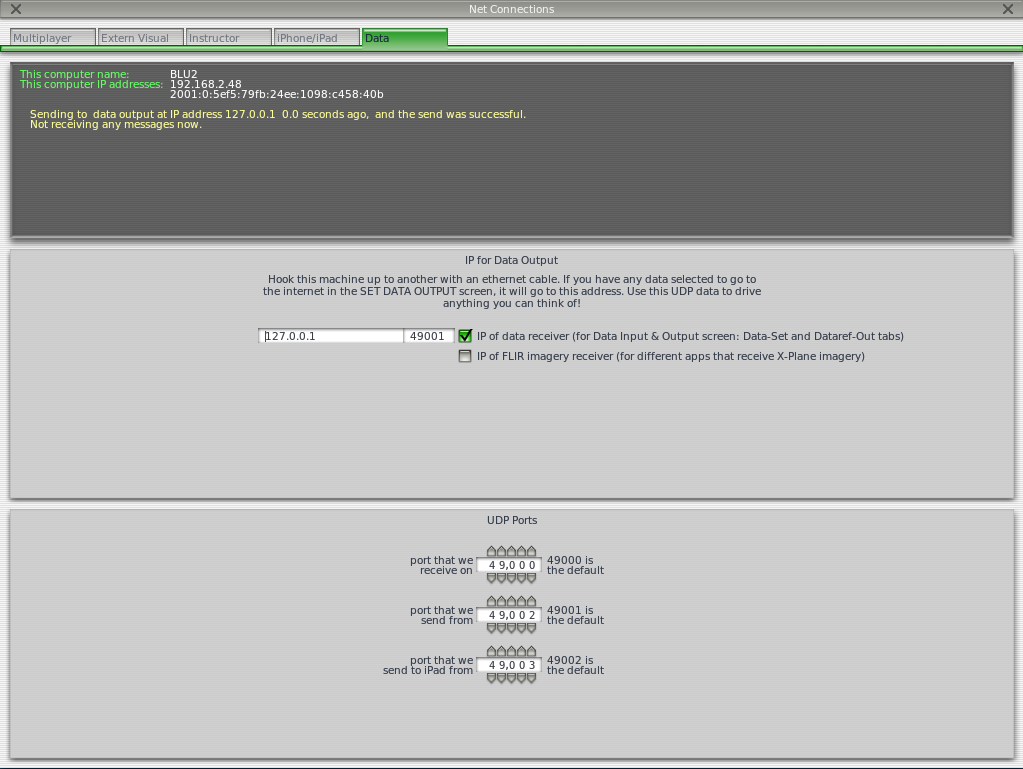
Go to the Settings -> Net Connections menu in X-Plane and then to the Data tab. Set the right IP address, and set the destination port number as 49001. Make sure that the receive port is 49000 (the default). If using loopback (ie. 127.0.0.1) then you also need to make sure the “port that we send from” is not 49001. In the example below 49002 is used.
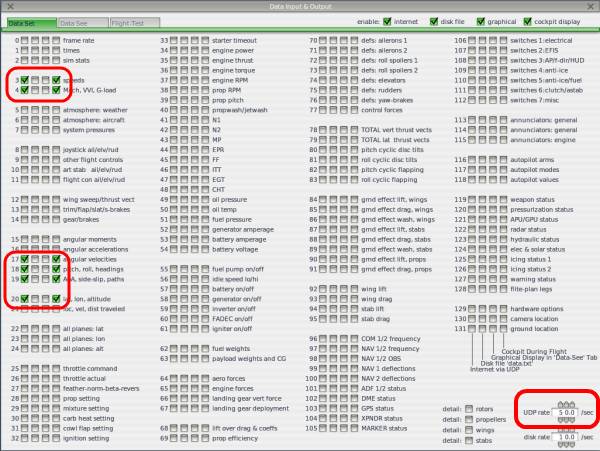
You will also need to output data from X-Plane. Click on Settings, then Data Input & Output. Copy at least 1 setting from the screenshot below. ArduPilot will then send commands to X-Plane that will enable all of the output data fields that it needs to operate.
If you have a joystick then you can configure the joystick for X-Plane. A joystick controlled by X-Plane will be available as R/C input when ArduPilot is in control of X-Plane, allowing you to fly the aircraft with the joystick in ArduPilot flight modes.
For joystick setup go to Settings -> Joystick and Equipment. You should setup controls for roll, pitch, yaw and throttle. Note that X-Plane has an unusual throttle setup where the bar is fully to the left at full throttle and fully to the right at zero throttle.
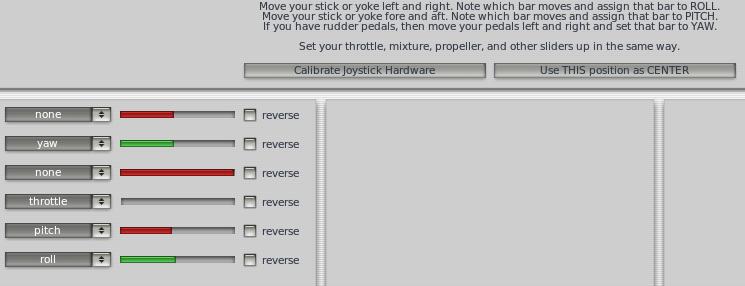
Right now you can’t use the joystick for other than basic axes controls, so you can’t use it for flight mode changes. We may be able to add support for that in the future.
Starting SITL
There are three approaches to starting SITL with X-Plane depending on what you are wanting to do.
running SITL from within MissionPlanner on Windows
building SITL yourself and connecting from your favourite GCS
building and running SITL using sim_vehicle.py and MAVProxy
The first approach is good if you just want to test ArduPilot with SITL but you don’t want to make changes to the code. MissionPlanner will download a build of ArduPilot SITL for Windows that is either the current stable release version or a nightly build of the latest ArduPilot code that is under development.
The second approach is good if you want to do ArduPilot development and try out code changes and you want to use a ground station of your choice. Any ground station that supports MAVLink over TCP can be used.
The third approach is good if you want the full capabilities of MAVProxy for ArduPilot SITL testing. MAVProxy has a rich graphing and control capability that is ideal for long term ArduPilot software development.
Using SITL from MissionPlanner
To start SITL directly from MissionPlanner go to the Simulation tab:
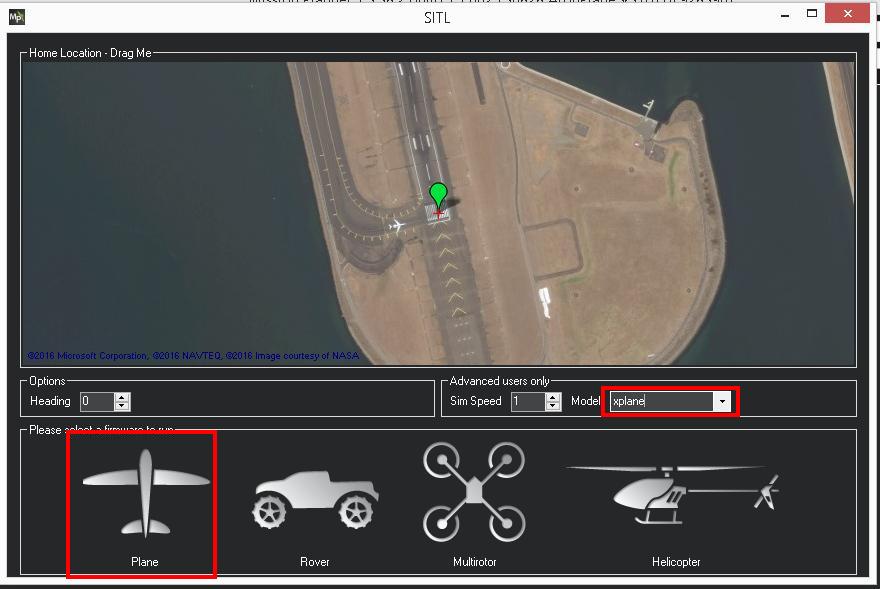
In the Simulation screen you need to select Model “xplane” and then select “Plane”. At the moment we only support fixed wing and helicopter aircraft in X-Plane with SITL. In the future we may support other aircraft types. See below for more information on flying a helicopter.
When you select “Plane” MissionPlanner will present a selection for downloading the current stable release or a nightly build of ArduPilot.
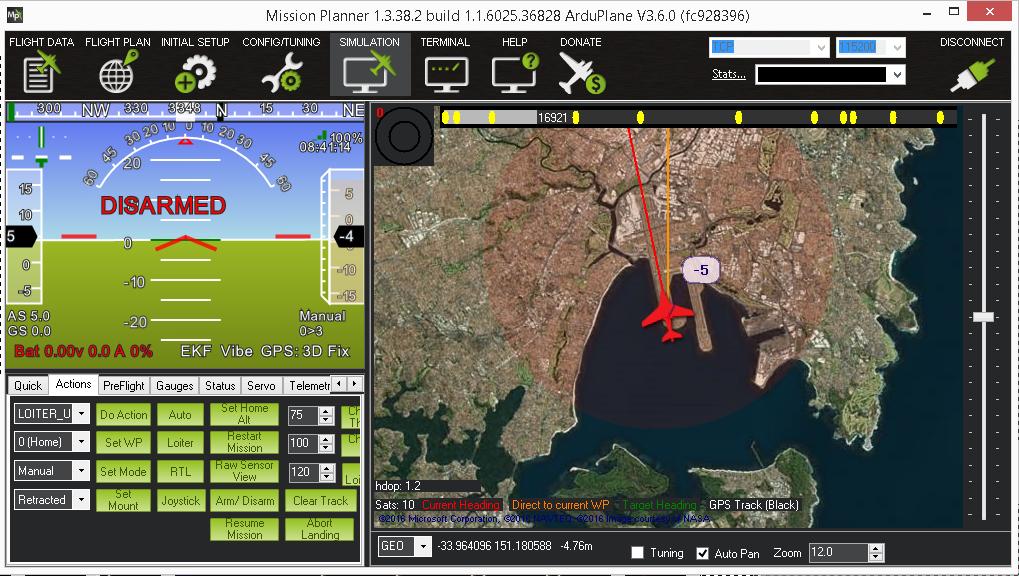
You then need to load an appropriate set of parameters for the aircraft (or setup the aircraft just like you would a real aircraft) and enjoy flying as usual with MissionPlanner.
When setting up the aircraft it is useful to use the joystick to move the control surfaces to make sure they are all going the right way. You can change channel direction in the normal way with ArduPilot parameters.
Using SITL with your own GCS
The second approach to running X-Plane 10/11 with SITL is to build ArduPilot SITL manually and then run it from the cygwin command line. You can then connect with your favourite GCS.
You should checkout the latest ArduPilot git tree in cygwin, and then change directory to the top “ardupilot” directory. Then run the following commands:
$ modules/waf/waf-light configure --board sitl
$ modules/waf/waf-light plane
$ build/sitl/bin/arduplane --model xplane
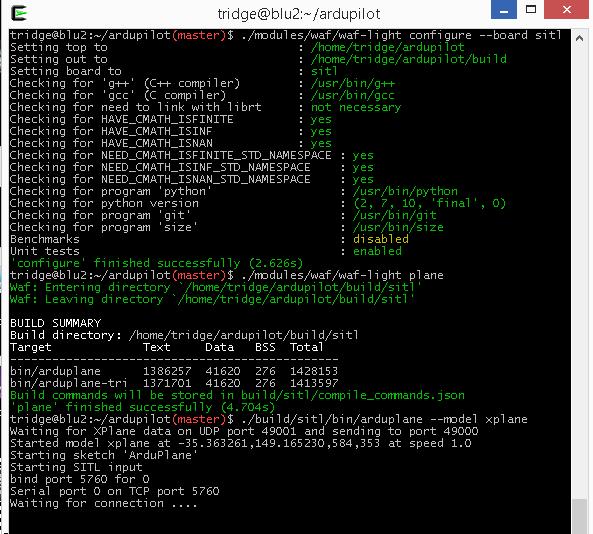
That will start SITL and wait for a GCS to connect. You should connect on TCP port 5760 and configure ArduPilot as usual.
Using SITL with sim_vehicle.py
The sim_vehicle.py script gives you a lot of options for launching all of the different simulation systems that work with ArduPilot, including X-Plane.
To use sim_vehicle.py you will need to install MAVProxy. If you are on Linux then make sure pip is installed and run:
$ pip install --upgrade pymavlink mavproxy
If you are on Windows then download and install MAVProxy from https://firmware.ardupilot.org/Tools/MAVProxy/
Then do a git checkout of ArduPilot master and change directory to the ArduPlane directory. I like to create a sub-directory for each aircraft I fly in SITL so that settings are remembered per-aircraft. If you want to do that then create a subdirectory in the ArduPlane directory and run sim_vehicle.py from there. In the following example I will be using the PT60 aircraft in X-Plane, so I create a PT60 directory:
$ cd ArduPlane
$ mkdir PT60
$ cd PT60
$ sim_vehicle.py -D -f xplane --console --map
Using SITL running inside WSL2
The currently recommended way of setting up SITL for Windows runs in Windows Subsystem for Linux, as explained in Setting up the Build Environment on Windows 10 using WSL for Windows 10 systems or Setting up the Build Environment on Windows 11 using WSL for Windows 11 systems.
To connect X-Plane and SITL in this environment you need to manually point each of them at the right address in the virtual network created between the two operating systems.
Find the address of Windows reachable from WSL by running ipconfig.exe in PowerShell or Command Prompt, and looking for the following device:
Ethernet adapter vEthernet (WSL):

    Connection-specific DNS Suffix  . :
    IPv4 Address. . . . . . . . . . . : 172.25.64.1
    Subnet Mask . . . . . . . . . . . : 255.255.240.0
    Default Gateway . . . . . . . . . :
This is the address that you need to pass to the SITL instance running in WSL. In this example it would look like the following:
$ sim_vehicle.py -D -f xplane --sim-address 172.25.64.1
On the side of Linux, you can get the address with ip addr command, look for the address from the same subnet, i.e. with same prefix, as the one you found for Windows.
For example, the relevant block looks like this in Ubuntu 20.04:
2: eth0: <BROADCAST,MULTICAST,UP,LOWER_UP> mtu 1500 qdisc mq state UP group default qlen 1000
    link/ether 00:15:5d:43:ee:d1 brd ff:ff:ff:ff:ff:ff
    inet 172.25.67.144/20 brd 172.25.79.255 scope global eth0
       valid_lft forever preferred_lft forever
Set this address (172.25.67.144 in this example) in the IP Address field shown in section Setup of X-Plane 11 above
Flying a Helicopter
It is also possible to fly a helicopter with XPlane-10/11. The setup is similar to a plane, with two additional requirements:
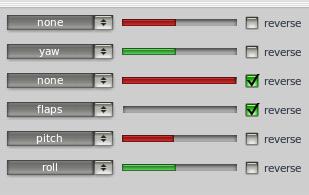
you need to setup your XPlane joystick to map the collective stick to flaps
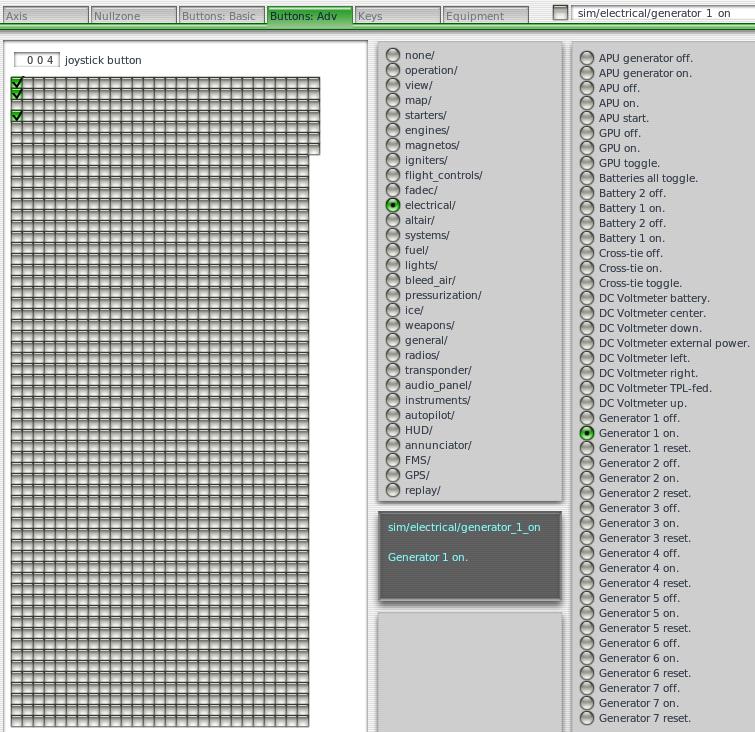
you need to map a key or joystick button to turn on and off the “generator1” electrical system
These strange requirements are because of limitations in the remote control of helicopters in X-Plane 10. The flaps input is something that ArduPilot SITL is able to read remotely while not interfering with flight of the helicopter. The “generator1 on/off” is used to simulate the interlock switch (channel 8) in ArduPilot helicopter support.
Note that for “generator on/off” you do need to map two separate events, one for on and one for off. If using a two position switch then map one to the switch on position and the other to the switch off position.
See this example for typical joystick setup
and this one for mapping the generator on/off switch to a joystick switch
A full set of parameters for the Bell JetRanger Helicopter in X-Plane 10/11 are available here http://uav.tridgell.net/XPlane/
You also need to start SITL with the model set to “xplane-heli” instead of “xplane” to activate Helicopter controls.
The startup procedure for a helicopter is:
set interlock on (so RC input channel 8 is low)
set zero collective (so RC input channel 3 is low)
arm the helicopter
set interlock off (so RC input channel 8 is high)
wait for the head to reach full speed
takeoff