Setting up the waf Build Environment on Windows using Cygwin
These setup instructions describe how to setup Cygwin on so that waf (the build system) can run natively on windows and build for all supported boards.
Note
There is a pre-built script at /ardupilot/Tools/environment_install/install-prereqs-windows.ps1 that will automatically perform all of the below steps.
Install Cygwin
Open a web browser to www.cygwin.com/install.html and download “setup-x86_64.exe”
Paste the following command at a DOS prompt (press window and R key then enter cmd) in the directory where you downloaded “Run setup-x86_64.exe”
setup-x86_64.exe -P autoconf,automake,ccache,cygwin32-gcc-g++,gcc-g++,git,libtool,make,gawk,libexpat-devel,libxml2-devel,python37,python37-future,python37-lxml,python37-pip,libxslt-devel,python37-devel,procps-ng,zip,gdb,ddd
Or, for a stepped install:
Open a web browser to www.cygwin.com/install.html and run setup-x86_64.exe”
Accept the prompts (including default file locations) until you reach the Select Packages dialog.
Select the required packages from the thousands of available packages. Refer to the list below and enter each package “Name” into the Search field as shown below. When you have found the package, click on the Skip button to change it to a version number and then move onto the next package:

Cygwin Installer: Select Package Dialog
Package Name
Category / Name / Description
autoconf
Devel | autoconf: Wrapper scripts for autoconf commands
automake
Devel | automake: Wrapper scripts for automake and aclocal
ccache
Devel | ccache: A C compiler cache for improving recompilation
cygwin32-gcc-g++
Devel | GCC for Cygwin 32bit toolchain (C++)
gcc-g++
Devel | gcc-g++ GNU Compiler Collection (C++)
git
Devel | git: Distributed version control system
libtool
Devel | libtool: Generic library support script
make
Devel | make: The GNU version of the ‘make’ utility
gawk
Interpreters | gawk: GNU awk, a pattern scanning and processing language
libexpat-devel
Libs | libexpat-devel: Expat XML parser library (development files)
libxml2-devel
Libs | libxml2-devel: Gnome XML library (development)
libxslt-devel
Libs | libxslt-devel: XML template library (development files)
python37
Python | python37: Python3 language interpreter
python37-devel
Python | python37-devel: Python3 language interpreter
python37-future
Python | python37-future: Clean single-source support for Python 3 and 2
python37-lxml
Python | python37-lxml: Gnome XML Library (Python bindings)
python37-pip
Python | python37-pip: Python package installation tool
procps-ng
System | procps-ng: System and process monitoring utilities (required for pkill)
gdb
Devel | gdb: The GNU Debugger
ddd
Devel | ddd: DDD, the data display debugger
zip
Archive | zip: Info-ZIP compression utility
When all the packages are selected, click through the rest of the prompts and accept all other default options (including the additional dependencies).
Select Finish to start downloading and installing the packages.
Warning
Sometimes the installation can stall because anti-virus protection software is running. If this occurs, shutdown all other programs on your PC including the anti-virus protection, and try again.
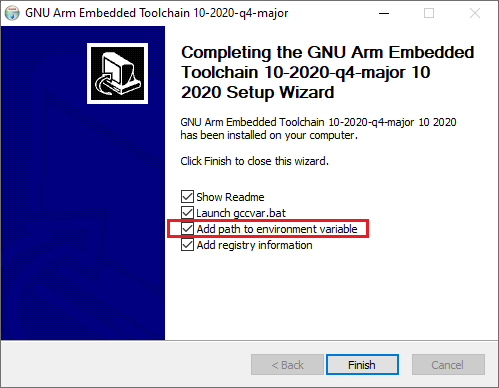
Install the GCC compiler
Note
This step is only required if you intend to compile for ARM-based boards.
Download and install the latest gcc-arm-non-eabi compiler from firmware.ardupilot.org/Tools/STM32-tools (quick link is here)
Accept the license
Install to the default location
Accept the SSL certificate
Check the option to “Add path to environment variable”
Install MAVProxy
The MAVProxy GCS is required when running SITL. If you’re not planning to run SITL, you can skip this step.
To install MAVProxy on Windows follow the MAVProxy documentation.
Set up directories/paths and extra packages in Cygwin
open and then close the “Cygwin Terminal” application from the desktop or start menu icon. This creates initialization files for the user in the Cygwin home directory.
open the “Cygwin Terminal” application from the desktop or start menu icon. Enter the following command to set Python 3.7 to be the default Python and then install additional Python packages:
ln -s /usr/bin/python3.7 /usr/bin/python
ln -s /usr/bin/pip3.7 /usr/bin/pip
pip install pyserial pymavlink empy<4.0
Download ArduPilot Source
“Cloning” is git’s term for making a local copy of a remote repository (i.e. one held on the GitHub servers).
Developers should clone the main ArduPilot repository (if they simply want to download and compile the latest code) or their own fork (if they want to make changes to the source code and potentially submit changes back).
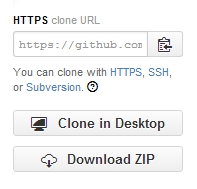
Instructions for commonly used tools are below but whichever tool is used, the URL for the source repo will be required. This can be found on the right side of the screen on each Github repository home page but in general the URL is:
https://github.com/ArduPilot/ardupilot.gitfor the main ardupilot repohttps://github.com/your-github-account/ardupilotfor your fork of the ardupilot repo
Cloning with the command line
open a terminal and navigate to the directory where you would like the clone to be stored
clone your fork:
git clone --recurse-submodules https://github.com/your-github-userid/ardupilot
cd ardupilot
Note
in case some firewalls do not allow ssh access which can cause the above submodule updates to fail, in this instance you can tell git to unilaterally use https through the following command:
git config --global url."https://"
to use https protocols instead of the default git:// prefix.
Build with Waf
You should now be able to start the “Cygwin Terminal” application from your Windows Start menu and build with waf as described in BUILD.md.
Warning
The build may fail if the file path to some files is too long. If the build fails, please try cloning ArduPilot into a directory very high in the directory structure (i.e. ~/ardupilot).
If during the build process you get an error of missing packet xyz, re-check that you have installed all Cygwin packages listed above
Running SITL
You can run SITL just as you can with any other build environment. To see the terminal, you should install VcXsrv or another X server application for Windows. You must then tell Cygwin where to look for the display by setting the DISPLAY variable.
export DISPLAY=:0.0
Build SITL binaries for Windows
You can build 32-bit binaries to be run outside of Cygwin with a small set of companion files. This can be useful when used in conjunction with Mission Planner to run SITL with a stable release build rather than a build from the development branch of ArduPilot. This can be done by compiling using the command below in Cygwin and copying the binary the “sitl” folder typically found at C:\Users\user\Documents\Mission Planner\sitl. Mission Planner will download the required files during the first time running SITL. After the initial run, the vehicle-specific binary file can be replaced with the file you built. The custom SITL binaries should be located at /ardupilot/build/sitl.
./waf configure --board=sitl --toolchain x86_64-pc-cygwin