APSync
Warning
APSync is deprecated. Instead we recommend using BlueOS or Rpanion-server
APSync simplifies the setup of companion computers so that they can be used to provide additional functionality to ArduPilot and also to ease integration with internet services.
The current release automatically creates a Wifi Access Point on startup, allows DataFlash logging to the companion computer and “simple” real-time video streaming from a camera on the drone to the ground station.
The supported companion computers are the RPi3, NVidia TX1, NVidia TX2 and Intel Edison.
Note
Video streaming from the Intel Edison is not supported.
Installation instructions are at the bottom of this page.
Please get involved by reporting issues in the ArduPilot Forums. Developers can help improve APSync by submitting PRs to ArduPilot/companion and/or discuss with others developers in the companion computers channel of the ArduPilot Discord Chat!
Wifi Access Point & DataFlash logging
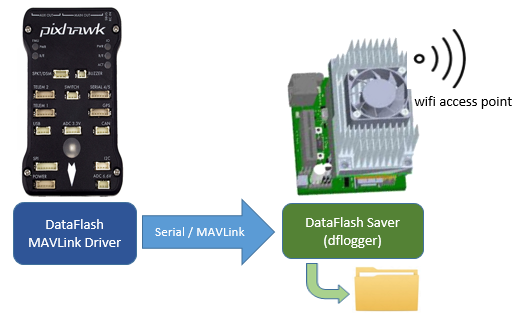
On start-up an access point is created with name “ardupilot”. The default password is also “ardupilot”.
The user can connect to this access point and then easily connect to ArduPilot running on the autopilot by setting their ground station (including Mission Planner) to connect using “UDP”, port 14550.
- Once connected to the WiFi network is possible to connect to these two URLs:
http://10.0.1.128        (Configuration pages)
http://10.0.1.128:8000   (Which shows a video streaming on/off button)
Dataflash logs are streamed to the companion computer via MAVLink and stored on the companion computer’s filesystem (as well as on the pixhawk’s dataflash). Dataflash log files can then be quickly downloaded (over wifi) using a script (Windows users may use apsync-download-logs) or you may pull the SD card out of the companion computer.
Simple Configuration Web page

A light weight webserver runs on the companion computer which allows the user to connect to the drone using a known URL (http://10.0.1.128 or http://10.0.1.128:8000) and do the following:
View and modify parameters
View sensor information and trigger some calibrations
Modify the Wifi access point name and password
View and download log files if they are stored on the companion computer
Simple Video
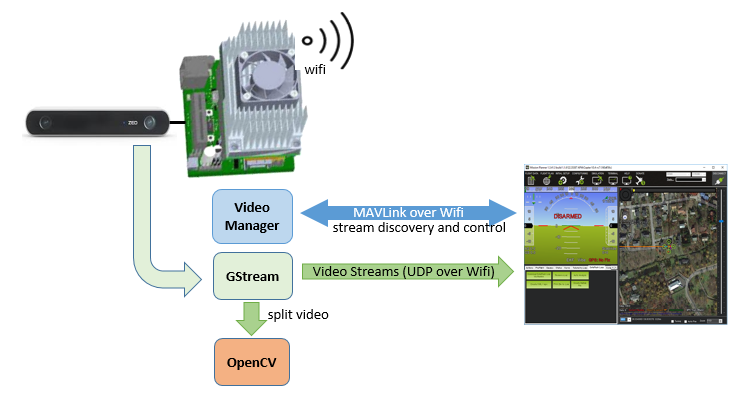
A single video stream is sent to the IP address of the first ground station that requests telemetry data.
Installing APSync
Images for the supported boards can be found in firmware.ardupilot.org.
Please follow the instructions for installing these images on the wiki page for each board (RPi3, NVidia TX1 and Intel Edison).
The flight controller (i.e. Pixhawk or similar) should be configured to communicate with the companion computer by setting the following parameters and then reboot the board:
SERIAL2_BAUD 921 (for RPi3, TX1 and Edison) or 1500 (for TX2)
Connecting with SSH
You can connect to the companion computer with a terminal emulator such as Putty by connecting to the board’s wifi access point and then ssh to 10.0.1.128 username: apsync, password: apsync
How flight controller data is routed to various programs
By default APsync uses “mavlink-router” to allow multiple programs running on the companion computer to talk to the flight controller. This programs configuration is held in ~/start_mavlink-router/mavlink-router.conf and defines the following connections:
/dev/ttyTHS1 at baud 1500000 to communicate with the flight controller (on TX1/TX2)
UDP 127.0.0.1:14655 for MavProxy running on the companion computer
UDP 127.0.0.1:14556 for dflogger (writes dataflash logs to companion computer)
UDP 127.0.0.1:14755 for APweb (small configuration web service)
UDP 127.0.0.1:14765 for OpenKai (vision processing program, similar to ROS)
UDP 10.0.1.255:14765 for telemetry to Ground Station via wifi
If additional programs are run on the companion computer that also need data from the flight controller, new ports can be opened by adding new lines at the bottom of ~/start_mavlink-router/mavlink-router.conf and then reboot the board.
For example the following lines could be added to open up port 14855 for use by ROS running locally on the companion computer:
[UdpEndpoint to_ros]
Mode = Normal
Address = 127.0.0.1
Port = 14855