Archived: Intel Edison as a Companion Computer
Warning
The Intel Edison has been discontinued
This page explains how to setup and use the Intel Edison as a companion computer primarily for use with the The Cube.
The Intel® Edison can provide features including:
Wifi telemetry to the autopilot
Easy scripting/vehicle control via DroneKit
Faster download of log files (coming soon)
Where to buy
The Edison can be purchased from Sparkfun here.
The Cube with carrier board can be purchased from one of these retailers. Be sure to purchase a Cube with the Intel Edison compatible carrier board.
Installing the Edison in The Cube
To install the Edison into The Cube Carrier board:
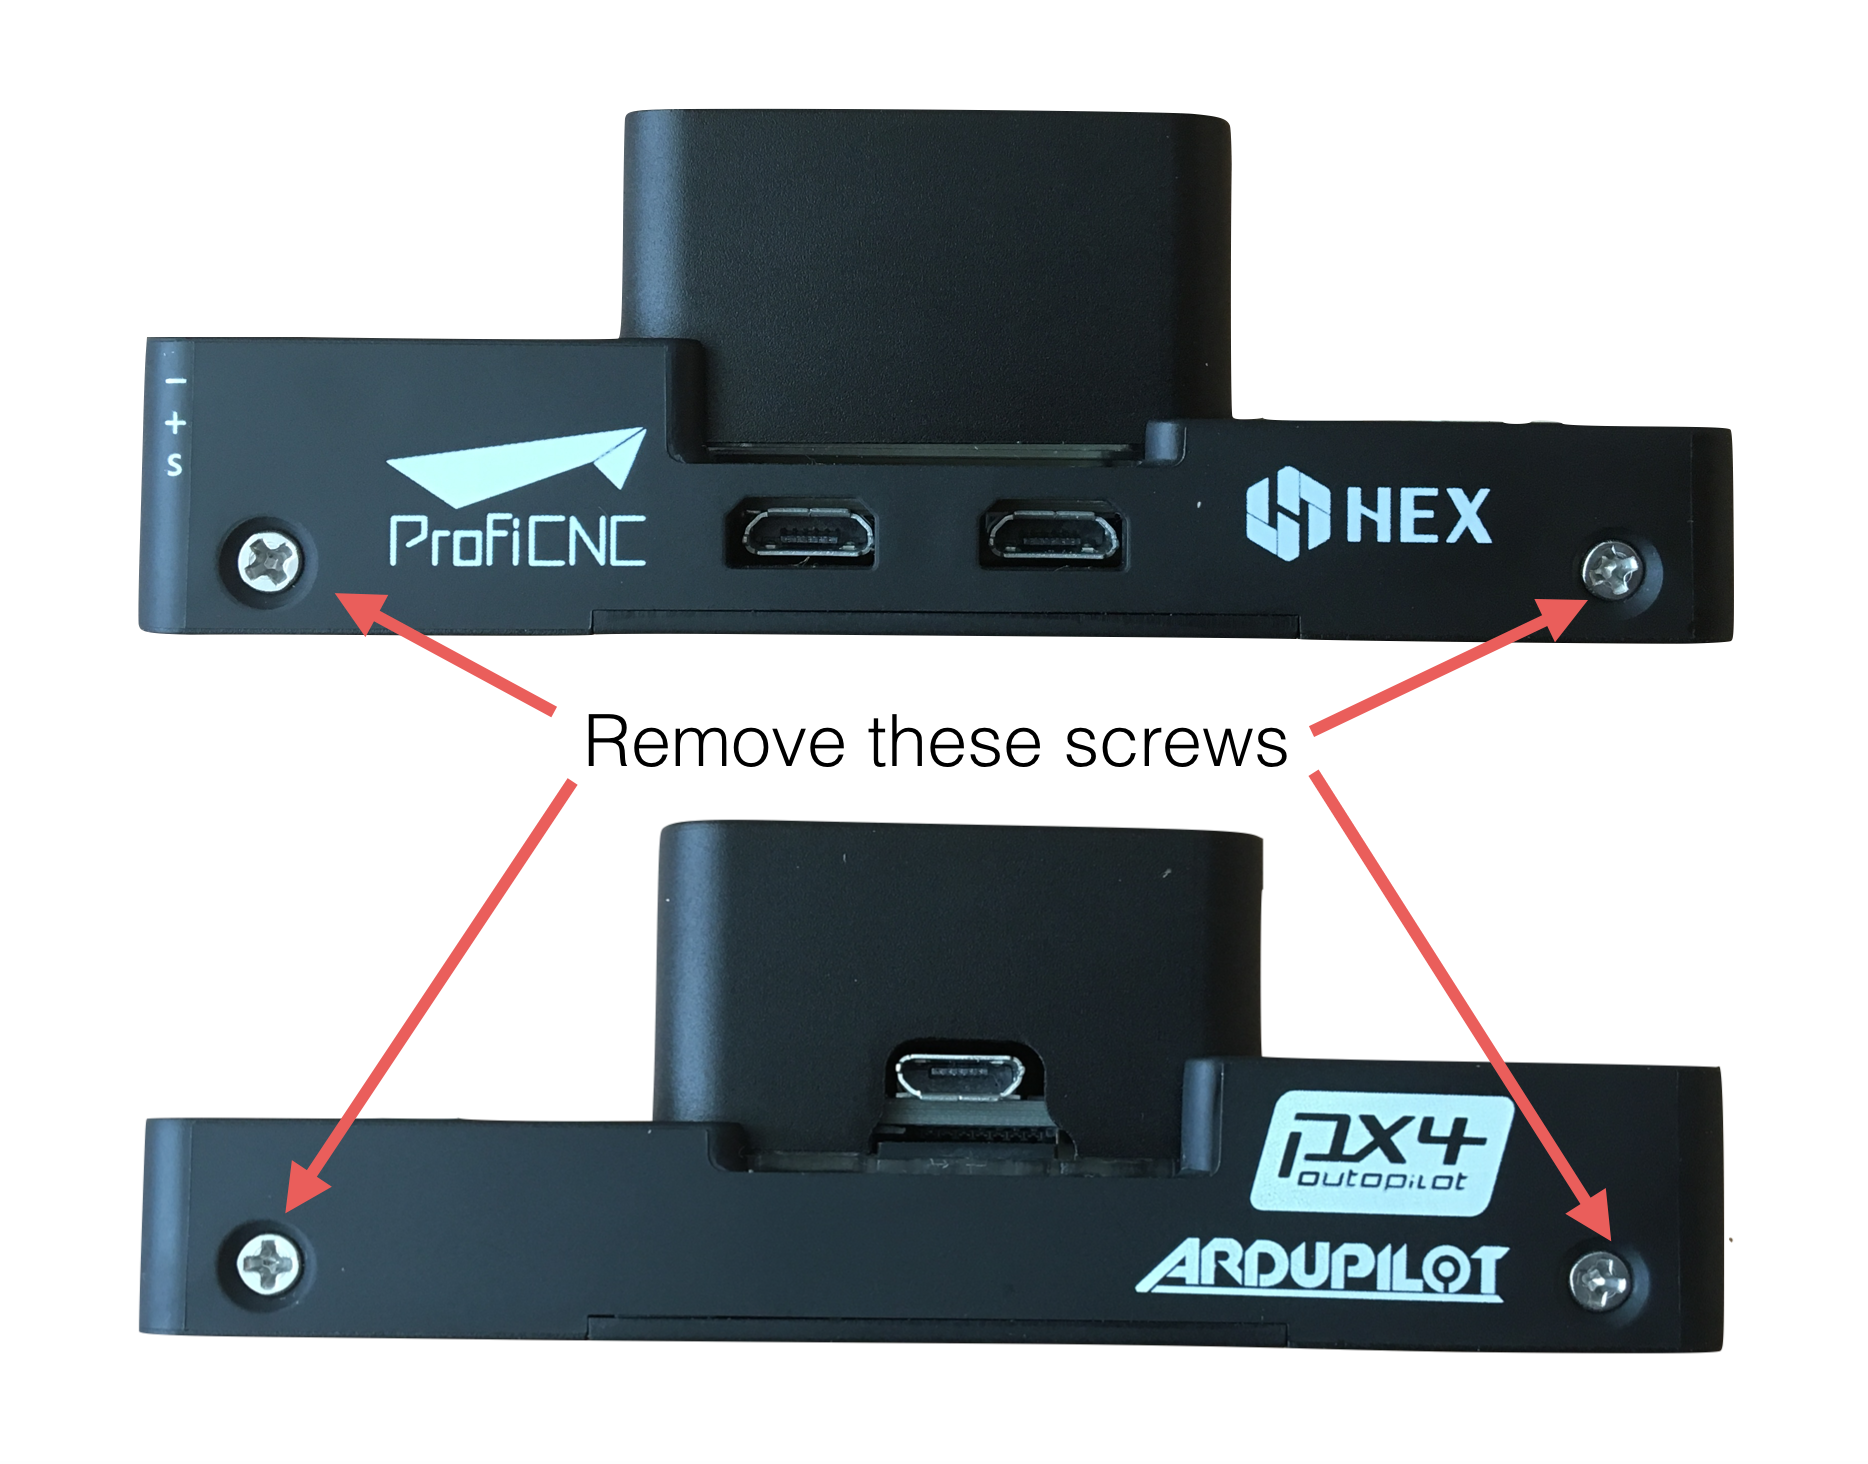
Remove the four side screews from The Cube
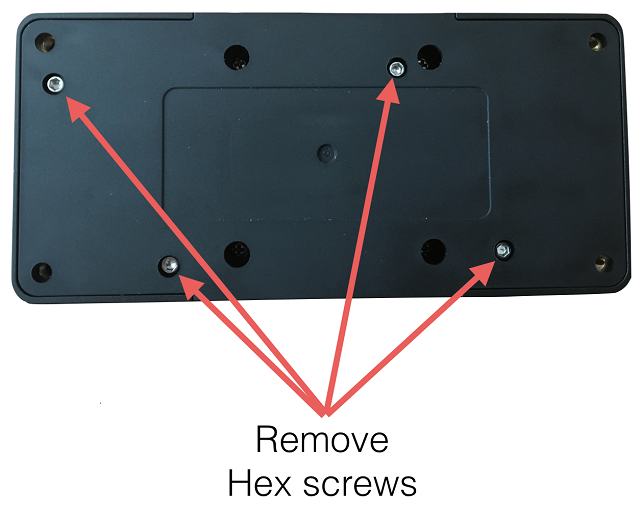
Remove the four hex screws on the bottom of the carrier board and lift the bottom cover to reveal the socket for the edison.
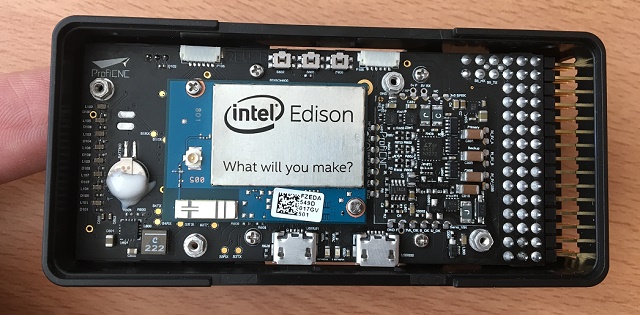
Remove the philips screws that will later hold the Edison in place. Place the Intel Edison into its socket and use the screws to hold it in place. It should now look like the top-most image on this page (see above)
Replace the bottom cover in the reverse order to the instructions above
Setting up the Edison
Note
Some information here was borrowed from the Intel Developer Zone.
The easiest way to get started is to flash the Edison with the APSync image recommended by the ArduPilot team:
Download the latest image from firmware.ardupilot.org. Look for the file starting with “apsync-edison”.
Extract/Unzip the image (a “toFlash” directory should appear):
Windows users can use 7-zip
Ubuntu users can right-mouse-button-click and select “Extract Here” or type
tar -xzvf intel_edison_image_latest.tar.gz
Install dfu:
On Windows:
Download and extract dfu-util-0.9.win64.zip from dfu-util.sourceforget.net/releases
Copy the
dfu-util.exeandlibusb-1.0.dllfiles into thetoFlashdirectory created when extracing the image (see above)Download and install the latest drivers from Intel.
On Ubuntu install with
sudo apt-get install dfu-utilOn OS X:
Follow the instructions on the Homebrew web page.
Install dfu-util
brew install dfu-util
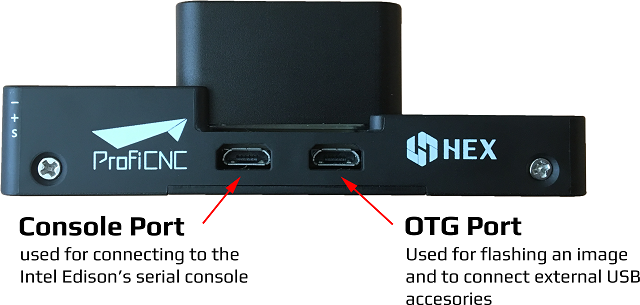
Connect your PC to The Cube using the USB cables as shown below. The USB cable connected to the Cube (the black cable shown below) provides power. The two USB cables connected to the carrier board (shown as white cables) enable flashing the image to the edison. If possible connect the “OTG port Flashing” using the flat USB cable that comes with The Cube because it provides the most reliable connection.

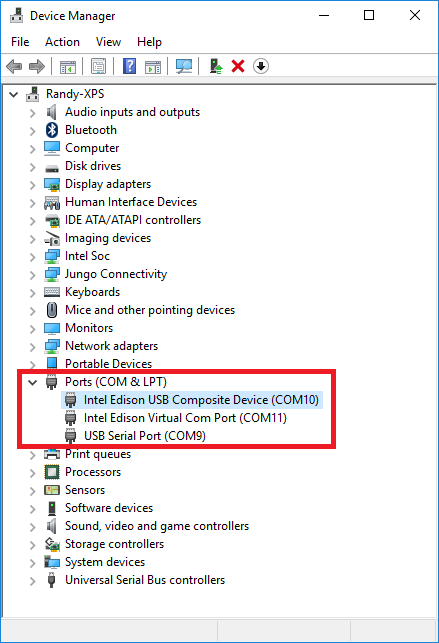
On a Windows machine, the Intel Edison should show up in the Device Manager as shown in the image below
Flash the image:
On Windows double click on the
flashall.batscript found in thetoFlashdirectory or Open a command prompt window navigate to thetoFlashfolder and runflashall.batto see the outputOn Ubuntu and OS X cd into the
toFlashdirectory and enter,./flashall.shIf/when you see a prompt, “Now waiting for dfu device 8087:0a99, Please plug and reboot the board”, unplug and then plug back in the USB cable connected to the Cube (i.e. the one providing power)

After flashing is done, wait 1 to 2 min before cutting power to the Edison
Setting up The Cube
Connect to The Cube with a ground station (i.e. Mission Planner) and set the following parameters:
SERIAL2_PROTOCOL = 1 (the default) to enable MAVLink on the serial port.
SERIAL2_BAUD = 921 so The Cube can communicate with the Edison at 921600 baud.
LOG_BACKEND_TYPE = 3 if you are using APSync to stream the dataflash log files to the Edison
Troubleshooting bricked Edison
In some cases the Edison may stop responding to the flashing script. If this happens you might want to try to recover the Edison by doing the following. It is important to note this will only work under Linux Ubuntu 14.04
Download the latest version of xFSTK onto your Ubuntu 14.04 32-bit system from here. and extract.
1. Unzip the downloaded file with
tar xvfz xfstk-dldr-linux-source-1.7.2.tar.gz2. Navigate to the source folder
cd xfstk-build/linux-source-package3. Install the required packages
sudo apt-get install g++ qtcreator build-essential devscripts libxml2-dev alien doxygen graphviz libusb-dev libboost-all-dev
sudo apt-get install libqt4-dev qt4-qmake
sudo apt-get install libusb-1.0-0-dev
4. Create the following Symlink
ln -s /usr/lib/x86_64-linux-gnu/libusb-1.0.a /usr/lib/libusb.a5. Configure the build parameters
export DISTRIBUTION_NAME=ubuntu14.04
export BUILD_VERSION=0.0.0
6. Build the xFSTK tools
make --version -j 67. Run cmake
mkdir build
cd build
cmake ..
8. Build the package
make package9. Install the package you just built
dpkg -i [built package]10. May need to install:
sudo apt-get install libboost-program-options1.55.0
sudo apt-get install dfu-util
now you should be able to run ./flashall.sh —recovery to recover the Edison.
Archived Instructions
The following instructions were written before the standard image was created and are not useful for most users.
Download the Edison SDK appropriate for your platform and install it:
kevinh@kevin-think:~/tmp$ sudo ./poky-edison-eglibc-x86_64-edison-image-core2-32-toolchain-1.6.sh
[sudo] password for kevinh:
Enter target directory for SDK (default: /opt/poky-edison/1.6):
Extracting SDK...
The default Edison load is missing a number of useful features, so we recommend using the ubilinux port of Debian.
Download the latest uilinux build.
Install per their instructions
kevinh@kevin-think:~/development/drone/edison/new/ubilinux-edison-ww44.5$ sudo ./flashall.sh
[sudo] password for kevinh:
Using U-Boot target: edison-blank
Now waiting for dfu device 8087:0a99
Flashing IFWI
... lots of stuff ...
Your board needs to reboot twice to complete the flashing procedure, please do not unplug it for 2 minutes.
3. Have the Edison join your wifi network: On the serial console of the edison login with username root, password edison. “vi /etc/network/interfaces”. And adjust settings for your local wifi network name and password (and uncomment the line that says “auto wlan0”). Then save the file and run “ifup wlan0”.
You will see:
...
 DHCPREQUEST on wlan0 to 255.255.255.255 port 67
 DHCPOFFER from 192.168.1.1
 DHCPACK from 192.168.1.1
 bound to 192.168.1.37 -- renewal in 40603 seconds.
Your Edison will now be on your wifi network at the indicated IP address. You can disconnect your serial session and connect to Edison via ssh (much easier/faster):
ssh root@IP-ADDRESS-SEEN-ABOVE
 The authenticity of host '192.168.1.37 (192.168.1.37)' can't be established.
 ECDSA key fingerprint is af:f2:ae:e4:7f:0d:b4:42:3d:c6:db:ac:e7:c7:66:bb.
 Are you sure you want to continue connecting (yes/no)? yes
 Warning: Permanently added '192.168.1.37' (ECDSA) to the list of known hosts.
 root@192.168.1.37's password:
 Linux ubilinux 3.10.17-poky-edison-ww42+ #4 SMP PREEMPT Wed Oct 29 12:41:25 GMT 2014 i686
 ...
Now install Dronekit, Opencv and Mavproxy.
root@ubilinux:~#
 root@ubilinux:~# apt-get update
 ... lots of messages from apt ...
 root@ubilinux:~# apt-get dist-upgrade
 ... lots of messages from apt ...
 root@ubilinux:~# apt-get install git sudo python-pip python-numpy python-opencv python-serial python-pyparsing
 ... lots of messages from apt ...
 root@ubilinux:~# pip install droneapi
 ... lots of messages from PIP ...
 Successfully installed droneapi pymavlink MAVProxy protobuf
 Cleaning up...
And add the ‘edison’ user account to the various groups it should be a member of so it can do dangerous things.
root@ubilinux:~# usermod -a -G sudo,plugdev,dialout edison
Configure mavproxy to always load the DroneAPI module:
echo "module load droneapi.module.api" > ~/.mavinit.scr
Install the DroneAPI example code
kevinh@kevin-think:~/development/drone/edison/new/ubilinux-edison-ww44.5$ ssh edison@192.168.1.37
 edison@ubilinux:~$ git clone https://github.com/dronekit/dronekit-python.git
 Cloning into 'droneapi-python'...
 remote: Counting objects: 460, done.
 remote: Total 460 (delta 0), reused 0 (delta 0)
 Receiving objects: 100% (460/460), 246.43 KiB | 182 KiB/s, done.
 Resolving deltas: 100% (213/213), done.
 edison@ubilinux:~$ cd droneapi-python/example
 edison@ubilinux:~/dronekit-python/example$ ls
 client_sketch.py follow_me.py run-fake-gps.sh fake-gps-data.log microgcs.py small_demo.py
Run a basic test of your coprocessor/DroneKit connection (ttyMFD1 is the serial port connecting the Edison to The Cube):
edison@ubilinux:~/dronekit-python/example$ mavproxy.py --master=/dev/ttyMFD1,57600 --rtscts
Logging to mav.tlog
libdc1394 error: Failed to initialize libdc1394
Failed to load module: No module named terrain
Running script /home/edison/.mavinit.scr
-> module load droneapi.module.api
DroneAPI loaded
Loaded module droneapi.module.api
MAV> Flight battery warning
AUTO> Mode AUTO
APM: Plane V3.2.0 (a9defa35)
APM: PX4v2 002E001B 3433470D 32323630
T|D0 .Received 486 parameters

AUTO> api start small_demo.py (If you see the messages below your vehicle is now happily talking to mavproxy/dronekit)
AUTO> mode is AUTO
Mode: VehicleMode:AUTO
Location: Location:lat=0.0,lon=0.0,alt=1.38999998569,is_relative=False
Attitude: Attitude:pitch=0.00390338362195,yaw=-1.69979262352,roll=-3.12372088432
Velocity: [0.0, 0.0, 0.0]
GPS: GPSInfo:fix=0,num_sat=0
Armed: False
groundspeed: 0.0
airspeed: 14.2826738358
Requesting 0 waypoints t=Fri Nov 28 19:42:14 2014 now=Fri Nov 28 19:42:14 2014
Home WP: MISSION_ITEM {target_system : 255, target_component : 0, seq : 0, frame : 0, command : 16, current : 0, autocontinue : 1, param1 : 0.0, param2 : 0.0, param3 : 0.0, param4 : 0.0, x : 0.0, y : 0.0, z : 0.0}
Current dest: 0
Disarming...
Arming...
Overriding a RC channel
Current overrides are: {'1': 900, '4': 1000}
RC readback: {'1': 0, '3': 0, '2': 0, '5': 0, '4': 0, '7': 0, '6': 0, '8': 0}
Cancelling override
mode is AUTO
APIThread-0 exiting...
APM: command received:
Got MAVLink msg: COMMAND_ACK {command : 400, result : 4}
APM: Throttle armed!
Got MAVLink msg: COMMAND_ACK {command : 400, result : 0}
Got MAVLink msg: COMMAND_ACK {command : 11, result : 0}

AUTO> edison@ubilinux:~/dronekit-python/example$
Done! Now you can run your own custom DroneKit code on the Edison (see the tutorial or documentation for more information).
Wifi MAVLink bridging
The Edison can forward MAVLink to other computers on your wifi lan (and you can either run a traditional GCS on those computers or run DroneKit scripts on your PC).
To turn on this feature you need to leave mavproxy running indefinitely, listening for incoming UDP packets from clients.
update-rc.d mavgateway defaults
mavproxy.py –master=/dev/ttyMFD1,57600 –rtscts –out=udpin:0.0.0.0:14550
On your desktop computer:
mavproxy.py –master=udpout:192.168.1.37:14550