3DR Solo - Initial ArduCopter Install Using Mission Planner & WinSCP
These are detailed instructions for the installation of ArduCopter on the 3DR Solo using Mission Planner and WinSCP. Your solo should be in safe working order before you start. It should not be malfunctioning or unreliable before you even begin. It must be up to date with the latest 3DR firmware. You cannot do this with a straight out of the box Solo. You must go through the full pre-flight update first on a new Solo. Once your Solo is up to date and working well, you’re ready to begin this process.
This method is somewhat complicated compared to using Solex. But this does work. Please read carefully and follow all steps in order.
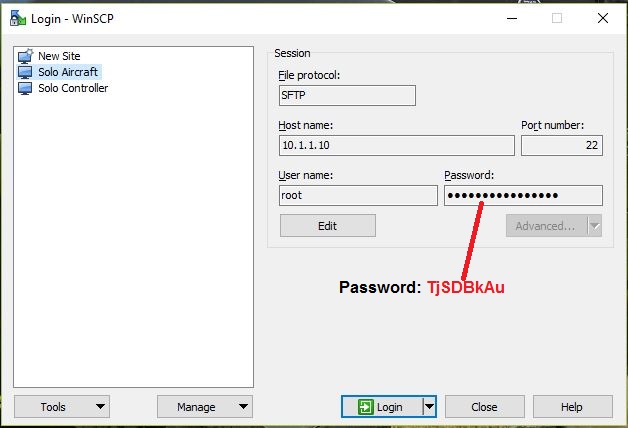
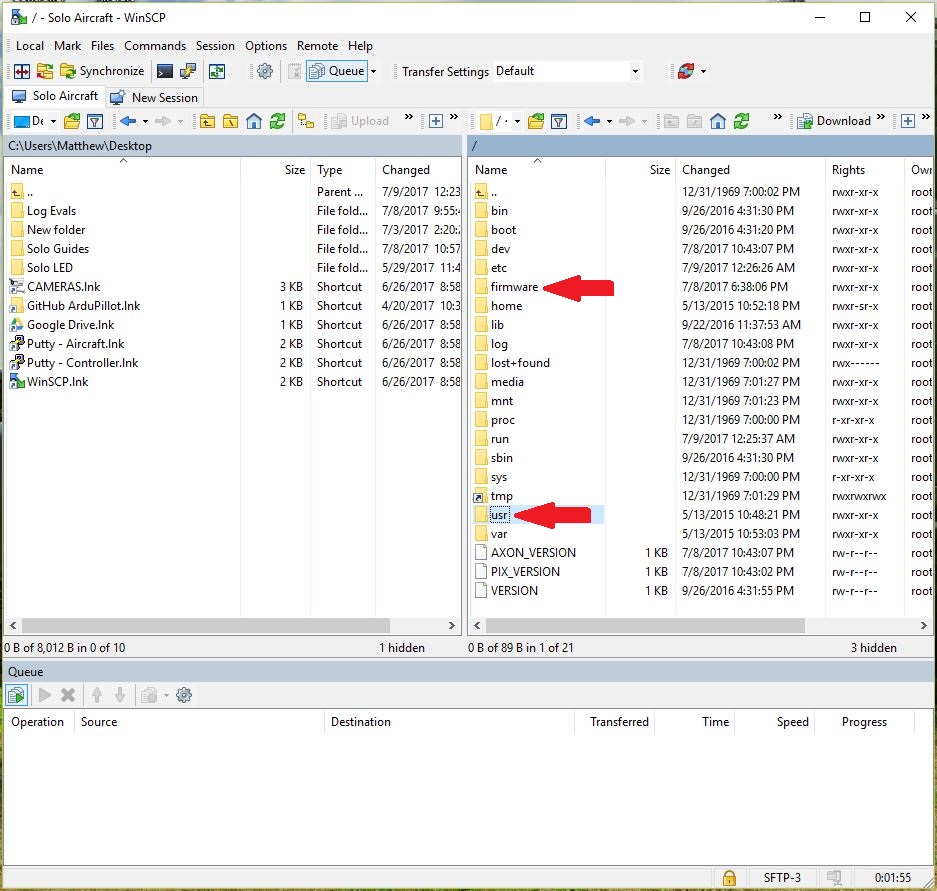
These instructions use WinSCP for moving files to/from the companion computer and your PC. But the settings and process are basically the same for Filezilla and other SFTP applications. The settings and what the directory structures look like are pictured below.
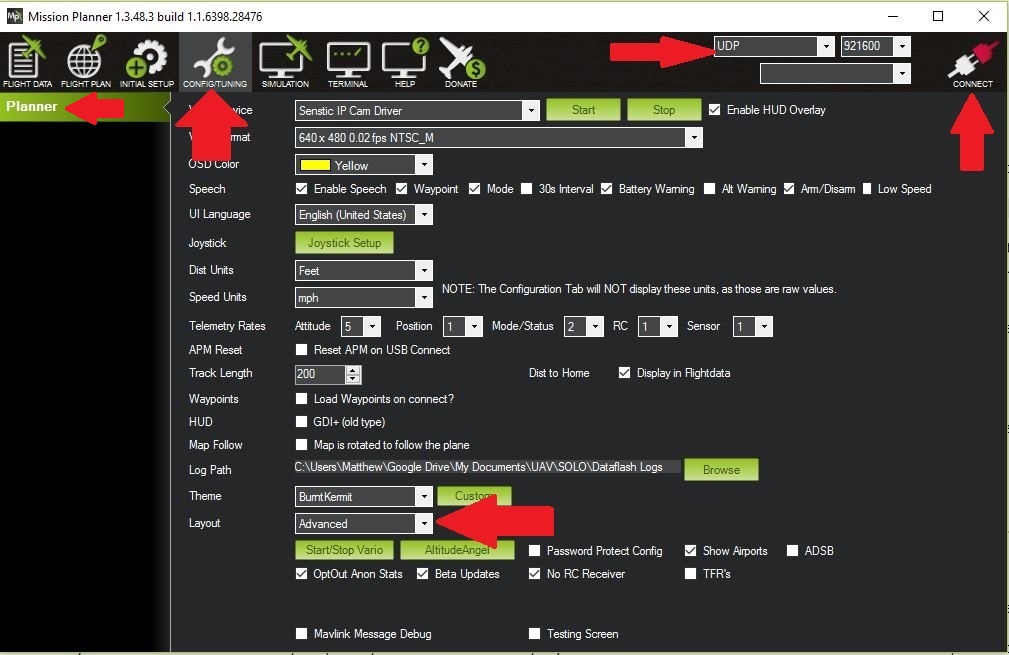
These instructions use The Mission Planner ground station application for Windows. The necessary settings for Mission Planner are pictured below. They are in the Config/Tuning > Planner section. You need the layout drop down set for advanced and the connection drop down set for UDP. To connect to the Solo, your PC must be connected to the Solo’s WiFi. To connect with Mission Planner, press the connect button in upper right once you’re ready. Mission Planner will connect to the Solo’s Pixhawk and download all its parameters. Once connected, you will get many more options in config/tuning.
Download the zip file for the version you wish to install from the SoloScripts repository on GitHub. As of this writing, that is ArduCopter_3-5-0.zip. Save this zip file somewhere convenient on your PC and unzip it. In the zip, there are several files that will be used throughout this process.
An ArduCopter firmware file. As of this writing, the file is
AC350_Firmware.px4.A directory of python files (
*.py)A wipe firmware file called
Wipe_Pixhawk_Firmware.px4.
1) Update python files before installing Pixhawk! Before doing anything else, you must load the new python files onto the Solo’s companion computer. Use WinSCP, Filezilla, or other SFTP application as described in the beginning. Put all the python files (*.py) from the zip file into the /usr/bin/ directory on the Solo, overwriting the ones that are already there. After copying the files, power cycle the solo. The files are compiled on reboot. It will reconnect to the controller upon rebooting. It is critical that this step take places before you install the Green Cube in your solo!
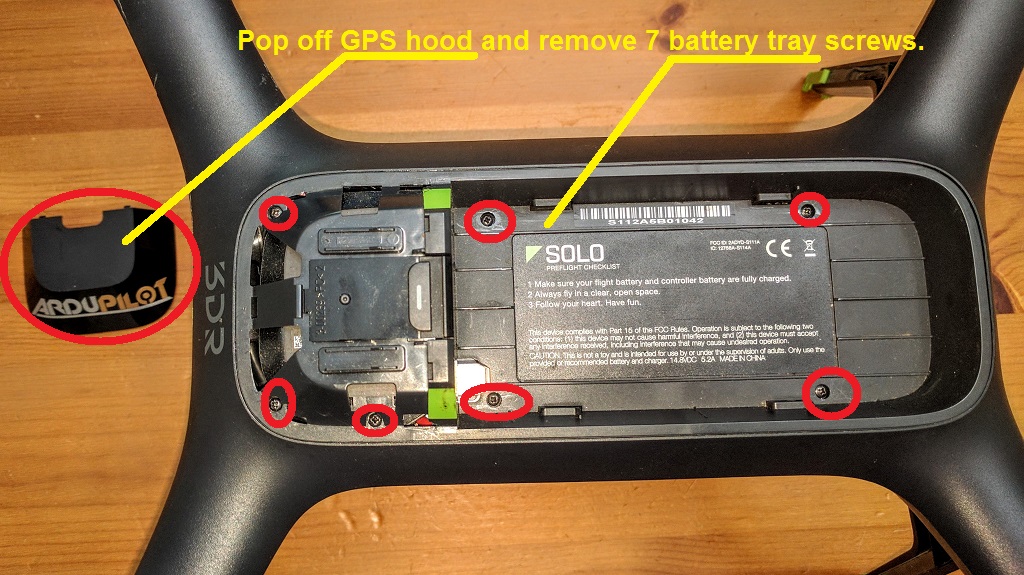
3) Remove the battery tray: Remove the battery and pop off the GPS cover. Then unscrew all the small black screws around the battery tray. The battery tray can now be lifted up. Carefully unplug the GPS from the carrier board. Set the battery tray aside.
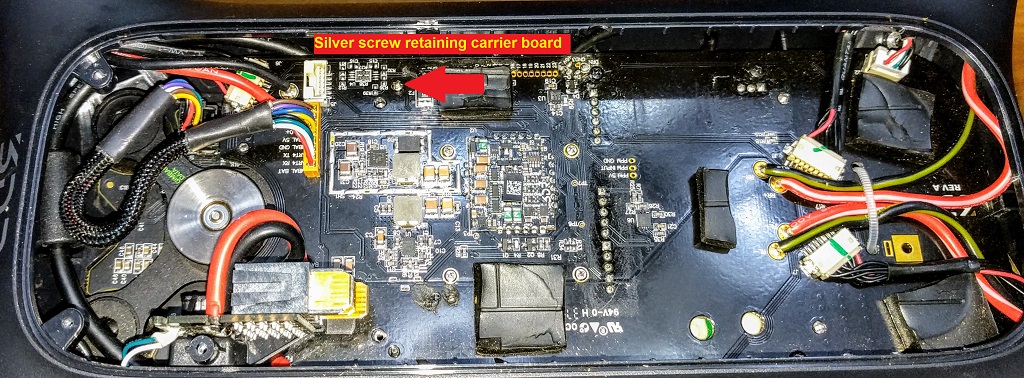
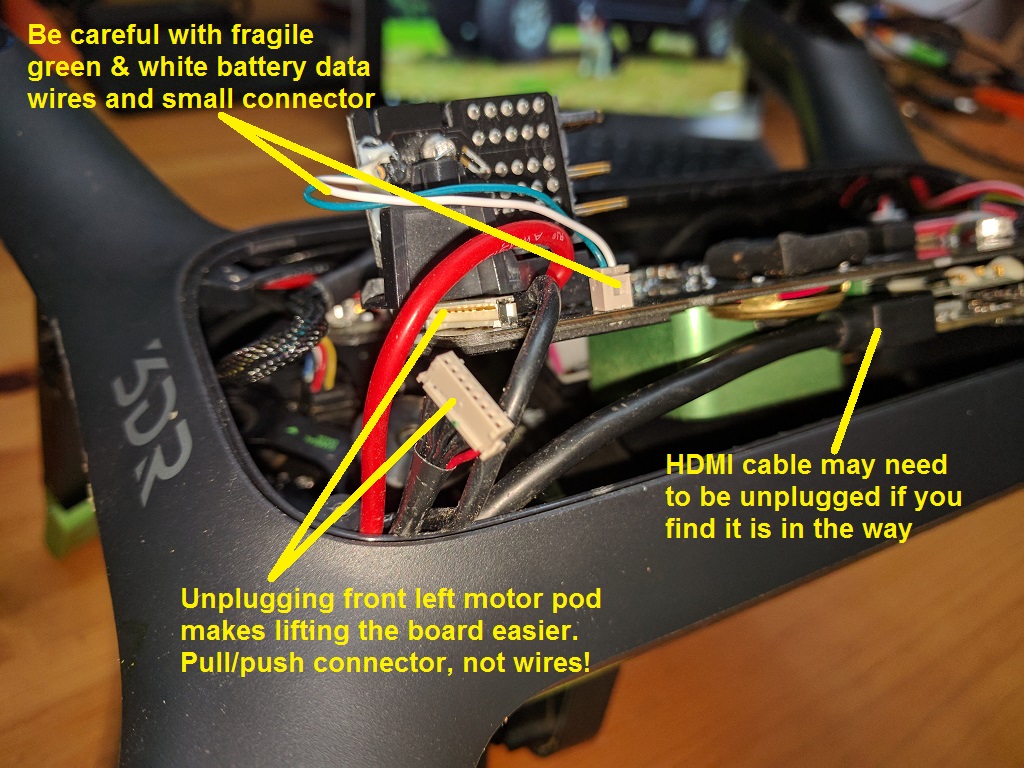
4) Lift up the carrier board: Locate the comparatively large silver screw on the right side toward the front. Unscrew that and set it aside with all the other screws.. The carrier board can now be lifted up very carefully. You will need to fidget with the wires from the motor pods a bit. Unplugging the front left motor pod from the carrier board can make this easier. The board will need to go up a bit, then shift back, then shift up the rest of the way. The left side can go up higher than the right, which is convenient. It’s kind of tight and generally annoying. Be careful not to break the small wires. Don’t break any of the other wires either. You will need to get the board high enough up to expose the Pixhawk mounted underneath it. It’s the black cube looking device.
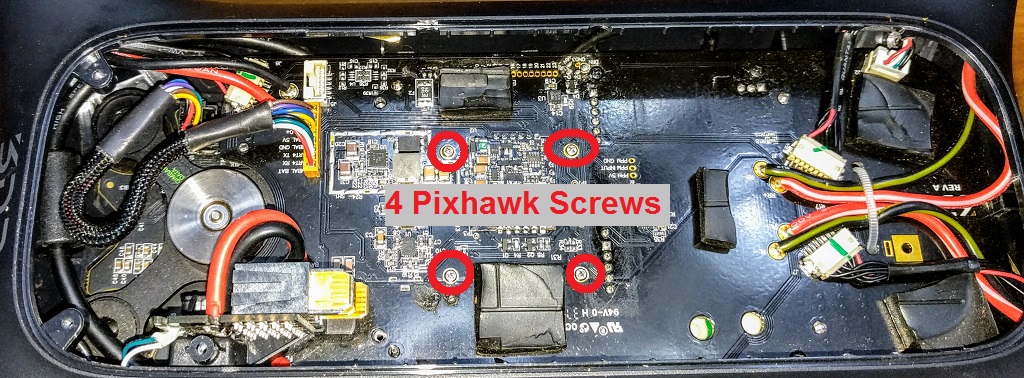
5) Unscrew the stock Pixhawk: There are 4 very small screws on the top of the carrier board. Unscrew them and set them aside. The stock Pixhawk can now be removed. It will pull down off the carrier board. Set the stock Pixhawk aside somewhere safe. You will want to keep it.
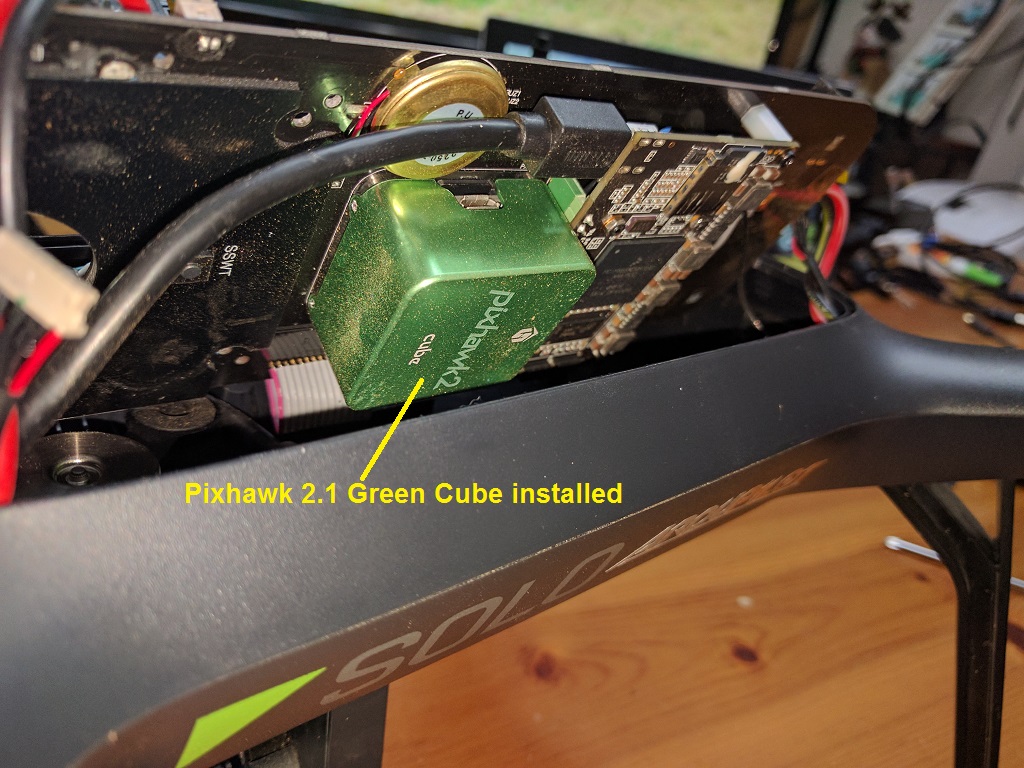
6) Install the green cube: The green cube installs the same way the old one came off. Plug it into the carrier board from the bottom. Then put in the four screws.
Note
Do not reassemble yet: It is best to do the initial firmware install with the Solo still opened up. If anything goes wrong, it avoids having to disassemble it again.
7) Power up the Solo and reconnect to controller: Put the battery onto the solo. It will just sit atop the carrier board. Obviously you should avoid moving the Solo around too much at this point since the battery can just fall off. So get everything situated first. Turn on the battery. The solo will power up as usual. After a short while, the Solo will reconnect with the controller as usual. It will probably give you all kinds of warnings about calibration. This is normal and expected.
8) Wipe Firmware: Use WinSCP, Filezilla, or other SFTP application as described in the beginning. Put the Wipe_Pixhawk_Firmware.px4 file in the /firmware/ directory on the Solo. If there are any other .px4 files in this directory, delete them now, but there really shouldn’t be. Power cycle the solo. It will reboot, then switch into bootloader mode. Normally you will see disco lights while it’s doing this. But if the LED driver isn’t enabled, you may not. Don’t worry. It’s working. Give it 3-5 minutes to process. You may hear some clicks as the Pixhawk reboots. After 3-5 minutes, you will hear some tones signalling completion. It will come back to life, reconnecting with the controller.
9) Install ArduCopter Firmware: Use WinSCP, Filezilla, or other SFTP application as described in the beginning. Put the ArduCopter firmware px4 file (such as AC350_Firmware.px4) from the zip file into the /firmware/ directory on the Solo. If there are any other px4 files in this directory, delete them now, but there really shouldn’t be. Power cycle the solo. It will reboot, then switch into bootloader mode. Normally you will see disco lights while it’s doing this. But if the LED driver isn’t enabled, you may not. Don’t worry. It’s working. Give it 3-5 minutes to process. You may hear some clicks as the Pixhawk reboots. After 3-5 minutes, you will hear some tones signalling completion. It will come back to life, reconnecting with the controller.
Note
If the Solo doesn’t seem to complete the firmware installations after about 5 minutes, power off the Solo and power it back on. A few people have experienced this. It took a few power cycles to get it go through. It is unknown why this happens. But in those cases, power cycling 1-4 times got it to go.
10) Reset parameters: Connect with Mission Planner as described in the beginning. Go to Config/Tuning > Full Parameter List. Press the Reset To Defaults button and acknowledge any prompts. The Pixhawk will reboot. Shortly after, the controller will reconnect. You may need to reconnect Mission Planner if it does not reconnect on its own.
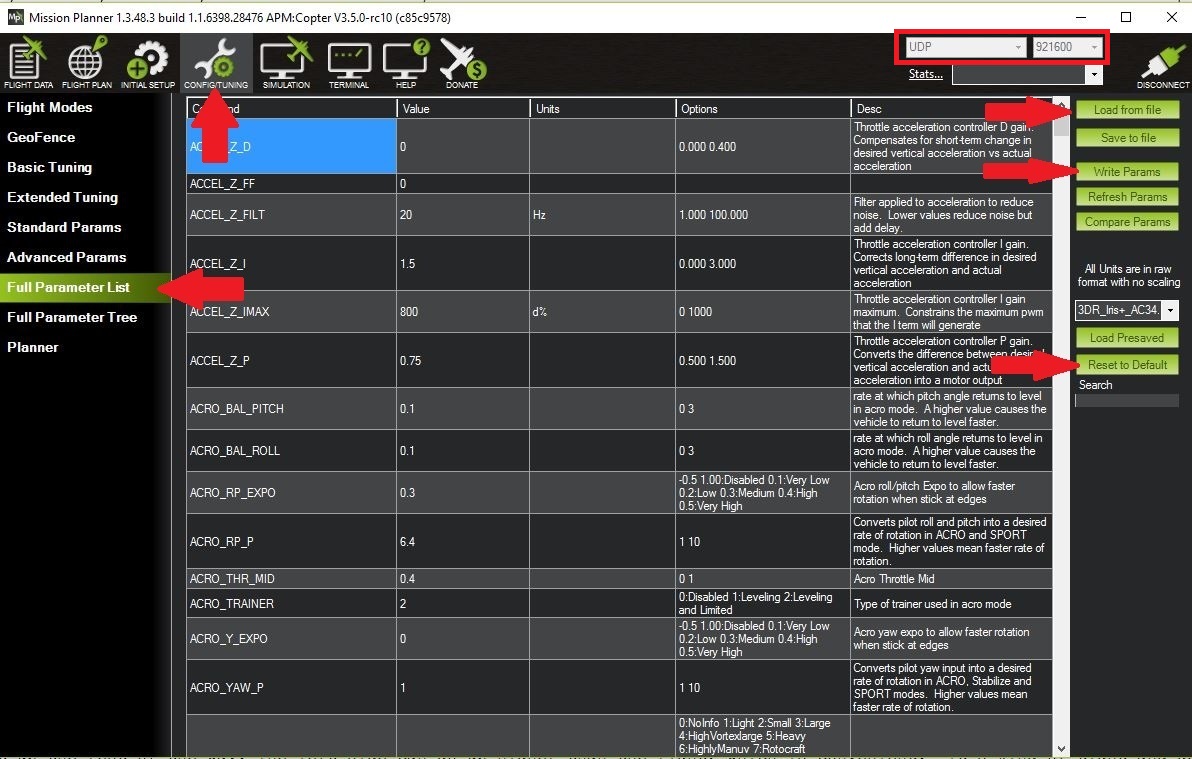
11) Load Solo Parameters: Connect with Mission Planner as described in the beginning. Go to Config/Tuning > Full Parameter List. Click the Load From File button. Select and the parameters file (*.param) from the zip (such as AC350_Solo_Parameters.param). Once the file loads, you’ll probably see a lot parameter boxes in Mission Planner turn green, which is normal. Next, press the Write Params button. Mission Planner will write all the new parameters to the Pixhawk. Once it is complete, you can disconnect and close Mission Planner. Power cycle the Solo. It will reboot and reconnect to the controller. You will notice the LEDs now look like an aircraft rather than a car. Installation complete!
12) Reassemble the Solo: Once all of the above steps are completed successfully, you can reassemble the Solo. Make sure you don’t have any screws left over. Make sure all the wires, including the GPS and motor pods, are plugged back in.
13) Connect and Check: Turn the Solo back on. Connect with any and all apps you plan to use (3DR, Solex, Side Pilot, etc) and test functionality. Run the turtle/rabbit sliders for speed and pan all the way to rabbit and back down all the way to turtle. These sliders make changes to the parameters. Running the sliders up and down ensure those parameters are set the way they should be. Go through all the settings. Touch everything to set and verify everything. Do not assume these settings stuck from before.
14) Calibrations: Once all of this done, you will need to do the 3D Accelerometer Calibration (aka Accel Cal, aka Level Calibration, AKA IMU Calibration) and the compass calibration. Both the 3DR Solo app and Solex v1.4.9 and higher has these calibrations in the menus.
Do the level calibration first on an actual level surface, such as a table. For each orientation, place Solo down gently, and let it settle for about 5 seconds before clicking through to the next one. It must remain perfectly still when you push the button, so hands off the aircraft! Once calibration is complete, you must reboot the Solo.
The compass calibration must be done outdoors in an open area, away from structures, vehicles, and other metal objects. This applies to any vehicle running any firmware, not just a Solo, and not just ArduCopter master. Once calibration is complete, you must reboot the Solo.
15) FLY! Once all of the above is complete, you are ready to fly!
Return to the main upgrade page for first flight details.